
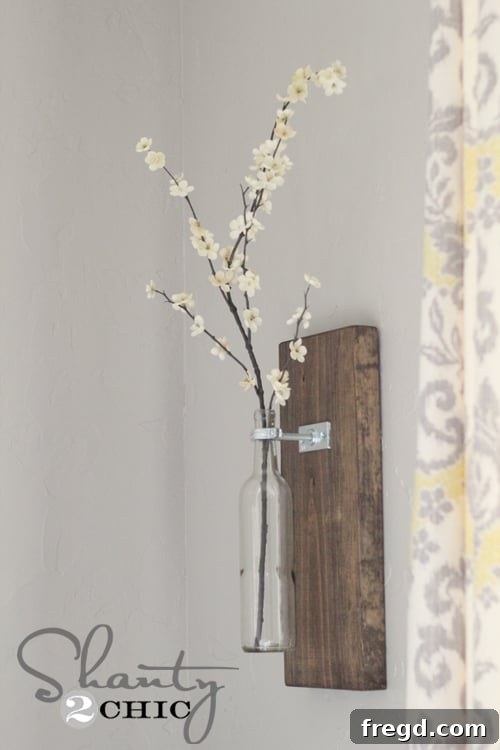
Transform your living space with a touch of rustic charm and industrial elegance by creating your very own DIY Wine Bottle Wall Vase. Inspired by the brilliant designs from Shanty2Chic, this project is not only incredibly easy and budget-friendly but also adds a unique, personalized character to any room. Whether you’re looking to refresh your kitchen, living room, bedroom, or even an entryway, this handmade wall sconce offers a stylish solution for displaying fresh flowers, dried botanicals, or even ambient lighting with LED fairy lights. Dive into this detailed guide and discover how you can craft these beautiful decorative pieces, making a statement that’s both chic and sustainable.
The beauty of this DIY wine bottle wall vase lies in its simplicity and the satisfaction of repurposing everyday items into stunning home decor. It’s a perfect weekend project for beginners and seasoned DIY enthusiasts alike. With readily available materials, mostly found at your local hardware store like Lowe’s, you’ll be amazed at how quickly you can assemble these charming wall features. Let’s gather our supplies and turn an ordinary wine bottle into an extraordinary piece of art that reflects your personal style and creativity.
Essential Supplies to Build Your DIY Wine Bottle Wall Vase
Crafting these elegant wine bottle wall vases is a straightforward process, requiring a few key components that contribute to their distinctive industrial-chic aesthetic. All the supplies listed below are commonly available at major home improvement stores, ensuring an accessible and affordable crafting experience.
- 2x8x8 Board: This is the foundation of your wall vase. An 8-foot long 2×8 board offers enough material to create multiple vases (typically four 18-inch pieces). Its robust size provides a substantial base for the bottle and creates a prominent visual element on your wall. Choosing a good quality piece of lumber ensures durability and a beautiful finish.
These are the primary materials you’ll need to kickstart your project. I sourced everything needed for these stylish wall vases conveniently from Lowe’s, making it easy to grab all components in one go.
- 3/8″ Ceiling Flange: This crucial piece acts as the mounting point for the threaded rod, securing the bottle assembly to your wooden board. Its design provides a sturdy and clean attachment, contributing to the industrial look. Ensure it’s the correct size to accommodate the threaded rod.
- 3/4″ Split Ring Hanger: The split ring hanger is designed to snugly hold the neck of your wine bottle. Its two-part design allows you to secure the bottle firmly, preventing it from slipping while providing easy access for cleaning or changing out your botanicals. The 3/4″ size is generally ideal for standard wine bottle necks.
- 12×1 – 1/4 Wood Screws: These screws are essential for securely attaching the ceiling flange to your wooden board. Opt for wood screws that are long enough to provide a strong hold without penetrating entirely through the board. Having a few extra on hand is always a good idea.
- 3/8″ Threaded Rod – 12″ piece cut into 3″ pieces: The threaded rod connects the ceiling flange to the split ring hanger, creating the arm that holds your bottle. A 12-inch rod is often sold as a single piece, which you’ll need to cut into shorter, manageable 3-inch segments. This allows for precise length adjustment and ensures the bottle hangs at an appealing distance from the board.
Cutting the threaded rod is surprisingly simple. You can easily achieve this with a small hacksaw, a common tool available at most hardware stores like Lowe’s. If you don’t own one, it’s a worthwhile investment for various DIY tasks.
For those who prefer to avoid cutting, many hardware stores also offer pre-cut threaded rod pieces in various lengths. This can save you time and effort, making the project even simpler. Look for small packs of pre-cut rods, often available right next to the longer pieces at places like Lowe’s.
- Empty Wine Bottle: The star of the show! You’ll need an empty wine bottle or any bottle with a relatively slender neck that fits snugly within the 3/4″ split ring hanger. This is an excellent opportunity to repurpose an old bottle, adding an eco-friendly touch to your decor. Alternatively, inexpensive new bottles with unique shapes can be found at craft stores or even discount retailers. I found mine at Wal-Mart for less than $3 a bottle, which is a fantastic deal for a stylish decorative element!
Beyond these essential components, remember to have basic tools on hand: a measuring tape, a pencil for marking, a drill with appropriate bits for pre-drilling, and a screwdriver for tightening. The rest of the assembly process is incredibly straightforward, promising a rewarding DIY experience!
Step-by-Step Guide to Building Your Wine Bottle Wall Vase
Now that you have all your supplies and tools ready, let’s dive into the construction phase. Each step is designed to be clear and easy to follow, ensuring a smooth and enjoyable building process for your new rustic-industrial wall decor.
Step 1 – Prepare the Wooden Boards: Make the Cuts
The first step involves preparing the wooden base for your wall vase. Precision here ensures a clean and professional look for your finished piece. Using a measuring tape and pencil, accurately mark your 2×8 board into 18-inch long sections. For safety and accuracy, use a miter saw or a circular saw to make these cuts. If you don’t have access to these tools or prefer not to cut the wood yourself, many hardware stores like Lowe’s offer lumber cutting services, where they can cut your boards to the specified dimensions for a small fee.
These 18-inch sections will serve as the mounting surface for your bottle assembly and will be the backdrop for your beautiful floral arrangements. If you are making multiple vases, ensure all your cuts are uniform for a cohesive look.
Step 2 – Enhance the Boards: Stain or Paint for Desired Finish
Once your boards are cut to size, it’s time to add character and protection through staining or painting. After cutting my boards (or having Lowe’s cut them for me), I moved on to staining them using my absolute favorite product: Rust-Oleum Dark Walnut wood stain. This particular stain provides a rich, deep hue that perfectly complements the industrial elements of this project.
This stain is truly remarkable! It boasts an incredibly fast drying time, which means you won’t have to wait long to move on to the next steps of your project. Beyond its efficiency, the finished look is absolutely beautiful, imparting a warm, elegant, and timeless appeal to the wood. You can easily find Rust-Oleum Dark Walnut at Lowe’s and other home improvement stores. While there are many fantastic stain colors available, I personally find Dark Walnut to be the most versatile and appealing for this particular design. Apply the stain evenly with a brush or cloth, following the wood grain. Allow it to dry completely according to the manufacturer’s instructions for a durable and stunning finish.
Step 3 – Position and Attach the Ceiling Flange
With your stained boards ready, it’s time to prepare for mounting the bottle holder. Take your 3/8″ ceiling flange and determine its desired position on your board. For a balanced look, it’s often centered both horizontally and vertically (or slightly offset if you prefer a different aesthetic). Once you’ve settled on the perfect spot, use a pencil to mark the locations for the screw holes. These marks will guide your pre-drilling.
After carefully marking each spot, use a drill with a small drill bit (slightly smaller than your wood screws) to pre-drill pilot holes. Pre-drilling is a crucial step that prevents the wood from splitting when you drive in the screws, especially in harder wood types, and makes the screws easier to insert. Once the pilot holes are drilled, align the flange over the holes and attach it securely to the board using your 12×1 – 1/4 wood screws. Use a screwdriver or a drill with a driver bit to tighten them firmly, ensuring the flange is flush and stable against the wood.
Step 4 – Integrate the Threaded Rod
Now, take one of your 3-inch threaded rod pieces. The ceiling flange is designed with a threaded opening, so simply insert one end of the rod into this opening. Begin to screw it in by hand, turning clockwise until it is as far as it will go and feels very secure. This hand-tightening ensures that the connection is firm and that the rod is straight, providing a stable arm for your bottle hanger. No special tools are typically needed for this step, just a good grip.
Step 5 – Secure the Split Ring Hanger and Bottle
With the threaded rod firmly in place, it’s time to attach the split ring hanger. Take the bottom half of the 3/4″ split ring hanger and screw it onto the exposed end of the threaded rod. Again, hand-tighten it until it feels secure. This forms the lower part of the cradle for your wine bottle.
Next, carefully place your empty wine bottle into the bottom half of the hanger. Then, take the other half of the split ring hanger and fit it over the neck of the bottle, aligning it with the bottom half. The two halves of the hanger typically secure together with a small screw. Use a screwdriver to tighten this screw, firmly clasping the wine bottle’s neck. Ensure it’s tight enough to hold the bottle securely without damaging the glass. This secure attachment ensures your bottle remains stable when hung.
Step 6 – Install the Sawtooth Hanger for Easy Wall Mounting
To prepare your beautiful new wall vase for hanging, you’ll need to attach a sawtooth hanger to the back of the wooden board. Position the sawtooth hanger on the top center of the back of your board. Use small nails or screws provided with the hanger to fasten it securely. Ensure it’s perfectly centered and level to prevent your vase from hanging crookedly on the wall. This simple addition makes hanging effortless and allows for easy adjustment if needed.
Step 7 – Hang Your Beautiful Wine Bottle Wall Vase
The final and most satisfying step is to hang your newly crafted wine bottle wall vase and admire your handiwork! Choose a prominent spot in your home – perhaps in the living room, dining area, entryway, or even a cozy bedroom nook. Use a wall hook or nail appropriate for the weight of the vase (especially once a bottle is filled with water and flowers). Consider hanging multiple vases in a cluster or a row for a striking visual impact. Once hung, step back and take a moment to appreciate the character and style you’ve added to your space. You can then fill the bottle with fresh flowers, elegant dried arrangements, or even a strand of battery-operated fairy lights for a soft, inviting glow.
What do you think? Isn’t it amazing how simple materials can transform into such a captivating piece of home decor? The industrial-chic aesthetic combined with the warmth of the wood makes these vases truly stand out.
I genuinely hope you fall in love with these DIY Wine Bottle Wall Vases as much as I have! They are incredibly straightforward to construct, and the industrial chic aesthetic they bring to a space is simply captivating. The combination of warm, stained wood and the rugged metal accents creates a balanced and stylish look that complements a wide range of interior designs, from modern farmhouse to urban loft.
Customization and Styling Tips
One of the best aspects of DIY projects like this is the endless potential for customization. While the dark walnut stain and specific hardware create a distinct industrial feel, don’t hesitate to experiment with different finishes and styles to match your home’s unique decor:
- Wood Finish: Instead of dark walnut stain, consider a lighter stain for a more Scandinavian or natural look, or paint the wood in a vibrant color, a classic white, or a distressed finish for a shabby chic appeal.
- Bottle Choice: Beyond clear wine bottles, explore colored glass bottles (green, blue, amber) or unique shapes from spirits or specialty beverages. Different bottle heights can also add visual interest when grouped.
- Decorative Elements: Wrap the neck of the bottle with jute twine, add small charms or tags, or even stencil a design onto the wooden board before hanging.
- Lighting: For a cozy ambiance, consider inserting battery-operated LED fairy lights into the bottles, especially in areas where fresh flowers might not be practical.
- Arrangement: Display fresh-cut flowers from your garden, elegant dried lavender, eucalyptus, or even artificial botanicals that require minimal maintenance.
The Fantastic Value of DIY: Cost Breakdown!
Beyond the creative satisfaction, one of the most compelling reasons to embark on this DIY project is the incredible affordability. Creating custom home decor often comes with a hefty price tag, but not with this wine bottle wall vase. Let’s break down the approximate costs, demonstrating just how budget-friendly this endeavor truly is:
- Metal Supplies: For the ceiling flange, split ring hanger, threaded rod, and wood screws, the total cost typically averages around $4.74. These small, yet essential, pieces provide the structural integrity and industrial flair.
- Wood: An 8-foot long 2×8 board generally costs about $4.96. Since one 8-foot board can yield four 18-inch vase bases, the cost per vase for the wood is an astonishingly low $1.24. This makes it an incredibly efficient use of materials.
- Wine Bottle: The cost of the wine bottle itself can vary. If you’re recycling an empty bottle from home, the cost is absolutely zero! However, if you opt to purchase a new bottle for its specific shape or clarity, they are often very inexpensive. My bottles were a mere $2.79 each at Walmart, proving that stylish elements don’t need to break the bank.
Total Estimated Cost Per Wine Bottle Wall Vase: $8.77! Whoop! Imagine getting a custom, stylish, and high-quality piece of wall decor for less than nine dollars. This project truly embodies the spirit of affordable elegance and resourceful crafting. It’s a testament to how creative thinking and a little elbow grease can lead to stunning results without draining your wallet.
Do you love them as much as I do? I would absolutely LOVE for you to Pin this tutorial on Pinterest and share it across your social media channels! Spreading the word about easy, affordable, and beautiful DIY projects helps inspire others to get creative with their home decor. Don’t forget to leave a comment below with your thoughts or if you decide to try this project yourself. I’d love to see your creations!
Have a wonderful and crafty day!
~Whitney