
Craft Your Dream Dining Space: The Easy DIY Hairpin Leg Table
Hello DIY enthusiasts and home decor lovers! Are you searching for that perfect blend of modern style, rustic charm, and effortless functionality for your dining area? Look no further! Today, we’re thrilled to share one of our most rewarding and surprisingly simple woodworking projects: the stunning DIY Hairpin Leg Dining Table. This isn’t just any table; it’s a statement piece that combines a chic industrial aesthetic with the warmth of natural wood, designed to be built by anyone, regardless of their prior woodworking experience.
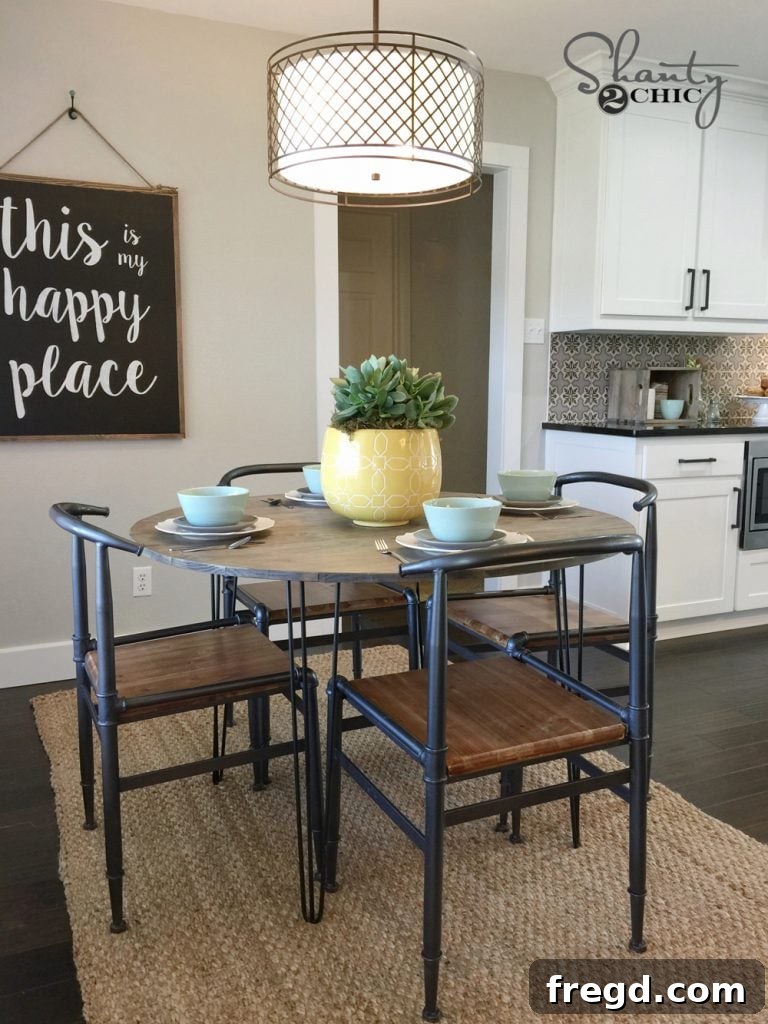
We had the incredible opportunity to build this very table for the Berry family on HGTV, and we couldn’t be more delighted with how beautifully it transformed their dining space. Its unique character and robust design make it a focal point, perfect for family meals, entertaining guests, or even as a versatile workspace. The beauty of this round dining table lies not only in its captivating design but also in the satisfaction of building it yourself.
Isn’t it absolutely charming? This DIY hairpin leg table project offers a fantastic opportunity to create a custom piece of furniture that perfectly fits your home’s style and needs, all while saving significantly compared to store-bought alternatives. The round design fosters conversation and intimacy, making every meal a more connected experience.
Your Journey Begins: Download the Free Plans!
To ensure your building process is as smooth and straightforward as possible, we’ve put together comprehensive, step-by-step plans. These free plans include a detailed cut list, material requirements, and clear diagrams for every stage of the build. They are your essential guide to constructing this beautiful hairpin leg dining table with confidence.
Before gathering your materials and tools, be sure to download and print your FREE PLANS RIGHT HERE! Having them handy will make each step clearer and help you stay organized.
Gathering Your Essential Materials and Tools
Part of any successful DIY project is having the right materials and tools at your disposal. This project is designed for accessibility, utilizing common woodworking tools and readily available materials. Here’s what you’ll need to create your own round hairpin leg dining table:
Materials:
- Several wood boards for the tabletop (e.g., pine, oak, or plywood for a solid top – refer to plans for exact dimensions).
- Set of 4 hairpin legs (we recommend sturdy, furniture-grade legs, typically 28-30 inches tall for a dining table).
- 3/4″ pocket hole screws (1.25″ length for attaching tabletop boards).
- Wood glue for extra strong joints.
- Screws or nails for attaching leg braces.
- Wood stain (e.g., Varathane Briarsmoke for a rich, warm tone).
- Durable topcoat (e.g., Triple Thick Polyurethane for protection and longevity).
- Sandpaper in various grits (from coarse to fine).
Tools:
- Kreg K5 Pocket Hole Jig: An invaluable tool for creating strong, hidden joints. It makes joining boards incredibly easy and precise.
- Ryobi Jig Saw: Essential for cutting the perfect circular tabletop. Its versatility makes it a must-have for various curved cuts.
- Drill/Driver: For making pocket holes, driving screws, and general assembly.
- Tape Measure & Pencil: For accurate measurements and marking.
- Thumbtack & String: A clever trick for drawing a flawless circle.
- Clamps: Crucial for holding boards together securely during assembly and glue drying.
- Safety Glasses & Hearing Protection: Always prioritize safety!
Step-by-Step Construction: Building Your Hairpin Leg Dining Table
Step 1: Preparing Your Wood and Making Pocket Holes
Once your wood is cut to the specifications in the free plans, the first crucial step is to create your pocket holes. Pocket holes are angled pilot holes that allow you to drive screws at an angle, creating incredibly strong and concealed joints. This table design primarily uses 3/4″ pocket holes, which will be secured with 1.25″ pocket hole screws.
For this, I used my trusted Kreg K5 Jig. This jig makes setting up and drilling precise pocket holes a breeze. Simply adjust the jig for 3/4″ thick material, clamp your board, and drill. Ensure you make enough pocket holes along the edges of your tabletop boards to create a robust and seamless surface when joined.
Step 2: Assembling the Tabletop Boards
With all your pocket holes drilled, it’s time to assemble the foundation of your tabletop. Lay your boards out on a flat, stable surface, arranging them as they will appear in the final table. Take your time to align them perfectly, ensuring the edges are flush and the grain patterns complement each other. This is where clamps become your best friend – use them to hold the boards tightly together, preventing any movement while you secure them.
Apply a thin, even bead of wood glue along the edges of the boards before bringing them together. Then, using your drill, attach everything with 1.25″ pocket hole screws through the pocket holes you’ve created. Drive the screws until they are snug, but be careful not to overtighten, which can strip the wood or cause splitting. Wipe away any excess glue that squeezes out with a damp cloth.
Step 3: Marking the Perfect Circle
Now for the fun part that gives this dining table its distinctive round shape! Once your tabletop is fully assembled and the glue has dried, it’s time to mark the circle for cutting. This method ensures a perfectly symmetrical and smooth curve, even without specialized tools.
Find the exact center of your assembled tabletop. Attach a small thumbtack or a thin nail securely into this center point. Then, tie one end of a piece of string or twine to the thumbtack. Measure the desired radius of your table (half the total diameter) along the string and tie a pencil to the string at that exact length. Keeping the string taut, walk around the thumbtack, allowing the pencil to draw a perfect circle on your tabletop. Double-check your mark to ensure it’s precisely where you want to cut.
Step 4: Cutting the Circular Tabletop
With your circle marked, it’s time to bring out the Ryobi Jig Saw! This versatile tool is perfect for making precise curved cuts. Before you start cutting, make sure your tabletop is well-supported and clamped to your workbench to prevent movement. Always wear your safety glasses.
Carefully guide the jig saw along your marked line. Take your time, moving slowly and steadily to achieve a smooth, clean cut. Don’t force the saw; let the blade do the work. If you’re new to using a jig saw, practicing on a scrap piece of wood first can be very helpful. Once the circle is cut, you’ll want to sand the edges thoroughly to smooth out any imperfections and prepare for finishing.
Step 5: Attaching the Leg Braces for Stability
With your beautiful round tabletop shaped, the next step is to add the leg braces. These braces are crucial for providing a stable and secure mounting point for your hairpin legs, ensuring your table is sturdy and durable. The design of these braces should be outlined in your free plans.
Position the leg braces on the underside of the table top, ensuring they are evenly spaced and provide optimal support where the legs will attach. Use both wood glue and nails or screws to firmly attach the braces to the bottom of the table top circle. The glue provides a strong bond, while the fasteners hold everything securely in place while the glue dries. Allow ample time for the wood glue to cure completely before proceeding to the next step.
Step 6: The Signature Touch – Attaching the Hairpin Legs
This is the exciting moment where your tabletop truly transforms into a table! The hairpin legs are what give this piece its distinctive modern industrial flair. We sourced our hairpin legs from Osborne Wood Products, known for their quality. For your convenience, you can often find a set of 4 quality hairpin legs HERE on Amazon for under $100, often with Prime shipping available, making this step incredibly accessible! When selecting your legs, consider the height (typically 28-30 inches for a dining table) and the finish (raw steel, black, white, etc.) to match your desired aesthetic.
Carefully flip your tabletop over (you might need an extra set of hands for larger tables) and position the hairpin legs at the corners of the braces. Use appropriate screws to firmly attach the legs to the braces. Ensure each leg is securely fastened and aligned correctly. Once all four legs are attached, carefully flip your newly constructed table upright.
The Grand Finale: Finishing Your Masterpiece
With the assembly complete, the final step is to give your table a beautiful and protective finish. This is where your table truly comes to life and gains its long-lasting durability.
Begin by thoroughly sanding the entire tabletop. Start with a medium-grit sandpaper (e.g., 120-grit) to remove any pencil marks, minor imperfections, or rough spots, especially along the cut edges. Progress to finer grits (e.g., 180-grit, then 220-grit) for an incredibly smooth finish. A well-sanded surface is essential for an even stain application. After sanding, wipe away all dust with a tack cloth or a slightly damp cloth and allow it to dry completely.
For our table, we applied a rich coat of Varathane Briarsmoke stain. This particular stain provides a gorgeous, deep tone that beautifully complements the modern industrial vibe of the hairpin legs. Apply the stain evenly with a brush or rag, working in the direction of the wood grain. Allow it to penetrate for the recommended time, then wipe off any excess. You may opt for a second coat for a deeper color. Always allow the stain to dry completely according to the manufacturer’s instructions.
To protect your beautiful tabletop from spills, scratches, and daily wear, a durable topcoat is essential. We used a coat of Triple Thick Polyurethane. This product offers excellent protection and a beautiful, clear finish. Apply it according to the instructions, ensuring even coverage. Allow each coat to dry fully before applying another, and lightly sand between coats with a very fine grit sandpaper (like 320-grit) for an ultra-smooth finish. With this final step, your DIY Hairpin Leg Dining Table is complete!
Styling Your New Dining Space
Once your gorgeous new dining table is ready, it’s time to complete the look of your dining area! Thoughtful styling can elevate your space and truly make it feel like home. We had a blast finding the perfect pieces to complement our hairpin leg table:
- The inviting rug that anchors the space was found at World Market HERE! A rug helps define the dining area and adds warmth and texture.
- We found the stylish overhead light HERE! Good lighting is key for setting the mood and ensuring your dining area is bright and welcoming.
- All the charming dishes that adorn the table are from Target, proving that beautiful tableware doesn’t have to break the bank.
- The sweet, personalized sign was a wonderful gift from a dear friend, adding a unique and heartfelt touch to the decor.
Don’t be afraid to mix and match styles to create a look that is uniquely yours. Hairpin legs tables are incredibly versatile and can fit into modern, industrial, farmhouse, or even eclectic aesthetics.
Why Choose This DIY Hairpin Leg Table Project?
Opting to build your own dining table, especially one with such a striking design, offers numerous benefits:
- Cost-Effectiveness: Building your own furniture often saves you a significant amount of money compared to purchasing a pre-made item of similar quality and style.
- Customization: You have complete control over the wood type, stain color, leg finish, and even the exact dimensions, ensuring it perfectly fits your space.
- Sense of Accomplishment: There’s immense satisfaction in creating something beautiful and functional with your own hands.
- Unique Design: This hairpin leg table offers a modern, chic aesthetic that stands out and adds character to any home.
- Durability: By choosing quality materials and following solid construction techniques, you can build a table that will last for years.
Ready to Build More?
We hope this detailed guide inspires you to take on this rewarding DIY hairpin leg table project. It’s a fantastic way to enhance your home, learn new skills, and create a piece of furniture you’ll cherish. The simplicity of the design, combined with the comprehensive free plans, makes it an ideal project for both seasoned woodworkers and eager beginners.
If you enjoyed this project and are looking for more ideas to furnish your home, be sure to explore our extensive collection of DIY Dining Table Plans. You’ll find a wide variety of designs and styles to fit your space, aesthetic, and skill level. Happy building!