
Revitalize Your Space: A Step-by-Step Guide to Transforming Old Furniture into Stunning Statement Pieces
Happy Friday, fellow DIY enthusiasts and home decor lovers! For those of you that follow us on Instagram, you might know that my dining room is currently undergoing a bit of a transformation. I’ve been dreaming of a new dining table for quite some time, one I could proudly say I built myself. That project is now beautifully complete, and I absolutely cannot wait to share all the details with you soon!
In the meantime, I couldn’t resist giving you a sneak peek into another exciting revamp that’s been brewing – a project involving an old server that I absolutely adore. This blog, which Ash and I started, was founded on the very premise of breathing new life into forgotten pieces, transforming them from worn-out to wonderful. There’s an incredible satisfaction that comes from taking an antique or pre-loved item and giving it a brand new purpose, a fresh aesthetic that seamlessly integrates into modern living. It’s truly like a fabulous haircut for your furniture, revealing its inherent beauty with a contemporary twist. And the best part? It’s far less daunting than it seems! Join me as I walk you through the simple yet impactful steps of this furniture makeover journey.
The Grand Reveal: A Modern Classic Reborn
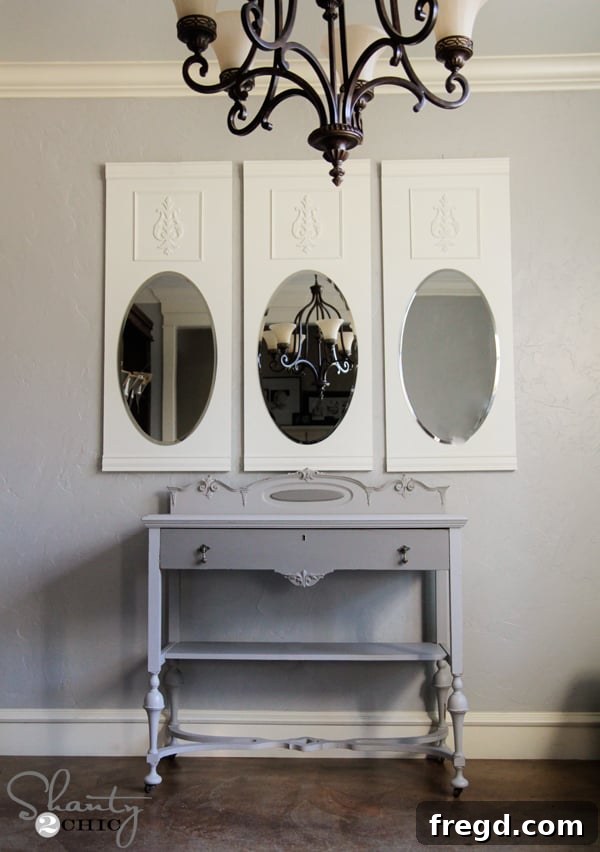
Before we dive into the nitty-gritty, let me show you how this beautiful server turned out after its complete transformation. Prepare to be amazed by the stunning change a little paint and effort can make!
I confess, I am absolutely in love with this piece! Its fresh new look radiates charm and sophistication. This newly revamped server is actually destined for a new home at my mom’s house. But before I sent it off to its permanent residence, I knew it needed a little bit of freshening up, a complete cosmetic overhaul, to truly make it shine. It’s always rewarding to pass on a beautifully restored item, knowing it will be cherished for years to come.
The “Before”: Unveiling the Server’s Original Character
Every great transformation story begins with a “before” picture. Here’s what the server looked like in its original finish, complete with all its endearing imperfections and dated charm.
While I genuinely appreciated the classic tone of its legs, the majority of the piece had a very strong yellow-orange hue, which felt a bit dated and didn’t align with the fresh aesthetic I envisioned. Beyond the color, it had accumulated its fair share of dings, scratches, and spots over the years – natural wear and tear that comes with age and use. My goal was not to erase its history entirely but to refresh it in a way that highlighted its timeless structure while addressing these cosmetic imperfections. So, after a quick repair to its base (you can actually spot the clamp I used on the bottom in the early stages), I was ready to begin the exciting process of its transformation.
Step 1: Meticulous Preparation – The Foundation for a Flawless Finish
The secret to any successful furniture revamp lies in thorough preparation. Skipping this crucial first step can lead to disappointing results down the line, so it’s always best to invest a little extra time here. This stage sets the groundwork for a truly professional and long-lasting finish.
**Preserving Original Charm: Hardware & Protection**
My first order of business was carefully removing all the old hardware. Typically, when revamping a piece, I might opt to replace the pulls and knobs with new ones to enhance the updated look. However, in this case, the existing pulls were simply perfection. They possessed a beautifully worn character and an intricate design that felt authentically vintage and truly unique. It’s increasingly difficult to find hardware of this quality and aesthetic today, so preserving them was a non-negotiable decision. They would be cleaned and set aside, ready to be reinstalled and complement the server’s new persona.
To ensure certain areas remained pristine and paint-free, I employed some trusty 3M ScotchBlue painter’s tape. This was particularly important for delicate areas like the keyhole, which adds a touch of historical charm, and the inside of the drawers. The precision of good quality painter’s tape helps create clean lines and protects surfaces you want to keep in their original state or in a different finish. It’s a small step that makes a huge difference in the final, polished appearance of your project.
Step 2: The Priming Process – A Non-Negotiable for Long-Lasting Beauty
While many paints today boast “primer included” formulas, I’ve learned through countless projects that for older, more challenging pieces like this server, using a dedicated primer is absolutely paramount. This vital step acts as a barrier, preventing bleed-through from old stains or wood tannins, improving paint adhesion, and ensuring a smoother, more even topcoat. It’s the ultimate insurance policy for your hard work.
For this project, I opted for a high-quality primer that delivers exceptional results. You can typically find this reliable product at your local Lowe’s hardware store. It’s incredibly easy to apply, gliding on smoothly with a brush, and will undoubtedly save you from a lot of potential heartache and frustration later on. Trust me on this – a good primer makes all the difference! I applied one generous coat over the entire surface of the server, ensuring full coverage and a solid foundation for the paint layers to follow. Once applied, I allowed it ample time to dry completely, creating a perfectly prepped canvas.
Step 3: Mastering the Paint Application – A Symphony of Grays
With our server perfectly primed and ready, it was time for the most exciting part: introducing color! For this transformation, I decided to go with a sophisticated and timeless palette of two distinct shades of gray. Gray offers incredible versatility, bringing a modern yet classic feel that complements almost any decor style. These were the two specific Valspar colors I chose to achieve the desired depth and elegance:
For the lighter, primary color of the server, I used **Valspar Pantone String**. This shade offers a beautifully soft and inviting light gray, perfect for brightening up the piece without overwhelming it. It provides a crisp, clean base that allows the subtle distressing to truly pop.
And for the darker, accent color, I selected **Valspar Siene**. This rich, deeper gray provides a wonderful contrast, adding depth and architectural interest to certain areas of the server, like the inner panels or decorative details. Both colors, though they might appear slightly brownish on screen, are perfect, true grays in person, offering a sophisticated and calming aesthetic. To complete the look, I opted for a satin sheen for both colors. A satin finish strikes the perfect balance between matte and glossy, offering a subtle, elegant glow that’s also highly durable and easy to clean, ideal for a frequently used piece of furniture.
I applied two even coats of paint for each color, allowing adequate drying time between applications to ensure a smooth, professional finish. Using a high-quality brush helps minimize brush marks and provides excellent coverage, bringing the server’s new character to life with every stroke.
Step 4: The Art of Distressing – Adding Character and Charm
Once the paint had fully dried and cured, it was time to introduce that coveted “shabby chic” or naturally aged look through distressing. This technique isn’t about damaging the furniture; rather, it’s about artfully replicating the subtle wear and tear that occurs naturally over decades, giving a piece character and depth. It helps to soften the new paint finish, making the server feel like it has a story to tell, even with its fresh coat of paint.
For this step, I used an 80-grit sanding paper. The coarse grit is ideal for removing paint efficiently but with enough control to achieve a natural distressed effect. The trick is to be very light-handed and strategic. I focused on the corners and edges – areas where a piece of furniture would naturally show signs of wear from years of use and handling. Think about where bumps and rubs would occur organically. By lightly scratching these specific spots, I allowed glimpses of the darker, original finish (or the primer, depending on how deep I went) to peek through, creating an authentic, time-worn appearance.
This step is incredibly “easy peasy,” as they say! It’s all about controlled experimentation and stepping back frequently to assess the look. You can always take away more paint, but you can’t easily put it back without repainting. The goal is to create a subtle, charming worn effect that enhances, rather than detracts from, the overall aesthetic.
Step 5: Sealing the Deal – Protecting Your Masterpiece for Years to Come
After all the careful preparation, painting, and distressing, the final, and arguably one of the most important, steps is to protect your newly transformed piece. A durable topcoat is essential for safeguarding the paint finish from everyday wear, moisture, and potential scratches, ensuring your hard work stands the test of time. This is particularly crucial for a piece like a server, which will see regular use and handling.
To seal and protect all my hard work, I applied two coats of **Rustoleum Ultimate Polyurethane**. I truly LOVE this stuff for its reliability and excellent protective qualities. One of its standout features is that it goes on white, making it easy to see where you’ve applied it, but then dries crystal clear, leaving no yellowing or cloudiness to obscure your beautiful paint job. It creates a robust, clear shield that is both water and scratch-resistant, perfect for maintaining the server’s pristine new look.
When applying polyurethane, I prefer to use a good quality bristle brush rather than a foam brush. While foam brushes might seem convenient, they often tend to create more tiny bubbles on the surface, which can dry into a less-than-perfect finish. A bristle brush, when used with smooth, even strokes, allows for a much smoother application, resulting in a flawless, durable protective layer. I allowed each coat to dry completely according to the manufacturer’s instructions before applying the next, ensuring maximum adhesion and protection.
The Grand Finale: A Sentimental Journey and Lasting Beauty
And that’s it! With the protective layers cured, I carefully reattached all the original, beloved hardware. The transformation was truly complete. I cannot express how much I LOVE the final outcome. To me, this revamp has not only given the entire piece a completely brand new look and lease on life, but it has also managed to bring out all of its inherent beauty even more profoundly. The subtle distressing, combined with the elegant gray tones, highlights the server’s classic lines and rich history in a way that the old, yellowed finish simply couldn’t.
This project serves as a wonderful reminder that with a little vision, some basic tools, and a weekend’s worth of effort, you can turn an overlooked, dated piece of furniture into a cherished family heirloom or a stunning focal point in any room. It’s an incredibly rewarding process that champions sustainability and personal expression in home decor.
Now, this beautifully revamped server is off to its new temporary home at my mom’s house. I sincerely hope she takes good care of her, because I fully intend on getting her back at some point down the line! It’s a piece that holds sentimental value, and I’m thrilled it will continue its story with family. This project truly embodies the spirit of giving forgotten treasures a second chance, creating beautiful and functional pieces that enhance our living spaces.
Thank you so much for stopping by and taking the time to read about this exciting furniture transformation! I hope this detailed guide inspires you to tackle your own DIY furniture projects and experience the immense satisfaction of bringing old pieces back to life. Don’t hesitate to let me know if you have any questions at all about the process, the products, or anything else. I’m always happy to share tips and tricks to help you on your creative journey!