
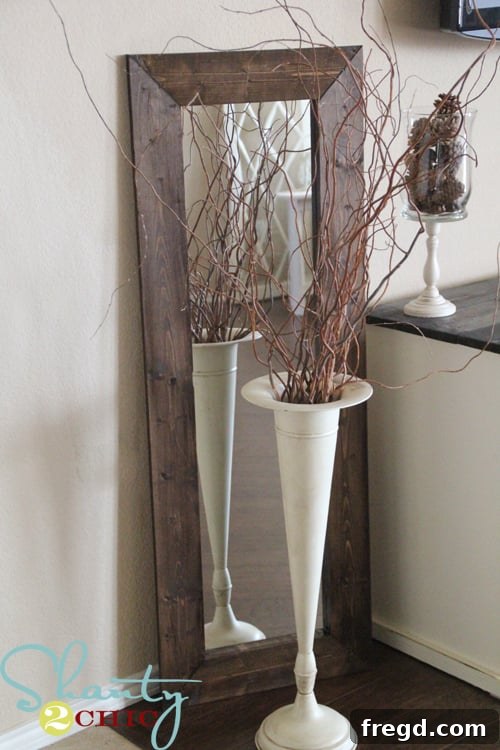
Welcome, fellow DIY enthusiasts! Are you ready to transform a budget-friendly find into a stunning home accent that looks like it cost a fortune? This guide will show you how to craft a beautiful, custom-framed mirror in just about an hour, for an astonishingly low price of around $15. Get ready to add a touch of elegance and personal style to your space without breaking the bank or dedicating an entire weekend to a complex project.
The beauty of this project lies in its remarkable simplicity and the dramatic impact it delivers. If you’ve been searching for an affordable way to elevate your home decor, or if you’re a beginner looking for an empowering woodworking project, you’ve found it. Let’s dive into creating your very own custom mirror!
Craft Your Own Stunning & Affordable DIY Framed Mirror
Creating your own decorative mirror offers numerous advantages over purchasing a pre-made one. Beyond the significant cost savings, you gain the freedom to customize every aspect – from the stain color of the wood to the exact dimensions – ensuring it perfectly complements your existing decor. This particular DIY mirror project is ideal for anyone looking to add a touch of rustic charm, modern simplicity, or farmhouse elegance to their living room, bedroom, entryway, or even a hallway. It’s a fantastic way to introduce a focal point, brighten a space, and make a statement about your personal style.
Why This DIY Mirror Project is Perfect for You
- Budget-Friendly: With a total cost of around $15, this project proves that beautiful home decor doesn’t have to be expensive.
- Time-Efficient: Many crafters can complete this entire mirror build in about an hour, making it an ideal weekend afternoon activity.
- Beginner-Friendly: The steps are straightforward, requiring minimal tools and woodworking experience.
- Customizable: Choose your preferred wood stain or paint to match any interior design aesthetic.
- High Impact: Transform a plain, inexpensive mirror into a high-end looking piece that will garner compliments.
Materials You’ll Need
- One Mainstay door mirror (typically 18″ x 48″) from Wal-Mart or a similar inexpensive store.
- Two 1×4 white wood boards (ensure they are straight and free of major defects).
- Gorilla Glue wood glue (or similar strong wood adhesive).
- Liquid Nails adhesive (or similar construction adhesive for mirror bonding).
- Wood stain (e.g., Rust-Oleum Dark Walnut) or paint of your choice.
- Windex or another glass cleaner.
- Rags or old cloths for applying stain and cleaning.
Tools for the Job
- Utility knife.
- Staple gun (with staples) or wood clamps.
- Miter saw (manual miter box with hand saw works too, or a power miter saw for speed and precision).
- Measuring tape.
- Pencil.
Step-by-Step Guide to Crafting Your DIY Framed Mirror
Step 1: Preparing Your Base Mirror
Our journey begins with a humble Mainstay door mirror, typically available for around $5. These mirrors are incredibly versatile for DIY projects, but they often come with cheap, plastic trim that we’ll need to remove to reveal the blank canvas underneath.
Start by carefully peeling off any paper backing that might be covering the mirror’s edges or frame. This will give you better access to the plastic trim.
Next, grab your utility knife. The plastic trim is usually secured with a type of hot glue. Carefully slide the utility knife blade along the seam where the plastic trim meets the edge of the mirror. The goal here is to cut through the glue, not to pry the trim off forcefully. Exercise caution and wear appropriate safety gloves if you wish, as utility knives are very sharp.
This next step is crucial for preventing the mirror from cracking. Once you’ve cut through the glue, gently pull the plastic trim *away* from the mirror’s surface, rather than trying to bend it upwards or downwards. Applying pressure parallel to the mirror’s plane helps release the adhesive without putting undue stress on the glass. The trim should come off easily with this method.
With the trim successfully removed, take a moment to clean your mirror thoroughly with Windex or your preferred glass cleaner. This ensures a pristine, streak-free surface, ready for its new, elegant frame. A clean surface is essential for the final look of your DIY masterpiece.
Step 2: Crafting the Perfect Wood Frame
Now for the exciting part: building the custom frame that will elevate your mirror! For this project, two 1×4 white wood boards are ideal. White wood is affordable, easy to work with, and takes stain beautifully. When selecting your boards, try to pick ones that are as straight as possible, without significant warping or large knots, to ensure a tight, professional-looking frame.
If you’re new to woodworking, investing in a miter saw – even a basic manual miter box with a hand saw – is highly recommended. It will make this project incredibly easy and is a perfect starter tool for anyone interested in future building endeavors. Precision in cutting angles is key to a seamless frame.
You will need to cut four pieces from your 1×4 boards, each with 45-degree angles at both ends. These angles will meet to form perfect 90-degree corners for your rectangular frame. The measurements provided are from “long point to long point,” meaning the longest edge of each angled cut. For a standard 18″x48″ door mirror, use these dimensions:
- Two pieces: 48 inches (long point to long point)
- Two pieces: 17 1/4 inches (long point to long point)
Measure twice, cut once! Accuracy here ensures your frame fits snugly around the mirror. If your mirror has slightly different dimensions, adjust these measurements accordingly to create a frame that precisely outlines its edges.
Step 3: Assembling Your Frame with Ease
This is often described as the most satisfying part of the project because of how quickly it comes together! Lay out your four cut wood pieces on a flat, clean surface. For assembly, it’s often easier to flip the boards over so that the “bad sides” (any imperfections or marks) are facing upwards. These will be the inside or back of your frame.
Apply a generous but not excessive amount of Gorilla Glue wood glue along the 45-degree angled edges where the pieces will meet. Wood glue creates an incredibly strong bond, crucial for the longevity of your frame. Carefully bring the pieces together to form a rectangle, ensuring the angles align perfectly to create crisp corners.
To hold the frame together while the glue dries, a staple gun (like one purchased years ago from Hobby Lobby) works wonders. Staple across the mitered joints on the back side of the frame. If you don’t have a staple gun, C-clamps or even painter’s tape can be used to hold the joints tight, though a staple gun provides immediate stability. Once secured, allow the glue to dry completely according to the manufacturer’s instructions. This usually takes at least 30 minutes to an hour before handling, but full cure can be 24 hours.
Step 4: Staining for a Rich, Professional Finish
Once the wood glue has dried and your frame is solid, carefully flip it over to reveal the “good side” – the front of your mirror frame. Now it’s time to add character and depth with a beautiful stain. For this project, Rust-Oleum Dark Walnut stain was used, providing a rich, classic finish that enhances the wood grain.
Before staining, ensure the wood surface is clean and smooth. Lightly sand with fine-grit sandpaper if needed to remove any rough spots or pencil marks, then wipe away all dust. Apply the stain with a clean rag, wiping it on evenly in the direction of the wood grain. Allow the stain to sit for about 10-15 minutes, or longer for a deeper color. Then, with a clean, dry rag, wipe off any excess stain. This process allows the wood to absorb the pigment while preventing a sticky finish. For an even richer hue, you can apply a second coat after the first has dried, following the same steps. Always allow adequate drying time as per the product’s instructions.
Step 5: The Final Connection: Securing Your Mirror
The final step brings your mirror and frame together, creating the finished piece. Lay your stained frame face down on a clean, protected surface. Now, take your cleaned, trim-free mirror and carefully place it into the frame opening. Ensure the mirror is centered and fits snugly.
To permanently attach the mirror to the frame, use Liquid Nails (or a similar construction adhesive suitable for mirrors and wood). Apply a thin bead of Liquid Nails along the inner edges of the wooden frame, where the back of the mirror will rest. Remember, “a little goes a long way” with this powerful adhesive. Carefully lay the mirror down onto these beads of adhesive, pressing gently to ensure good contact. Do not move the mirror once it’s set in place to avoid smudges or uneven bonding.
Allow the Liquid Nails to cure completely, which can take up to 24-72 hours depending on the product and humidity. It’s best to leave the mirror undisturbed during this time. Once fully cured, your mirror is ready for display!
Displaying Your Masterpiece: Decor Ideas
The versatility of this DIY framed mirror is truly endless. Its classic design and rich finish allow it to blend seamlessly into various decor styles, from rustic farmhouse to modern minimalist. You can lean it against a wall, making it a dramatic full-length accent in an entryway or bedroom, much like it’s pictured here next to a Pottery Barn Inspired Media Console. Leaning a mirror is a great way to add height and dimension without committing to hanging it.
Alternatively, you could easily add D-rings or sturdy picture wire to the back to hang it on a wall, perhaps over a console table, a mantelpiece, or even in a bathroom to create a spa-like feel. Imagine it reflecting light and making a smaller room feel more expansive. The choice of display is entirely up to your personal style and the needs of your space.
The Unbeatable Value of DIY
It’s truly incredible how a simple $5 mirror and a few pieces of wood can be transformed into such a magnificent decorative piece for just $15 and about an hour of your time. This project is a testament to the power of DIY – enabling you to create high-quality, personalized home decor without the hefty price tag. The satisfaction of stepping back and admiring something you’ve built with your own hands is truly priceless.
If you’ve enjoyed this tutorial and are inspired to create your own mirror, we would absolutely love to see your creations and encourage you to pin this project to share with others! Your support helps us continue to bring you more easy, affordable, and impactful DIY ideas.
Thank you for joining us on this creative journey!
Ashley