
Welcome back, DIY enthusiasts! Two years ago, I embarked on what would become one of my most cherished home projects – a full-scale DIY storage system inspired by Pottery Barn. It was a significant undertaking, a true test of my budding building skills (or lack thereof at the time!), and a project that brought immense satisfaction. If you’ve followed my journey, you’ll remember the initial excitement and the learning curve that came with building this substantial piece from scratch.
Fast forward to today, and while my love for the functionality and craftsmanship of this piece remains as strong as ever, my affections for its original paint color have, shall we say, waned considerably. You see, when I first chose that particular shade of green, I was in the thick of my first trimester of pregnancy. There’s an old saying about never cutting your hair when pregnant; I’d argue it should extend to picking paint colors too! Every time I looked at it, the color evoked memories of nausea and a general sense of unease. It was a hue that, despite its initial appeal, had become a constant reminder of a challenging phase.
For two years, I tolerated it, focusing on other aspects of our home. But with the desire to finally tackle our game room decor, I knew it was time for a change. This beloved storage system, the focal point of the room, needed a fresh start, a new identity that aligned with my current aesthetic and energy. And so, the decision was made: it was time for a modern furniture makeover!
A Modern Makeover for Our Beloved DIY Storage System
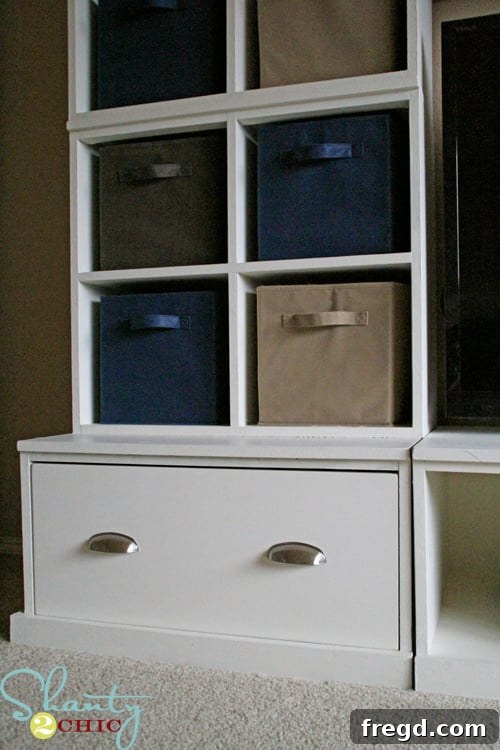
After what felt like an eternity, I finally caved and gave this magnificent piece the update it deserved. The transformation is truly incredible, and I’m absolutely smitten with its new, modern look. It’s amazing how a change in color and a few thoughtful details can completely revitalize a piece of furniture, making it feel brand new and perfectly suited to its surroundings.
The “first trimester green” is now a distant memory, replaced by two fresh coats of Behr Cozy Cottage in a beautiful satin finish. This new color instantly brightened the unit and brought a serene, inviting vibe to the game room. Beyond the paint, I also upgraded the top and bottom trims, opting for cleaner lines that complement a more contemporary aesthetic. And, of course, no furniture makeover is complete without new hardware; the pulls were swapped out to complete the modern transformation.
This project wasn’t just about changing a color; it was about evolving a piece to fit a new vision, breathing new life into a well-loved DIY creation. If you’re looking to update an existing piece of furniture or planning a DIY storage system, let me walk you through the simple steps that made all the difference in achieving this stunning modern look.
Step-by-Step Guide to Modernizing Your Storage Unit
Ready to give your own furniture a fresh update? Here’s a detailed breakdown of how I transformed my DIY storage system, step by step:
1. Selecting Your Materials for a Fresh Trim
The first step in achieving a modern aesthetic for this storage system was to replace the existing trim with something sleeker and more defined. I carefully selected pine boards for their versatility and clean appearance.
- Pine Boards: I purchased 1×2 and 1×3 select pine boards. The 1x3s were specifically chosen for the bottom trim, providing a sturdy and substantial base. The narrower 1x2s were designated for the top trim, ensuring a delicate yet distinct edge. Selecting “select” pine ensures fewer knots and a smoother finish, which is crucial for a refined look.
- Cove Molding: To add an extra layer of architectural detail and a finished look, I also purchased sticks of cove molding. This type of molding creates a gentle concave curve, which would sit beautifully beneath the 1×2 top trim, adding depth without being overly ornate.
2. Attaching the Top Trim and Molding
With the materials in hand, the real work began. Attaching the trim requires precision and the right adhesive for a lasting bond.
- Placement: I positioned the 1×2 boards flat side down directly on the very top surface of the unit. It’s important to let them hang over the edge slightly, ensuring they would be perfectly flush with the cove molding once it was installed underneath. This creates a continuous, clean profile.
- Adhesion: For a secure attachment, I first applied a generous bead of Liquid Nails adhesive along the back of the pine boards. Liquid Nails is fantastic for providing a strong, permanent bond that minimizes the need for excessive nailing and helps prevent future shifting. After pressing the boards firmly into place, I reinforced them with a few finishing nails. These nails provide immediate holding power while the adhesive cures.
3. Mastering Mitered Edges for a Professional Finish
Don’t be intimidated by the idea of mitering! It’s a key technique for achieving professional-looking corners, and it’s far easier than you might think.
- The Miter Saw: I used my compound miter saw for this task. The beauty of a compound miter saw is that it typically has hard stops at common angles, like 45 degrees, making accurate cuts incredibly simple. For trim pieces that meet at a 90-degree corner, two 45-degree cuts will form a perfect seam.
- Cutting and Caulking: The process truly is as straightforward as “cut and caulk.” Once the cuts were made, I dry-fitted the pieces to ensure a snug fit. Any minor gaps or imperfections at the joint were easily remedied with a bead of paintable caulk. Caulking not only fills gaps but also creates a seamless transition between trim pieces and the unit itself, crucial for that polished, modern look. This step also seals the edges, preventing dust and debris from settling in cracks.
4. Securing the Base Trim and Upgrading Hardware
With the top trim in place and the unit prepped, it was time to address the base and the hardware, completing the unit’s transformation.
- Base Trim Installation: Similar to the top trim, I used a combination of Liquid Nails and finishing nails to attach the 1×3 boards for the base trim. The wider profile of the 1x3s provides a more substantial and grounded feel, which is perfect for the base of a large unit. Ensure the cuts are precise and the boards are level for a professional finish. After attachment, fill any nail holes with wood filler and sand smooth before painting.
- Hardware Upgrade: The final touch that truly elevates the unit’s modern appeal was swapping out the old knobs for sleek, contemporary pulls. I found my absolute favorite pulls at Home Depot, priced at about $5 each. While a little pricier than some basic options, the impact they have on the overall look is immeasurable – they are absolutely worth every penny! Changing hardware is a quick and effective way to update the style of any furniture piece without major construction.
5. The Final Reveal and Renewed Motivation
The result of these changes is nothing short of transformative. The unit now perfectly embodies the modern aesthetic I was aiming for, and the fresh Behr Cozy Cottage paint color breathes new life into our game room. This makeover has finally given me the surge of motivation I needed to fully decorate the space!
Looking back, this DIY Pottery Barn-inspired storage system was my very first building project. I started with absolutely zero prior building experience, armed only with a vision and a willingness to learn. If I could tackle building it from the ground up, and then successfully give it a modern facelift years later, anyone can. Don’t let inexperience hold you back from creating the home of your dreams. Simple changes like paint and trim can dramatically alter the feel of a room and the functionality of your furniture.
Starting Your Own DIY Journey?
If you’re inspired to build your own storage system from scratch, or simply curious about the initial construction process, I’ve got you covered! You can find the detailed step-by-step tutorials I shared during the original build of this unit by following the links below. These guides will take you through every phase of construction, providing a comprehensive resource for your own DIY project.
- DIY Storage System: Step 1 – The Beginning
- DIY Storage System: Step 2 – Building the Frame
- DIY Storage System: Step 3 – Adding Shelves
- DIY Storage System: Step 4 – Backing and Details
- DIY Storage System: Step 5 – Constructing Doors
- DIY Storage System: Step 6 – Door Installation
- DIY Storage System: Step 7 – Building Drawers
- DIY Storage System: Step 8 – Crown Molding Finish
Whether you’re embarking on a full build or simply refreshing an existing piece, remember that every project, big or small, contributes to making your house feel more like a home. Don’t be afraid to experiment, learn, and most importantly, enjoy the process of creating something beautiful with your own hands.
Thanks so much for stopping by and following along with this exciting transformation! I hope it inspires you to tackle your next home decor project.
~Ashley