
Transforming Old Barstools into a Stylish & Functional Desk: A DIY Guide
Hello, fellow DIY enthusiasts! There’s nothing quite as satisfying as giving new life to old items, especially when they can serve a brand new, incredibly useful purpose. Today, I’m thrilled to share a project that turned what was once a pair of outdated barstools into a charming and highly functional desk, perfect for my two oldest girls. This transformation wasn’t just a simple makeover; it was an epiphany – a moment of pure inspiration that led to a beautiful and budget-friendly solution for their study space.
My home recently received a refresh with some sleek new metal barstools, which I absolutely adore. While I was delighted with the new additions, it meant saying goodbye to the old wooden saddle-seat stools. Instead of simply donating them, a spark of creativity ignited. I knew my girls were in dire need of a dedicated workspace for homework, art projects, and general creative endeavors. It hit me: why not repurpose these perfectly sturdy barstools into a chic desk? What started as a couple of simple “shanties” was destined for something truly elegant and practical!
The best part about this project? It requires minimal building skill. Seriously, if you can handle a spray can and a drill, you can absolutely tackle this! It’s a fantastic entry-level DIY that yields professional-looking results. Let’s dive into how you can create your very own custom barstool desk.
Why Upcycle Your Old Barstools? The Inspiration Behind This Project
Upcycling is not just a trend; it’s a smart, sustainable, and incredibly rewarding way to furnish your home. Instead of contributing to landfill waste or spending a fortune on new furniture, you can transform existing pieces into something fresh and new. For this project, the primary motivation was the need for a desk for my daughters, coupled with the desire to be resourceful with the barstools I no longer needed.
These particular barstools were a great find on Amazon over a year ago, costing around $29 each. They were sturdy, simple, and the perfect foundation for a desk. If you don’t have old barstools lying around, don’t worry! You can easily find similar saddle-seat stools at stores like Target, or even scout your local thrift stores, garage sales, or online marketplaces for affordable options. The key is to find stools that are stable and have a relatively flat top surface to easily attach to your desk panel.
Beyond the financial savings, there’s an immense sense of pride that comes with creating something with your own hands. This DIY barstool desk project allowed me to customize the look to perfectly match the girls’ room decor, offering a personalized touch that mass-produced furniture simply can’t replicate. It’s a wonderful way to add character and unique charm to any space, all while keeping within a very modest budget.
Essential Materials You’ll Need for Your Barstool Desk Transformation
Gathering your materials before you start is crucial for a smooth and enjoyable project. Here’s a detailed list of what I used, along with some tips for selecting your own supplies:
- Two Sturdy Barstools: As mentioned, saddle-seat stools work perfectly due to their flat tops and sturdy construction. Ensure they are in good condition, as they will form the base of your desk.
- Spray Paint: I chose Rust-Oleum Painter’s Touch in Berry Pink. This specific paint offers excellent coverage and adhesion, making it ideal for furniture. Consider a color that complements your room’s existing palette. Don’t forget a primer if your stools are very slick or dark and you’re going for a light color.
- Wood for Shelves: Furring strips (typically 1×2 or 1×3) are economical and easy to work with. You’ll need enough to cut several planks for your desired shelf length. Mine were cut to 15 3/4 inches each.
- Wood Stain: Rust-Oleum Ultimate Wood Stain in Dark Walnut is my go-to. It provides a rich, deep finish that contrasts beautifully with lighter paint colors. Choose a stain that suits your aesthetic.
- Pine Project Panel for the Top: I used a 20×48-inch panel, easily found at home improvement stores like Lowe’s. These come in various sizes, so measure your space and choose one that fits your needs. Mine was a steal at $16.
- Nails: For attaching the shelf planks to the barstools. Small finishing nails or a brad nailer work well.
- Wood Screws: 1 3/4-inch wood screws are ideal for securely attaching the barstools to the underside of the desk top.
- Tools: You’ll need a spray paint handle (optional, but highly recommended for comfort and even application), a saw (manual or power saw for cutting furring strips), sandpaper (fine grit for prep and between coats), a hammer or brad nailer, and a drill/driver.
Step-by-Step Guide: How to Build Your Chic Barstool Desk
This project is truly straightforward, even for beginner DIYers. Just follow these steps, and you’ll have a stunning new desk in no time!
Step 1: Preparing Your Barstools – Clean, Prime, and Paint!
Before applying any paint, ensure your barstools are clean and free of dust or grime. A quick wipe-down with a damp cloth and a light sanding with fine-grit sandpaper (especially if they have a glossy finish) will help the paint adhere better. If your stools are made of a very dark wood or have a slick surface, a coat of primer can significantly improve paint coverage and durability.
Now for the fun part: painting! I started by spray painting the barstools with Rust-Oleum Painter’s Touch in Berry Pink. This vibrant color was perfect for adding a playful yet sophisticated touch to the girls’ room.
When spray painting, always work in a well-ventilated area, preferably outdoors. Apply paint in thin, even coats, holding the can about 8-12 inches away from the surface and moving it steadily. Multiple thin coats are always better than one thick coat, as this prevents drips and ensures a smooth, professional finish. Allow adequate drying time between coats, typically 15-30 minutes, and a full 24 hours for complete curing before handling extensively.
Step 2: Crafting Your Custom Shelves
While the painted barstools were drying thoroughly, I moved on to preparing the shelves. These shelves will connect the two barstools and provide additional storage space, making the desk even more functional. I cut several planks from a standard furring strip. Each plank measured 15 3/4 inches in length. This size was perfect for creating a stable connection between the stools and offering a usable shelf depth.
After cutting, I lightly sanded the edges of the planks to remove any splinters and create a smooth finish. Next, I stained them with Rust-Oleum Ultimate Wood Stain in Dark Walnut. I know, a shocker, right? Dark Walnut is my absolute favorite for its rich, classic appeal, and it provides a beautiful contrast against the Berry Pink. Apply the stain evenly with a cloth or brush, let it penetrate for a few minutes (refer to product instructions), and then wipe off any excess. Allow the stained planks to dry completely according to the manufacturer’s recommendations. This usually takes several hours.
Step 3: Assembling the Barstool Base and Attaching Shelves
Once your barstools are completely dry to the touch (ideally after 24 hours to prevent paint marring), it’s time to assemble the base. Position your two barstools facing each other, keeping them parallel at the desired distance for your desk width. Then, take your stained shelf planks and attach them horizontally to the inner sides of the barstools. I used nails for this step, securing the planks to the existing support beams of the stools. A brad nailer makes this incredibly quick and easy, but a hammer and finishing nails work just as well.
Ensure the planks are level and securely fastened. These shelves not only provide valuable storage for books, stationery, or decorative items but also add significant stability to the entire desk structure, effectively creating a rigid framework from your two separate stools. You can add one or two shelves depending on the height of your stools and your storage needs. I opted for multiple planks to create a strong, multi-tiered shelving unit.
Step 4: The Desk Top – Choosing, Staining, and Securing
For the desk top, I used a 20×48-inch pine project panel. These panels are fantastic because they come pre-cut and sanded, saving you a lot of time and effort. You can find them at most large home improvement stores like Lowe’s in a variety of sizes, so you can easily find one that fits your space and preferences. My panel was only $16, proving just how budget-friendly this project can be!
Before attaching, I also stained the pine panel with the same Dark Walnut stain used for the shelves. Pine can sometimes take stain unevenly, so if you’re concerned, you might consider applying a pre-stain wood conditioner beforehand. This helps to achieve a more consistent finish. Apply the stain, wipe off excess, and let it dry completely.
Once the stained top is dry, it’s time to unite all the components. Carefully lay your desk top upside down on a protected surface. Then, position the assembled barstool base (with the shelves attached) upside down on the center of the desk top, ensuring it’s perfectly aligned and centered. This upside-down method makes it much easier to secure the base to the top evenly and securely.
Using 1 3/4-inch wood screws, carefully attach the barstool structure to the underside of the pine panel. Drive screws through the flat top surface of each barstool directly into the desk top. Use multiple screws per stool to ensure maximum stability and durability. This step is critical for a strong and wobble-free desk. Make sure your screws are long enough to penetrate well into the desk top without poking through the other side!
The Final Reveal: A Shanty-to-Chic Transformation on a Budget!
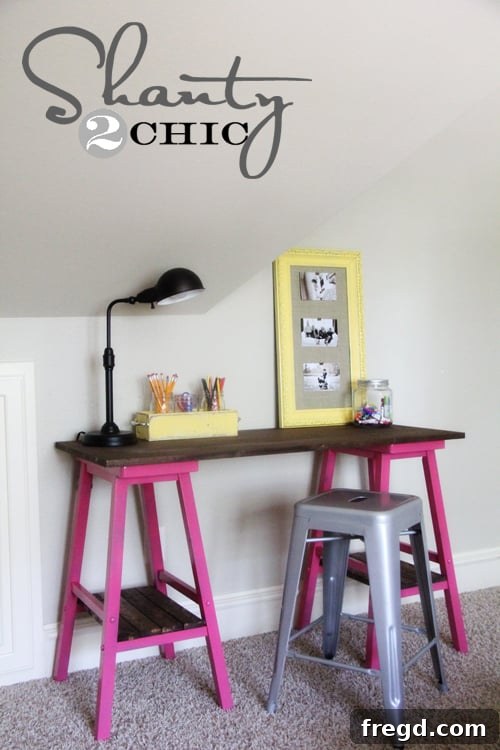
That’s it! Pretty darn simple, right? And the total cost for me was an astonishing $18 for the top and a few supplies, since I already owned the barstools and some of the paint/stain! Even if you purchase new barstools, the overall cost remains incredibly budget-friendly compared to buying a new desk of similar quality and style. This truly is my kind of desk – a perfect blend of “shanty” beginnings transformed into something oh-so-chic!
The end result is a vibrant, functional, and stylish desk that perfectly suits my girls’ room. It provides ample space for their studies and creative projects, with the added bonus of integrated shelving for organization. The Berry Pink adds a youthful pop of color, while the Dark Walnut stain grounds the piece with a touch of classic elegance. It’s amazing what a little paint, stain, and creativity can achieve!
This project serves as a fantastic reminder that you don’t always need to buy new to create something beautiful and functional for your home. With a little imagination and elbow grease, you can transform everyday items into unique pieces that tell a story and save you money.
Beyond the Desk: More DIY Inspiration for Kids’ Rooms
If you enjoyed this project, you’ll love some of the other goodies I’ve made to enhance the girls’ room and other spaces in our home. I believe in creating environments that are both beautiful and practical, and DIY projects are the perfect way to achieve that!
This Shanty Memo Frame is another simple yet impactful project, perfect for organizing notes, photos, and artwork. It adds a lovely personal touch to any wall and is incredibly useful for keeping track of important reminders.
And for a bigger project that still won’t break the bank, check out my DIY $20 Platform Bed. This Pottery Barn-inspired twin platform bed demonstrates that high-end looks are achievable on a shoestring budget with a little ingenuity and some basic carpentry skills. It’s incredibly sturdy and stylish, providing a comfortable and elevated sleeping solution.
These projects, including the barstool desk, are testaments to the power of DIY – transforming ordinary items and materials into extraordinary pieces of furniture and decor that enhance your home and your life. They provide practical solutions, reduce waste, and allow for endless customization, ensuring your space truly reflects your unique style.
Thank you so much for stopping by and checking out this exciting transformation! I truly hope this guide inspires you to look at your old furniture with fresh eyes and consider the incredible potential within them.
I would absolutely love for you to share and pin this barstool desk project below! Your shares help inspire even more people to try their hand at DIY. Have a fantastic weekend filled with creativity and perhaps your own inspiring projects!
~Whitney