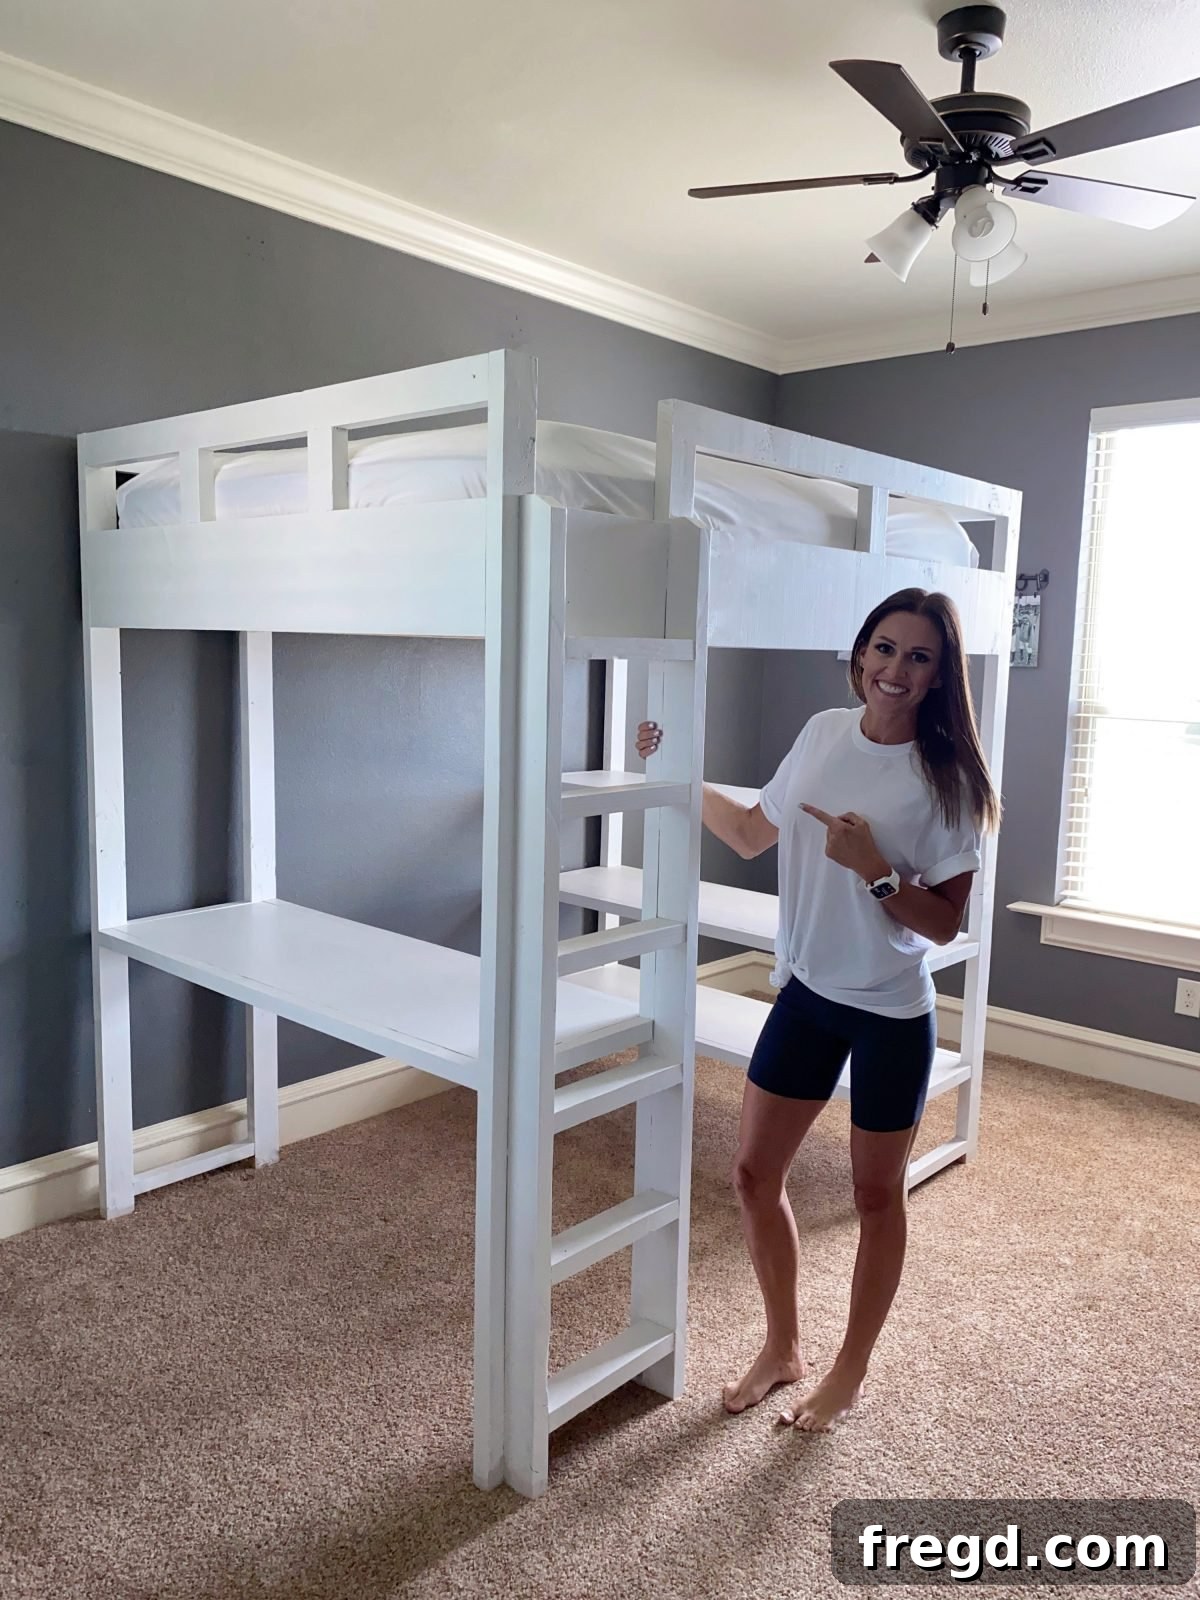
Are you looking to maximize space in a child’s bedroom or create a dedicated study zone that also doubles as a fun sleeping area? Building a DIY loft bed is an ingenious solution, offering incredible versatility and functionality. This comprehensive guide will walk you through how to build a loft bed with integrated desk and shelves, complete with free printable plans and a detailed step-by-step tutorial. Prepare to transform a cramped room into an organized, multi-purpose haven!
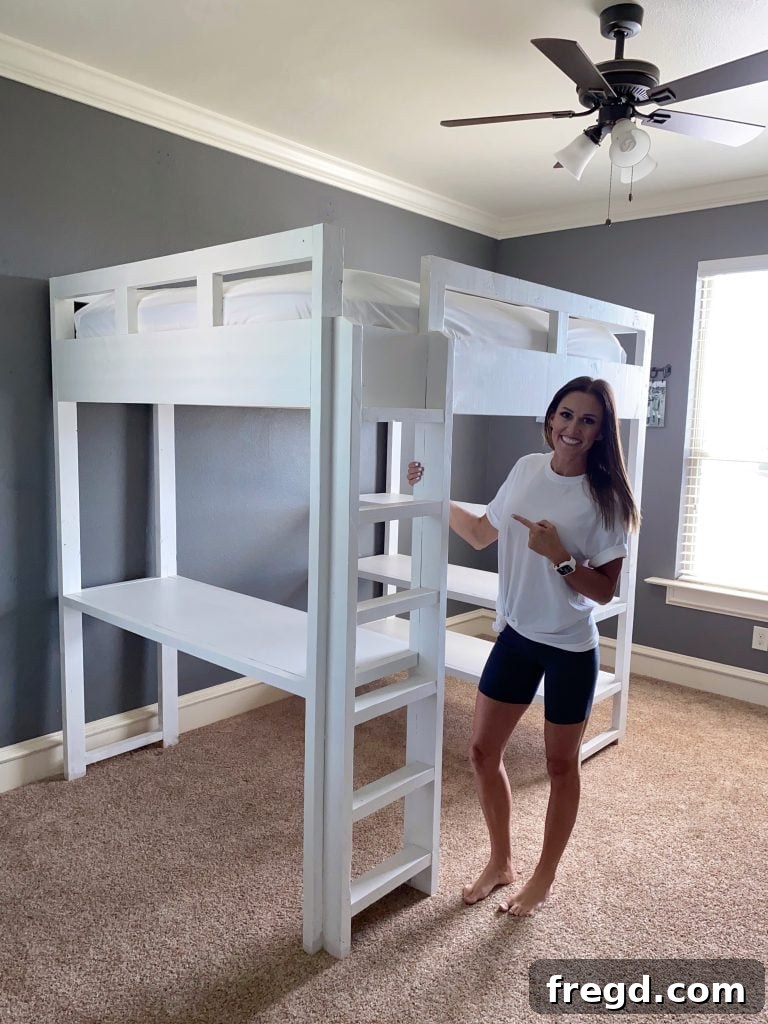
This particular DIY loft bed project was born out of a real need – my 9-year-old daughter requested a loft bed with a desk when she moved into her older brother’s room. With the rise of remote learning, I saw it as a perfect opportunity to design a creative and engaging space that would foster her enthusiasm for studying at home. This project, while substantial, is designed to be an easy build, broken down into manageable steps. Today, we’ll cover the initial phases, guiding you through the frame assembly. You can also watch the companion video for Part 1 to see these steps in action!
Watch the video tutorial for Part 1 of building this DIY Loft Bed:
Click here to watch the DIY Loft Bed Part 1 video
Table of Contents
Why Build a DIY Loft Bed?
A loft bed is far more than just a place to sleep; it’s a remarkably efficient piece of furniture that brilliantly addresses common space constraints. By elevating the sleeping area, you instantly free up valuable floor space underneath, which can be ingeniously repurposed to fit a variety of needs. This makes it an ideal choice for smaller rooms, shared bedrooms, or any space where maximizing functionality is key.
The beauty of a DIY loft bed lies in its unparalleled customizability. Unlike off-the-shelf options, building your own allows you to design a solution perfectly tailored to your specific storage and space requirements. Imagine combining a comfortable full-size bed with a spacious desk and a set of drawers for ample storage. Alternatively, you could opt for a full-size bed above, with a twin bed underneath, alongside a desk or shelving unit. For families with multiple children sharing a room, two desks or two sets of drawers can be integrated below, making it a dream setup for study or organization.
Beyond practical space-saving, a custom loft bed offers significant benefits for today’s dynamic lifestyles. For students engaging in remote learning, it provides a dedicated, clutter-free workspace that promotes focus and productivity. For growing kids and teens, it creates a personal sanctuary—a place to sleep, study, read, and relax—all within a compact footprint. Moreover, the sense of accomplishment from building it yourself and the ability to choose materials and finishes that perfectly match your home decor ensure a unique and aesthetically pleasing result. It’s not just furniture; it’s a smart investment in your home’s functionality and style.
DIY Loft Bed Plans (Free Printable + How-to Tutorial)
Undertaking a project of this scale might seem daunting, but the rewards are truly incredible. This DIY loft bed, while a substantial piece of furniture, is incredibly cost-effective compared to retail alternatives. For approximately $300 (depending on lumber prices in your region), you can construct what essentially amounts to three distinct pieces of furniture: a comfortable bed, a functional desk, and a practical set of shelves. This makes it an excellent value proposition for any homeowner looking to enhance their living space without breaking the bank.
Our goal is to make this project accessible to everyone, which is why we’re offering free printable plans. These detailed plans provide all the measurements and cut lists you’ll need to successfully build your own loft bed. Simply click the link below to access them. Please note that this tutorial covers Part 1 of the build – the frame assembly. You can find Part 2 of this DIY Loft Bed build, which focuses on finishing touches and additional features, HERE.
Click HERE to jump to the free printable plans and full supply list!
Now, let’s gather our tools and materials and get ready to transform some lumber into a fantastic, multi-functional loft bed!
How to Build a DIY Loft Bed (Step-by-Step Guide)
Before diving into the construction, it’s crucial to prepare your workspace and ensure you have all the necessary tools and materials on hand. A well-organized setup will make the building process smoother and more enjoyable. Safety should always be your top priority, so remember to wear appropriate personal protective equipment, such as safety glasses, when operating power tools.
Tools Needed for a Loft Bed Project
Having the right tools is half the battle. Here’s what you’ll need for this project:
- Table Saw: Essential for making precise, long cuts and ripping wider boards to specific dimensions.
- Miter Saw: Perfect for accurate crosscuts and angled cuts, ensuring all your pieces meet squarely.
- Drill: Indispensable for pre-drilling holes and driving screws quickly and efficiently.
- Kreg Jig: A game-changer for creating strong and discreet pocket hole joints, making assembly much cleaner.
- Tape Measure: For all your measuring needs; remember the adage: “measure twice, cut once!”
- Pencil: For marking your cuts and pocket hole locations.
- Safety Glasses: Always protect your eyes when working with power tools.
- Clamps: To hold pieces securely in place during drilling and gluing.
Materials & Lumber List
The strength and durability of your loft bed depend heavily on the quality of your materials. We’ve selected robust framing lumber and hardwood plywood to ensure a sturdy and long-lasting structure.
- 4 – 2x10x8 Framing Lumber: These will form the main structural elements of your bed frame, providing critical support.
- 14 – 2x4x8 Framing Lumber: Used for various framing components, offering excellent strength and stability.
- 11 – 2x2x8 Framing Lumber: (Note: You can typically rip these from 2x4s with a table saw to save on cost and ensure consistency.) These are great for lighter support structures and cleats.
- 12 – 1x4x8 Pine or Common Boards: Ideal for aesthetic elements, trim, or lighter support pieces.
- 2 – 3/4″x48″x96″ Hardwood Plywood: (Birch was used in this project.) This will be used for the desk surface, shelves, and potentially other flat surfaces, offering a smooth and durable finish.
- 1 1/4″ Pocket Hole Screws: For joining smaller components and plywood.
- 2 1/2″ Pocket Hole Screws: The primary fasteners for joining the larger framing lumber with strong pocket hole joints.
- 1 1/4″ Brad Nails: For attaching thinner pieces or holding components temporarily while glue dries.
- 3″ Wood Screws: Crucial for securely anchoring the loft bed to wall studs, ensuring stability and safety.
- 1 1/4″ Wood Screws: Versatile screws for general assembly and attaching various components.
- Wood Glue: Essential for creating incredibly strong, long-lasting joints when combined with screws.
Step 1 – Build the Front and Back Loft Bed Assemblies
We’ll begin by constructing the largest components of the bed frame: the front and back assemblies. These pieces will define the overall length and height of your loft bed.
Cut and Prep Lumber for Back Assembly
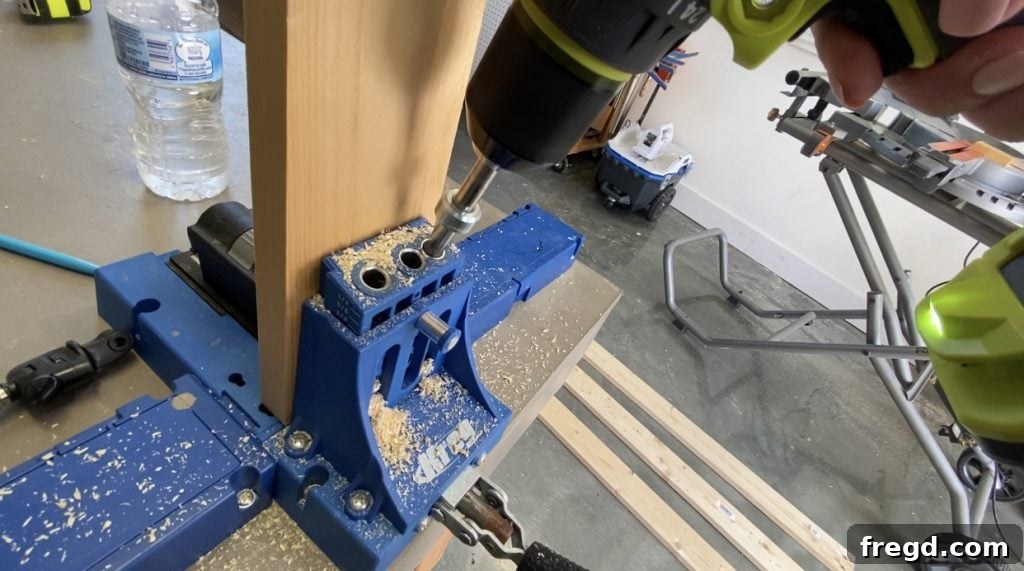
Carefully consult your free printable plans for the precise measurements of each piece required for the back assembly. Using your miter saw, cut the lumber to size. Once cut, set your Kreg Jig to the appropriate depth for your lumber (typically 1 1/2 inches for 2x lumber) and drill pocket holes as indicated in the cut list. Pay close attention to the orientation of the pocket holes – they should be positioned strategically for strong, concealed joints. Remember to drill pocket holes on the 2×10 board so they face the back, ensuring a clean finish on the visible side.
Assemble the Back Rails
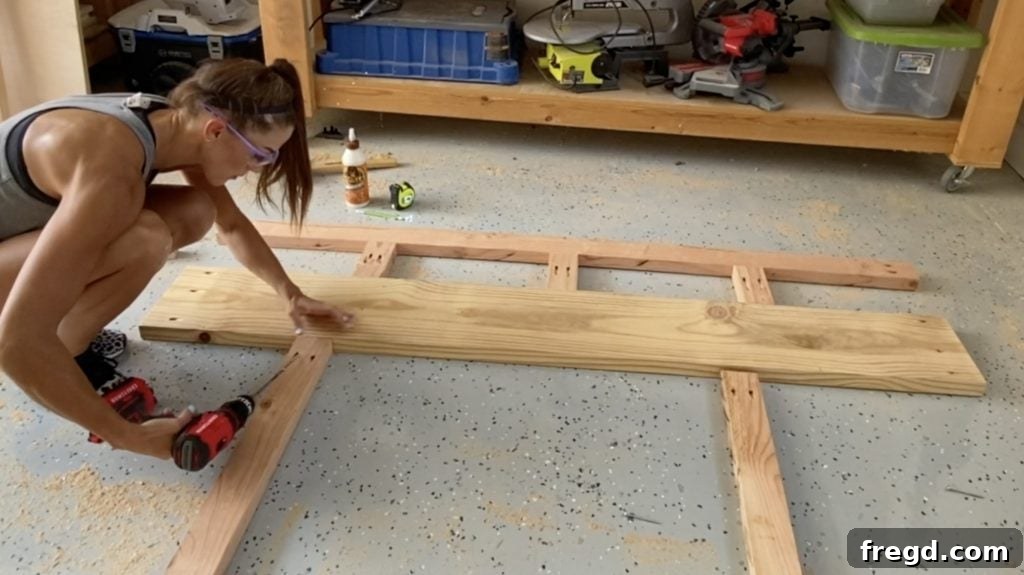
With your pieces cut and pocket holes drilled, it’s time to assemble the back frame. Apply a generous bead of wood glue to all mating surfaces before clamping the pieces together. Then, secure them firmly with 2 1/2″ pocket hole screws. Ensure all joints are tight and square as you assemble. Double-check that the 2×10 board’s pocket holes are indeed facing the back, ready for attachment to the wall.
Cut and Assemble the Front Assembly
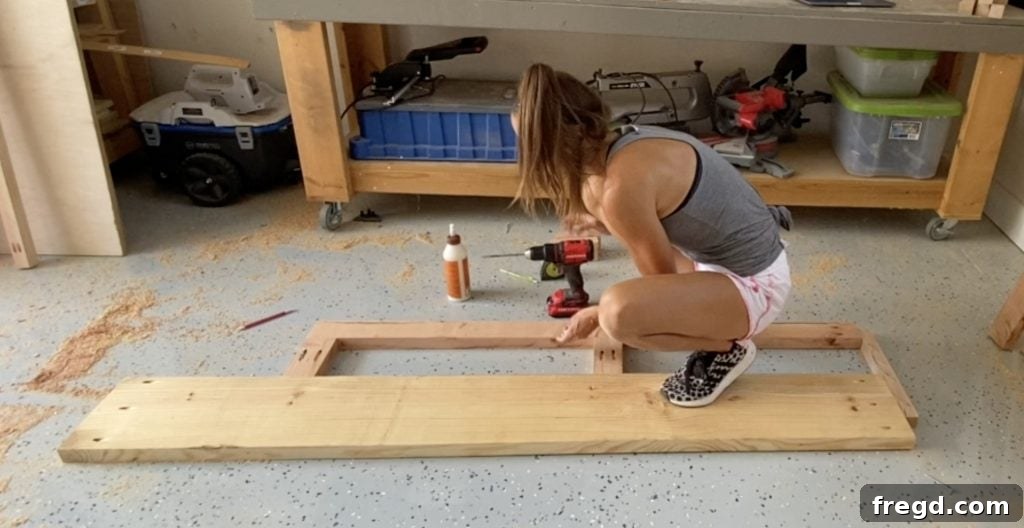
Now, repeat the process for the front assembly. Cut all the necessary pieces to size according to your cut list, drilling 1 1/2″ pocket holes where indicated. Once the cuts are precise, apply wood glue to the joints and use 2 1/2″ pocket hole screws to attach the pieces together. Pay meticulous attention to maintaining square angles and flush surfaces for a professional finish. This front assembly will mirror the back in its structural integrity, providing robust support for the bed.
Step 2 – Build the Loft Bed Side Assemblies
The side assemblies are critical for supporting the loft bed and integrating the functional elements like the desk and shelves. Accuracy in this step is crucial for a stable and aesthetically pleasing final product.
Measure and Cut Shelf Side Pieces
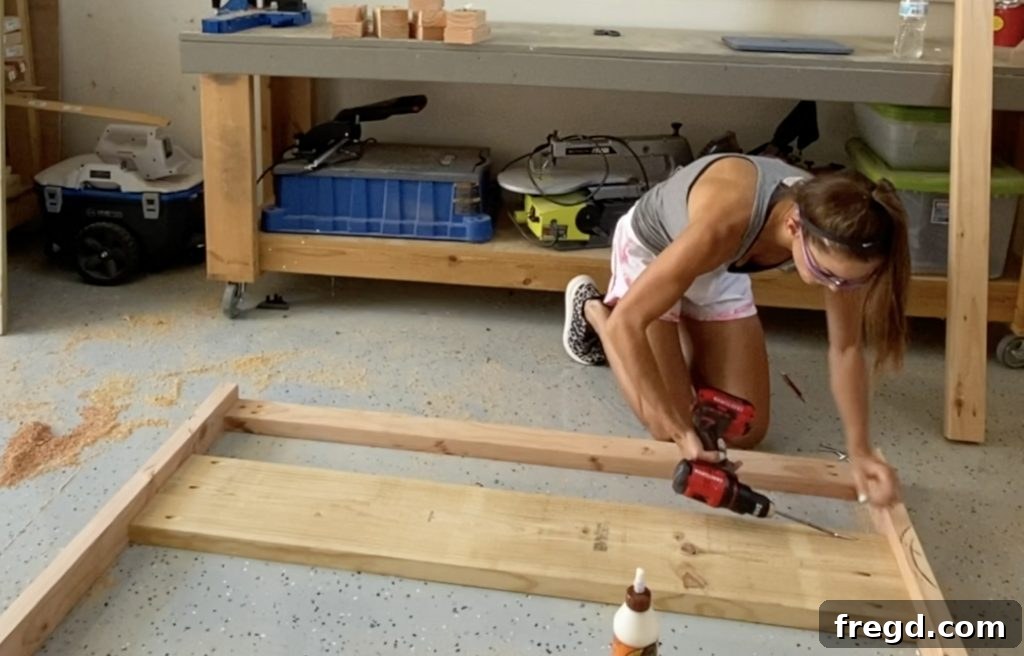
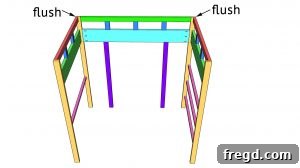
Refer to your plans to cut the components for the shelf side assembly. Drill 1 1/2″ pocket holes into the designated pieces, again following the cut list precisely. When assembling, it’s essential that the outside edges of the horizontal pieces are perfectly flush with the outside edges of the vertical legs. This alignment ensures a seamless fit with other components and provides a clean, finished look. Use 2 1/2″ pocket hole screws and wood glue to create strong, durable joints.
Build the Desk Side of the Loft Bed
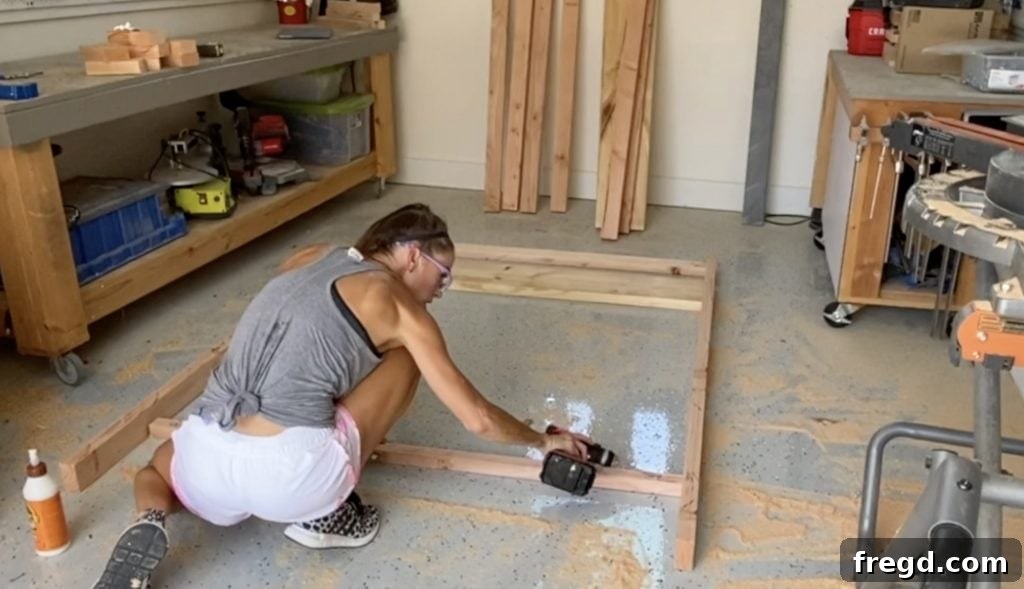
Next, assemble the desk side. As with the shelf side, cut all pieces to size according to your detailed cut list and drill 1 1/2″ pocket holes. Similar to the previous step, ensure the outside edges of the horizontal pieces align perfectly flush with the outside edges of the vertical legs. Apply wood glue to all joints and secure them tightly with 2 1/2″ pocket hole screws. This careful attention to detail during assembly will ensure a robust and visually appealing structure for your integrated desk.
Step 3 – Assemble the Loft Bed Frame
With the front, back, and side assemblies complete, it’s time to bring everything together and establish the main structure of your loft bed. This phase requires careful alignment and secure fastening to ensure the entire frame is stable and safe.
Attaching the Back of the Bed to the Wall
Anchoring the loft bed securely to the wall is paramount for safety and stability. This step is critical, so take your time and ensure proper fastening.

First, locate the wall studs using a stud finder. To account for the thickness of your baseboards, I recommend installing a scrap 2×4 board horizontally to the wall studs at the height where the back assembly will rest. This spacer ensures the back assembly sits flush against the wall above the baseboards. Use long, sturdy screws to fasten this scrap piece securely into at least two studs.
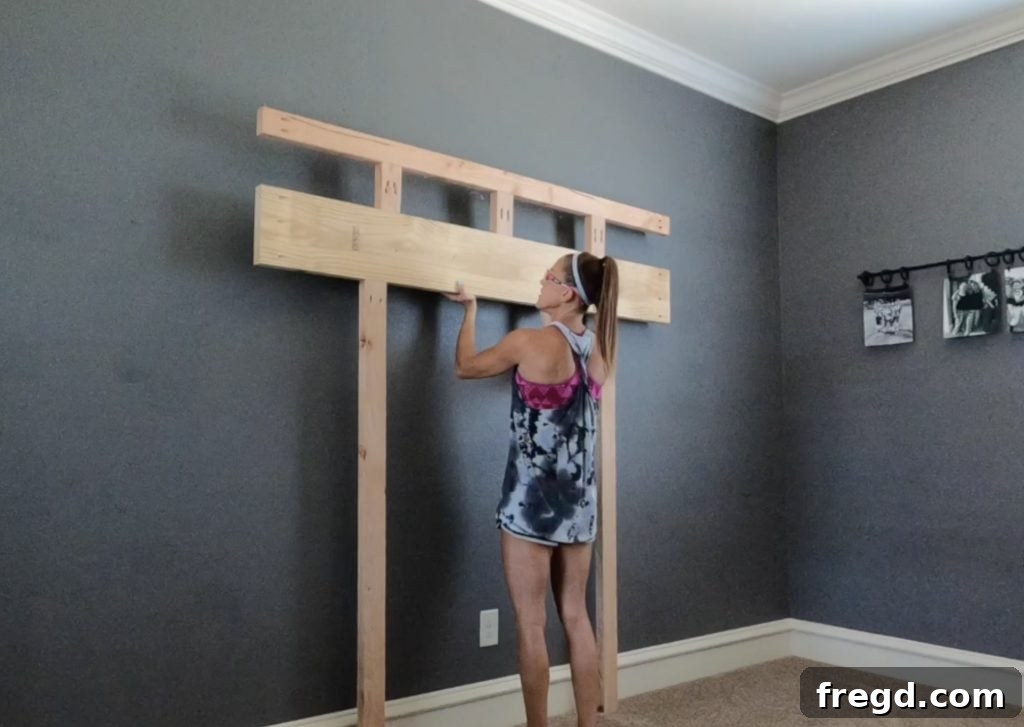
Once the spacer is in place, position your assembled back frame against the wall, aligning it with the spacer. Drive 3″ wood screws through the back assembly directly into the wall studs, ensuring a strong connection. Use multiple screws across the width of the frame for optimal security. This permanent attachment to the wall is a key factor in the overall stability of your DIY loft bed, making it safe for both children and adults.
Connect Front, Back, and Side Panels to Form the Frame
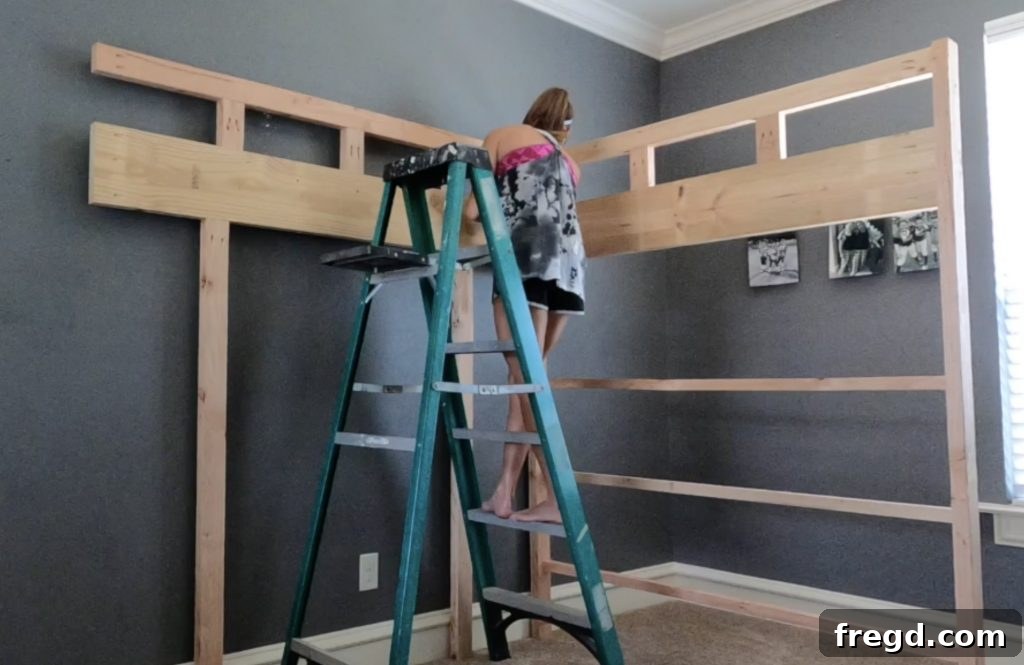
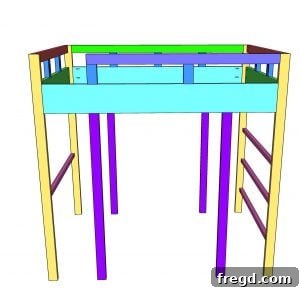
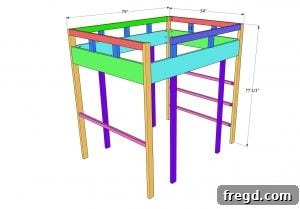
With the back assembly firmly anchored, bring in your assembled side components (the shelf side and the desk side). Align each side assembly with the corresponding end of the back assembly. Apply wood glue generously to the mating surfaces, then use 2 1/2″ pocket hole screws to attach the side assemblies to the back. Ensure these connections are tight and the corners are square. Having an extra set of hands for this step can be incredibly helpful for holding the pieces in alignment while you fasten them.
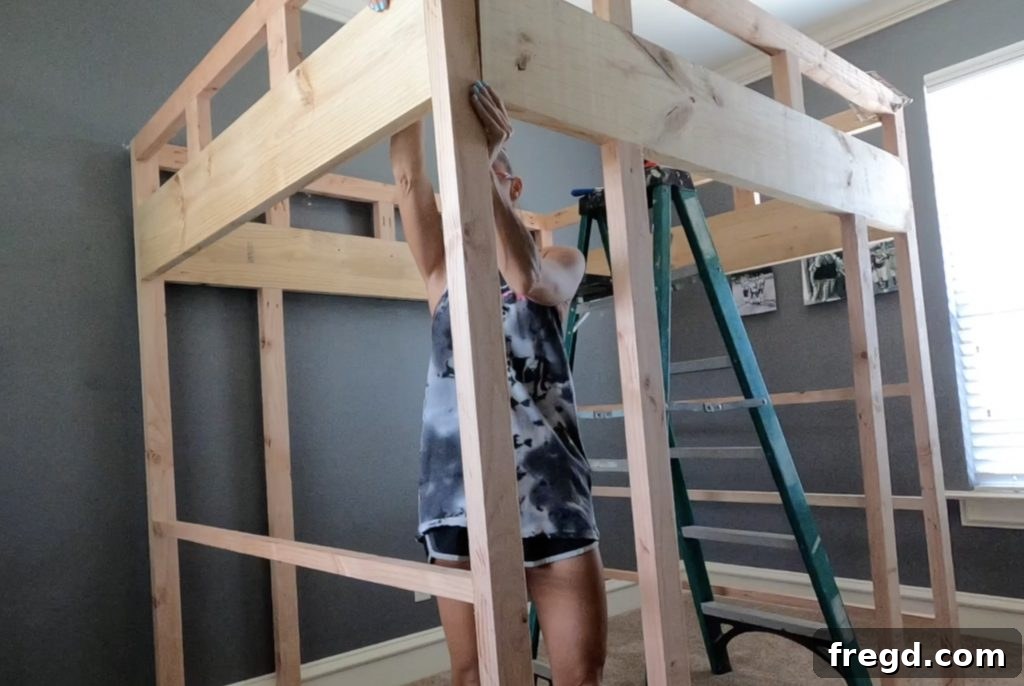
Finally, position the front assembly, aligning it with the open ends of the two side assemblies. Apply wood glue to the joints, clamp the pieces securely, and then drive 2 1/2″ pocket hole screws to connect the front assembly to the sides. At this point, you should have a complete, free-standing loft bed frame that looks robust and ready for the next stage of the build.
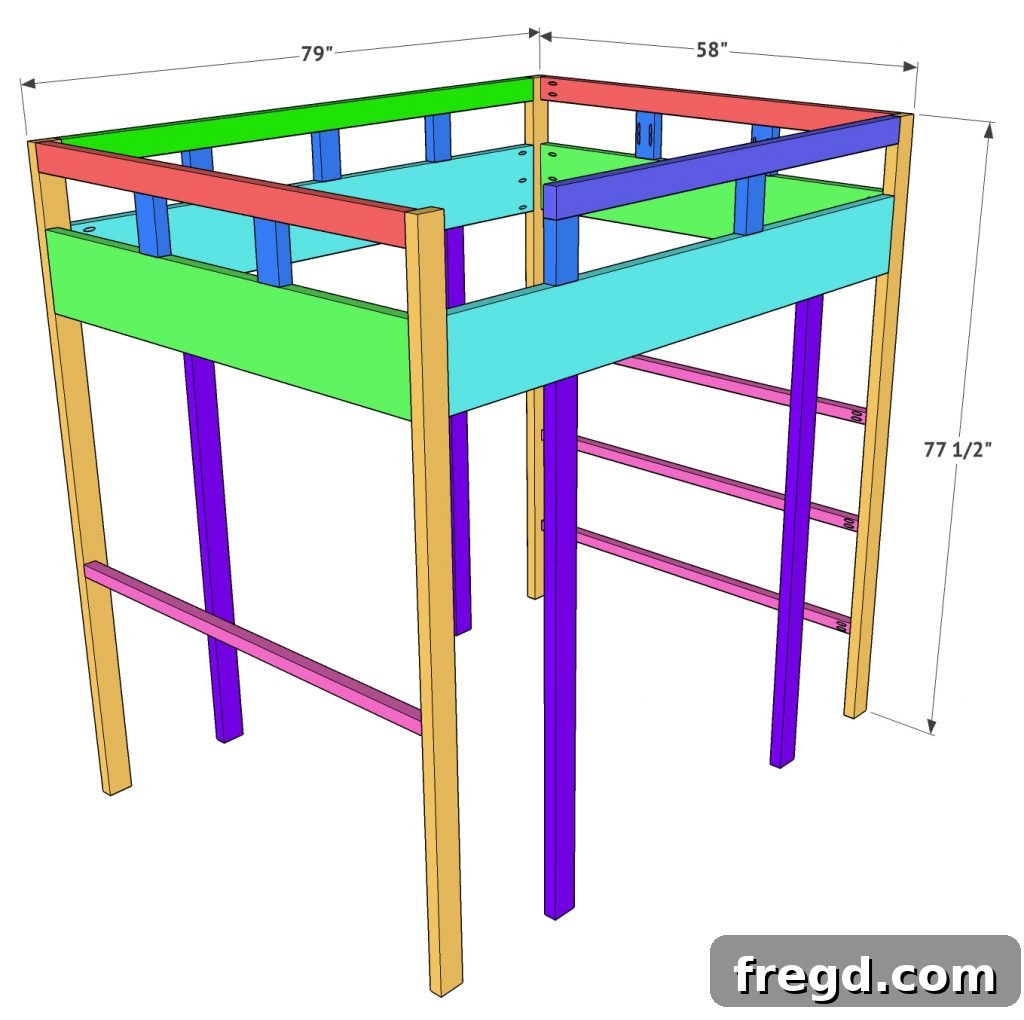
Congratulations! Your main DIY loft bed frame should now be fully assembled and securely mounted. This marks the successful completion of Part 1 of our build. The structure is robust and ready for the next phase of customization and finishing.
I’ll be back very soon with Part 2 of this Loft Bed tutorial, where we’ll delve into adding the desk, shelves, and other exciting features. Don’t forget to share your progress and completed builds with us on social media using #shanty2chic so we can celebrate your hard work and inspire others!
DIY Loft Bed FAQs
The cost to build this DIY loft bed is surprisingly affordable, averaging around $300 for lumber. This is a fraction of the price you would pay for a comparable multi-functional loft bed from a retail store. The exact cost can vary based on fluctuations in lumber prices in your specific area and your choice of materials. Our comprehensive shopping list, included in the free plans, will help you calculate a precise estimate for your project.
This specific loft bed design is optimized to fit a full-size mattress, offering ample sleeping space. However, the beauty of DIY is flexibility! You can easily modify the provided plans to accommodate a twin, queen, or even a king-size mattress. Adjusting the length and width of the bed frame components, particularly the side and end rails, would be the primary modification needed.
Absolutely! This loft bed is engineered for exceptional sturdiness and durability. It’s constructed using robust framing lumber, strengthened with powerful pocket hole joints, and most importantly, securely anchored into the wall studs. These construction methods ensure that the bed can safely support both children and adults, providing peace of mind for years to come.
Yes, the design of this loft bed is highly adaptable to suit your unique needs. You can certainly modify the plans to include a twin bed underneath instead of, or in addition to, the desk and shelves. This might involve removing either the desk or the shelving unit to make space for the lower bed. The versatile design also allows for other configurations, such as two sets of drawers, two desks, or any combination that best fits your room layout and functional requirements.
Download the Free DIY Loft Bed Plans
Ready to get started? Your journey to a more organized and functional space begins here! Download the comprehensive free DIY Loft Bed plans to guide you through every cut and joint. These plans include detailed diagrams, measurements, and a full supply list to ensure a smooth build process.
DIY Loft Bed Part 1: Detailed Plan
Get the full set of Part 1 Plans, including the complete supply list and all cut lists, right HERE!
Tools
- Miter Saw
- Drill
- Kreg Jig
- Table Saw (optional, but recommended for ripping 2x2s)
- Brad Nailer
- Sander
- Tape Measure
- Pencil
- Safety Glasses
Supply List
- 4 2x10x8 Framing Lumber
- 14 2x4x8 Framing Lumber
- 11 2x2x8 Framing Lumber (can be ripped from 2x4s)
- 12 1x4x8 Pine or Common Boards
- 2 3/4″x48″x96″ Hardwood Plywood (Birch recommended)
- 1 1/4″ Pocket Hole Screws
- 2 1/2″ Pocket Hole Screws
- 1 1/4″ Brad Nails
- 3″ Wood Screws
- 1 1/4″ Wood Screws
- Wood Glue
Instructions
Cut List Overview
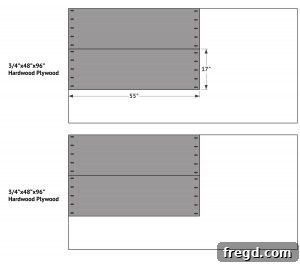
Refer to the downloadable plans for complete and detailed cut lists. These images provide a visual summary of the required pieces:
-
Cut List 1: Main structural components.

-
Cut List 2: Secondary framing elements.
-
Cut List 3: Smaller support pieces.
-
Cut List 4: Plywood and panel cuts.



Front and Back Assemblies Construction
-
Step 1: Prep Back Assembly Pieces. Cut all components for the back assembly to their specified sizes. Drill 1 1/2″ pocket holes according to the cut list provided in your free plans. Remember to position the pocket holes on the 2×10 board to face the back for a clean finish.
-
Step 2: Prep and Assemble Front Assembly. Cut all pieces for the front assembly to size and drill 1 1/2″ pocket holes as per the cut list. Apply wood glue to all mating surfaces and join the pieces together using 2 1/2″ pocket hole screws, ensuring all joints are square and secure.
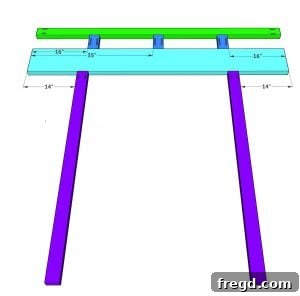
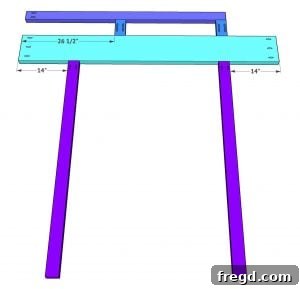
Side Assemblies Construction
-
Step 1: Build the Shelf Side Assembly. Cut the lumber for the shelf side assembly to the dimensions specified in the cut list. Drill 1 1/2″ pocket holes as indicated. Join the pieces using wood glue and 2 1/2″ pocket hole screws, making sure the outside of the horizontal pieces are flush with the outside edges of the vertical legs.
-
Step 2: Build the Desk Side Assembly. Cut the components for the desk side assembly to size, referring to the cut list. Drill 1 1/2″ pocket holes as needed. Attach the pieces together with wood glue and 2 1/2″ pocket hole screws, ensuring the horizontal pieces are flush with the outside edges of the legs for a clean finish.
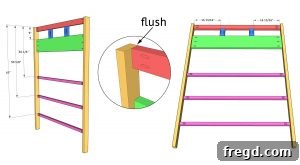
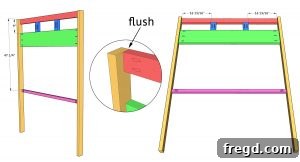
Building the Loft Bed Frame
-
Step 1: Mount Back and Attach Side Assemblies. First, locate wall studs and install a scrap 2×4 spacer to account for baseboard thickness. Then, securely attach the back assembly to the wall studs using 3″ wood screws. Next, position the side assemblies and attach them to the back assembly using 2 1/2″ pocket hole screws and wood glue, ensuring tight and square connections.
-
Step 2: Connect the Front Assembly. Bring the front assembly into place. Apply wood glue to the mating surfaces and securely attach it to the side assemblies using 2 1/2″ pocket hole screws. Verify all corners are square and all connections are firm.
-
Step 3: Completion of Part 1. Your main loft bed frame is now fully assembled and securely in place! This marks the end of Part 1 of the build. You’ve established a solid and safe foundation for your multi-functional loft bed. We’ll be back soon with the second half of this Loft Bed tutorial, focusing on adding the desk, shelves, and other finishing details. Make sure to share your progress with us on social media using the hashtag #shanty2chic so we can see and share your amazing builds!
Happy Building!