
Transforming Spaces: Crafting Personalized Wood Wall Letters for a Dream Room
Hello fellow DIY enthusiasts and home decor lovers!
I hope this message finds you well, perhaps even buzzing with inspiration for your next home project. As a mom and a lover of all things handmade, there’s nothing quite like the satisfaction of personalizing a space to make it truly feel like home. This past weekend, after enjoying a wonderful Mother’s Day surrounded by family and the happy chaos of children – a special shout-out to the built-in babysitters who made relaxation possible! – I managed to squeeze in a super quick, yet incredibly impactful DIY project. This endeavor was all about adding that perfect, personalized touch to a very special room: my daughter’s newly created sanctuary.
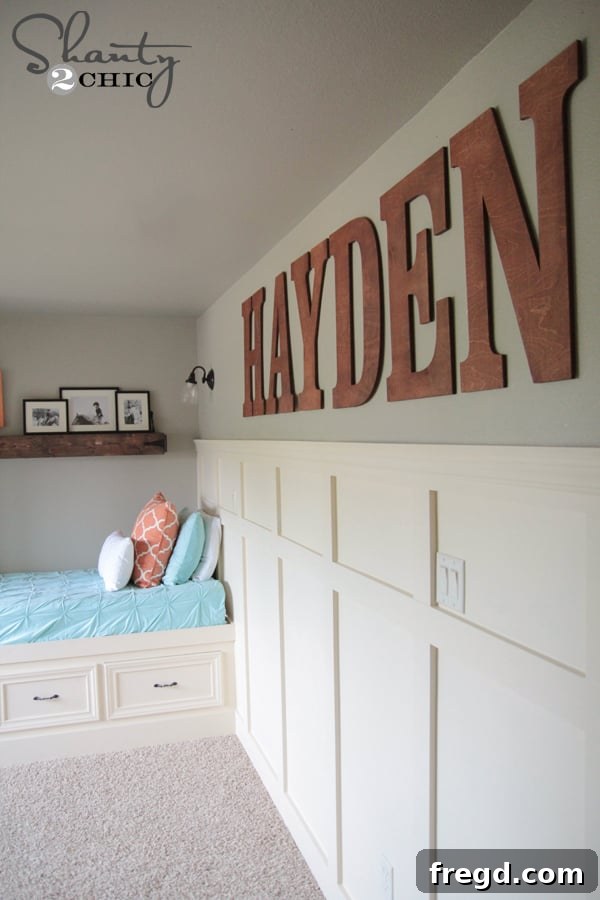
For those who have been following along, you’ll know that we recently undertook a significant home improvement. We transformed an open loft area into a private, cozy bedroom just for my daughter. This space has quickly become one of my favorite corners of our home, not just for its aesthetic appeal but for the sheer joy it brings her to finally have a room of her own. As the room came together, with its striking board and batten wall, I envisioned the perfect accent above it: large, beautiful wood letters spelling out her name. I wanted something substantial, something that could be stained to complement her existing shelf, adding a cohesive and warm touch to her personal haven.
The Hunt for the Perfect Custom Wood Letters
My quest for the ideal wood letters began with visits to local craft and home improvement stores. However, I quickly hit a wall. Most of what I found was made from MDF (medium-density fiberboard), which, while versatile, wasn’t quite the solid, stainable wood I had in mind. More often than not, the available options were also too small, lacking the bold presence I envisioned for her feature wall. I needed something that truly stood out, a statement piece rather than just a subtle embellishment. The idea was to create a focal point that celebrated her individuality and the joy of having her own space.
Frustrated but determined, I turned to the internet, and that’s when I discovered a gem: craftcuts.com. This website was a game-changer! It offered exactly what I had been searching for – high-quality, custom-cut wood letters with an incredible array of customization options. The moment I landed on their site, I knew my search was over. They had everything from various fonts and sizes to different wood types, allowing for complete creative freedom. The potential for personalization was exactly what this project needed. Take a look at these beauties:
Aren’t they absolutely adorable? I was instantly smitten! The quality and potential for customization were evident from the photos, and I couldn’t wait to get my hands on them.
Designing Your Personalized Wood Wall Decor
What truly sets Craftcuts.com apart is the ability to tailor every detail to your vision. You’re not just buying pre-made letters; you’re designing a custom piece of art. The most enjoyable – and perhaps the most challenging – part for me was narrowing down the endless possibilities. Should I go for a whimsical script or a classic serif? What size would best fill the space above the board and batten without overpowering it? And which wood type would take the stain perfectly to match the existing decor?
After much deliberation, I decided on the timeless “Clarendon Condensed” font. Its clean lines and classic appeal felt perfect for a child’s room that could grow with her. For the size, I opted for a substantial 22-inch height, ensuring the letters would be a prominent and eye-catching feature on the wall. As for the material, Baltic Birch wood was my choice. Known for its smooth grain and excellent staining properties, I knew it would absorb the stain beautifully, resulting in a rich, consistent finish. I placed my order, and just a few days later, my custom-cut wood letters arrived, perfectly packaged and ready for their transformation.
Bringing the Letters to Life: The Staining Process
The beauty of custom-cut letters from Craftcuts.com is that they do all the heavy lifting – cutting, shaping, and even a preliminary sanding. This left me with the fun part: adding the finishing touches! My goal was to match the rich, warm tones of her existing wooden shelf, and for this, I turned to a trusted favorite: Varathane stain in American Walnut. This particular stain is a staple in our DIY projects for several excellent reasons.
Firstly, it’s incredibly efficient. It dries in under an hour, which is a huge bonus when you’re eager to see your project come to life. No long waiting times between coats or before handling! Secondly, and perhaps even more appealing, it typically requires only one coat to achieve a deep, beautiful finish. This saves both time and product, making the staining process quick and hassle-free. You can readily find Varathane stain at your local Home Depot, making it easily accessible for any DIY enthusiast.
To stain the letters, I simply applied the Varathane American Walnut stain using a foam brush, ensuring even coverage across all surfaces and edges. The Baltic Birch wood absorbed the stain beautifully, resulting in a rich, consistent color that perfectly matched my vision. The quick-drying formula meant I could finish all the letters in one sitting without much interruption. It was truly a “woohoo!” moment, seeing the plain wood transform into elegant, rich pieces that would soon adorn her wall.
Effortless Installation: Hanging Your Custom Wood Letters
Once the stained letters were completely dry, it was time for the final, satisfying step: hanging them on the wall. For this, I chose another one of my absolute favorite DIY hacks: 3M Command Picture Hanging Strips. These strips are, quite simply, amazing. They make hanging virtually anything on your walls incredibly easy, and best of all, they’re damage-free. This is particularly important when decorating a child’s room, as tastes and decor might change over time, and you want the flexibility to update without patching and repainting.
Using Command Strips is straightforward and incredibly effective. Here’s how I did it:
-
Prepare the Strips: Take two Command Strips and press them together firmly until you hear a click, creating a strong, interlocking bond. These are designed to hold securely yet detach cleanly.
-
Attach to the Letter: Peel off one side of the protective backing from the connected strips. Carefully align and press the strips firmly onto the back of each wood letter. For larger letters like these, I used two sets of strips per letter to ensure maximum stability and hold.
-
Mount to the Wall: Once the strips are securely attached to the letter, peel off the remaining protective backing from the side facing the wall. Carefully position the letter on the wall. Before pressing firmly, ensure your placement is perfect. Once you’re happy with the position, press the letter firmly against the wall for about 30 seconds. This allows the adhesive to bond effectively with both the letter and the wall surface.
The whole hanging process, from getting the strips ready to leveling each letter, took me about 15 minutes. It was truly “easy peasy,” and the result was perfectly aligned letters securely fastened to the wall without a single nail hole!
The Grand Reveal: A Room Transformed
And just like that, the project was complete! The custom-stained wood letters now proudly grace her board and batten wall, adding a personalized, warm, and sophisticated touch to her new room. The rich American Walnut stain perfectly ties in with the existing decor, creating a cohesive and inviting atmosphere. It’s more than just decor; it’s a statement of ownership and personality, truly making the room her own.
The best part? She absolutely loves them! It’s such a wonderful reminder that this is HER room, a private sanctuary she doesn’t have to share for the first time in her life. That feeling of individuality and ownership is something every child deserves, and these personalized wood wall letters help solidify that sentiment. This project wasn’t just about decorating; it was about creating a sense of belonging and joy.
Embark on Your Own Custom Letter Project!
If you’re looking for a simple yet impactful way to personalize a bedroom, nursery, playroom, or even a living space, custom wood letters are an excellent choice. They offer versatility, durability, and a unique touch that store-bought items simply can’t replicate. Whether you stain them, paint them, or leave them natural, they are sure to add character and warmth to any wall.
I truly appreciate you stopping by and taking the time to read about this fun and rewarding project! If you’ve been inspired to add a similar custom touch to your home, I highly encourage you to explore the fantastic options available at craftcuts.com. Their quality and customization choices are unparalleled, making them my go-to for wood lettering. Don’t forget to share this project and PIN it for future inspiration!
Happy crafting!
~Whitney
Further Inspiration: Explore More Room Transformations
This personalized wood letter project is just one piece of the puzzle in creating my daughter’s dream room. If you enjoyed this DIY, you might also love seeing the other projects we completed in her space. Each one contributed to building a cohesive, functional, and beautiful room that she truly adores. Click on the photos below to discover the full tutorials for these complementary DIYs:
DIY Floating Rustic Shelf (or Mantle)
A sturdy and stylish addition, perfect for displaying books, decor, or even more personalized touches. This shelf complements the custom letters beautifully.
DIY Board and Batten Wall Tutorial
Learn how to create that stunning architectural detail that provides the perfect backdrop for wall letters and other decor elements, adding depth and character to any room.
DIY Built-In Storage Bed
Maximize space and add functionality with a custom built-in bed that offers storage solutions, making the most of every square inch in a child’s bedroom.