
Hello DIY Enthusiasts!
Transform Your Bedroom: Building High-End Nightstands on a Budget
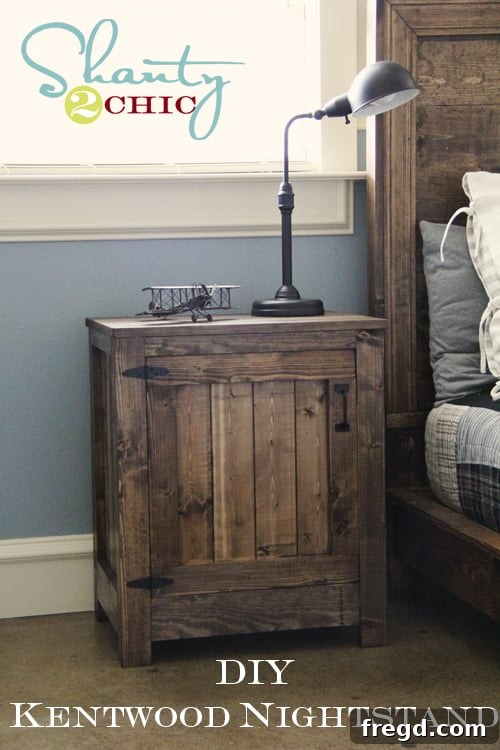
I’m absolutely thrilled to pull back the curtain on my latest woodworking adventure – a project that blends high-end aesthetics with practical, budget-friendly construction. As many of you know, I have a soft spot for the sophisticated, rustic charm of Restoration Hardware’s designs. So, when I stumbled upon their Kenwood Nightstand on the Baby and Kid site, I was instantly captivated. The elegant lines, the sturdy build, the timeless appeal – it was everything I envisioned for a perfect bedroom accent. The only hurdle? The price tag. But where there’s a design dream, there’s always a DIY solution!
Instead of letting the cost deter me, I immediately reached out to my incredibly talented friend, Ana White, the queen of accessible woodworking plans. With her brilliant guidance, these coveted nightstands transformed from a luxury item into a rewarding, achievable project. And let me tell you, what initially seemed like a complex build turned out to be surprisingly straightforward and immensely satisfying. You don’t need to be a seasoned carpenter to tackle this; with the right plans and a few key tools, you can create something truly beautiful for your home.
Unlock the Potential: Get Your Free Nightstand Plans Here!
Ready to embark on your own building journey? The detailed, easy-to-follow plans for these stunning nightstands are available right HERE on Ana White’s website. These plans break down each step, making the entire process manageable and enjoyable for DIYers of all skill levels. They provide precise measurements and instructions, ensuring that even beginners can achieve professional-looking results. Building from plans not only saves you money but also gives you a deep sense of accomplishment and the satisfaction of knowing you crafted something unique for your space.
A Glimpse into the Workshop: My Building Journey and Expert Tips
To give you a comprehensive overview and help you navigate your own build, I’ve documented my progress with pictures and included some valuable tips I picked up along the way. Let’s dive into the practical aspects of bringing these beautiful nightstands to life.
The Game Changer: Mastering Pocket Hole Joinery with the Kreg Jig®
One tool that truly revolutionized this project, and indeed all my furniture builds, is the Kreg Jig®. If you’re serious about building sturdy, professional-looking furniture, this is an absolute must-have in your arsenal. The Kreg Jig creates strong, discreet pocket holes that allow you to join pieces of wood with incredible precision and stability. It eliminates the need for complicated joinery techniques, making assembly faster, easier, and resulting in furniture that feels incredibly robust and durable. Its simplicity and effectiveness are unparalleled, especially for projects like these nightstands where you want clean lines and hidden fasteners.
Crafting the Side Panels: Understanding the Build Structure
Here’s a look at the foundational side panels of my nightstands. Preparing these correctly is crucial for the overall integrity and appearance of your finished piece.
In the image above, you can clearly distinguish between the front and back of the side frames. The panels on the right represent the backside of the frame, where you’ll find the expertly placed pocket holes created with the Kreg Jig. These holes are intentionally positioned on the inside or back where they won’t be visible in the final assembly, maintaining the clean aesthetic of the nightstand. Conversely, the panels on the left showcase the front of the sides, which will be prominently displayed, free of any visible fasteners. This meticulous attention to detail ensures a polished, store-bought finish for your DIY creation.
Selecting the Right Planks: My Material Journey and Smart Alternatives
For the planked sections of the nightstands, I initially envisioned using 4×8-foot sheets of plank paneling. However, my local Lowe’s only stocked this in MDF (medium-density fiberboard), which wasn’t ideal for my plan to stain the finished product. MDF tends to absorb stain unevenly and doesn’t showcase wood grain, which was central to the look I was aiming for. So, I continued my search and happily discovered a fantastic alternative: pre-cut, click-together wood planks.
These planks were a true game-changer! They are designed to easily interlock, simplifying the paneling process significantly. Not only did they make my job incredibly easy, but they also delivered the authentic wood grain and texture perfect for staining. I would enthusiastically recommend using these if you’re striving for a similar high-quality, planked aesthetic without the hassle of cutting individual boards. They were an excellent value at approximately $10 per package, and I found that one package was sufficient for each nightstand, making this a very cost-effective and time-saving choice.
Attaching the Planks: Bringing the Sides to Life
Once I had my ideal planks, the next step was to securely attach them to the backside of the prepared side frames. Here’s how they looked once nailed into place:
And from the front, showcasing the beautiful, seamless planked appearance:
Building the Base: A Solid Foundation
For the bases of both nightstands, I utilized a single 2×4-foot sheet of 3/4-inch plywood. Plywood is an excellent choice for bases due to its stability, strength, and cost-effectiveness. It provides a flat, robust surface that will support the entire structure of the nightstand reliably.
To ensure a strong and clean attachment of the side panels to the base, I added pocket holes to the bottom perimeter of the plywood base. This technique, again utilizing the Kreg Jig, allows screws to be driven in at an angle from underneath, securely fastening the sides without any visible hardware on the exterior. This method is not only strong but also incredibly neat, contributing to the professional finish of your furniture.
The Top Planks and a Secret to a Professional Finish
Attaching the top planks was a breeze thanks to my trusty nailer. This tool makes quick work of securing the planks, ensuring they are flush and firmly in place. While a nailer is convenient, always remember to use wood glue in conjunction with nails for maximum strength and durability. The glue provides the primary bonding strength, while the nails hold the pieces together while the glue dries.
Here’s a small but significant tip for achieving that high-end, custom look: after attaching all your planks and assembling the main structure, take an 80-grit sanding block to all the edges. Gently round them off just a bit. This subtle detail eliminates sharp corners, giving your piece a softer, more refined feel – a true hallmark of custom-built furniture. It moves your project from “I made this in my garage” to “This was professionally crafted.”
The Unsung Hero: Gorilla Wood Glue
I cannot emphasize enough the importance of good quality wood glue in any building project. For all my creations, including these nightstands, I consistently rely on Gorilla Wood Glue. It’s incredibly easy to apply, flows smoothly, and most importantly, it creates an unbelievably strong bond. When cured, it holds like a champion, ensuring your furniture stands the test of time. Never underestimate the power of a strong adhesive in your woodworking projects!
Constructing the Door Frame: Precision is Paramount!
Next up was the door frame – a crucial component that will define the functional elegance of your nightstand. Here’s an image of the door frame in progress:
BIG TIP: Measure Twice, Cut Once (Especially for Doors)!
This is perhaps one of the most critical pieces of advice I can offer for building any piece with doors or drawers. Once your main nightstand frame is built, *do not* rely solely on the initial plans for your door measurements. Instead, take the time to precisely measure the actual opening where your door will sit. Even a slight discrepancy in your overall frame measurements can lead to a door that doesn’t fit cleanly, hangs improperly, or requires frustrating adjustments. To save yourself a ton of deconstruction and rework time, measure the opening, then build your door frame 1/4 inch smaller than that exact opening (1/8 inch smaller on each side). This small clearance will allow the door to open and close smoothly without rubbing or getting stuck, ensuring a beautiful, functional fit. Trust me, this little step will save you immense headaches!
Just like the side panels, I attached the decorative planks to the door frame using the same simple and effective method with my nailer and wood glue. This consistent approach ensures a cohesive look across the entire nightstand.
Ready for Staining: The Transformation Begins!
With all the structural components assembled, the nightstand was ready for its aesthetic transformation – the staining process. This is where the raw wood truly comes to life, gaining depth, character, and its final hue.
I chose to use the same stain on these nightstands as I did for the matching bed, ensuring a perfectly coordinated bedroom set. This particular stain is widely available at Lowe’s and comes in an impressive array of colors to suit any decor style. For this project, I opted for:
Rust-Oleum Ultimate Wood Stain in Dark Walnut
I simply adore this product! One of its most remarkable features is its incredibly fast drying time – it literally dries within an hour. This rapid turnaround significantly speeds up the finishing process, allowing you to apply multiple coats or move on to the next step without lengthy waiting periods. For a busy DIYer, a fast-drying stain is an absolute dream, making the entire project more efficient and enjoyable.
The Perfect Hardware: Adding Character and Functionality
The right hardware can truly elevate the look of any furniture piece, adding character and functionality. I sourced all the hardware for these nightstands from Lowe’s. While I initially struggled to find 2-inch strap hinges in black to match my desired aesthetic, a simple solution came to the rescue: Rust-Oleum Painter’s Touch spray paint in black. A few light, even coats transformed the silver hinges into the perfect black accents, seamlessly integrating them with the dark walnut stain. Don’t be afraid to customize off-the-shelf hardware to achieve your ideal look!
The Grand Reveal: Your Finished DIY Nightstands!
Are you ready to see the breathtaking final result? After all the cutting, joining, sanding, staining, and hardware installation, these nightstands truly shine. The rich Dark Walnut stain, combined with the subtle texture of the planks and the striking black hardware, creates a piece that looks incredibly sophisticated and far more expensive than its actual cost. It’s a perfect blend of farmhouse charm and industrial elegance, designed to complement a variety of interior styles.
The Unbeatable Value: DIY vs. Retail Price Tag
Now, let’s talk about the numbers – because this is where the DIY magic truly shines! These beautiful Kenwood nightstands, if purchased directly from Restoration Hardware Baby and Kid, would set you back an astounding $398 *per piece*. That’s nearly $800 for a pair! Ouch. While their quality is undeniable, that price point can be a significant barrier for many.
However, with a bit of effort and the fantastic plans from Ana White, you have a much more appealing alternative. I built *both* of these gorgeous nightstands for under $120! That’s right – an incredible saving that makes the project even more satisfying. When you compare the nearly $800 retail price to my DIY cost of less than $120 for two, the value is undeniable. This dramatic cost difference is why I adore DIY projects; they empower you to create the home of your dreams without breaking the bank. Knowing how much I saved makes me appreciate these nightstands even more!
Empower Your Home: Start Your Next DIY Project!
I sincerely hope you’re as smitten with these DIY Kenwood-inspired nightstands as I am! This project is a testament to the fact that beautiful, high-quality furniture is well within reach for anyone willing to pick up a few tools. Not only do you get stunning pieces that perfectly match your style, but you also gain invaluable skills and the immense satisfaction of creating something with your own hands. Plus, the savings are just phenomenal!
If this project has sparked your creativity, please consider Pinning and Sharing this post far and wide! Your support helps inspire more people to embrace the rewarding world of DIY. I truly appreciate every share!
And don’t forget, the easy-to-follow and incredibly helpful plans for these nightstands are waiting for you HERE on Ana White’s site! Go check them out and start planning your next build!
Stay tuned! You won’t want to miss Ashley’s project tomorrow – it just might be one of my absolute favorites!
More DIY Inspiration for Your Home: Related Projects
Looking for more budget-friendly projects to elevate your living space? Here are a few other creations I’ve tackled for this room that you might love:
$20 Shelves ANYONE can build!
PB Teen Inspired Headboard
PB Teen Inspired Platform Bed
Pottery Barn Inspired Memo Board
~Whitney