
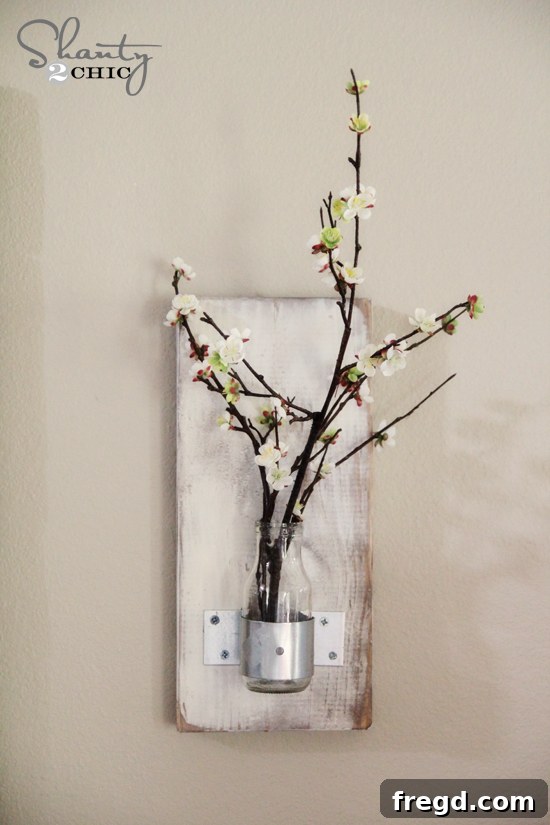
Transform Your Space: Create Beautiful & Affordable DIY Wall Vases from Repurposed Bottles
Are you searching for a creative and budget-friendly way to add a touch of rustic charm or farmhouse elegance to your home decor? Look no further! This comprehensive guide will walk you through crafting stunning wall vases using simple materials and a unique distressing technique. These adorable wall-mounted planters are not only incredibly easy and cheap to make, but they also offer a fantastic opportunity to repurpose items and inject personalized style into any room. Get ready to embark on a fun DIY project that promises beautiful results!
Imagine transforming an ordinary empty glass bottle and a piece of pine wood into a charming focal point for your living room, entryway, or even a cozy bedroom nook. These DIY wall vases are perfect for displaying your favorite fresh flowers, faux botanicals, or even propagating small plants. They bring a delightful blend of rustic warmth and elegant simplicity to any interior design, making them an ideal project for both seasoned DIY enthusiasts and beginners alike.
These are SO EASY and incredibly affordable to create!
Why Choose DIY Wall Vases for Your Home?
Beyond their aesthetic appeal, crafting your own wall vases offers numerous advantages:
- Cost-Effective Decor: With materials costing less than $5 per vase, this project significantly undercuts the price of store-bought decorative items.
- Personalized Touch: You have full control over the finish, color, and distressing level, allowing you to match your existing decor perfectly or experiment with new styles.
- Eco-Friendly Repurposing: Giving new life to empty glass bottles is a fantastic way to practice sustainability and reduce waste.
- Sense of Accomplishment: There’s immense satisfaction in creating something beautiful and functional with your own hands.
- Versatility: These vases can hold various types of greenery or flowers, and their simple design complements multiple decor styles from farmhouse to shabby chic, and even modern rustic.
Let’s get started on this rewarding home decor project!
Essential Materials and Tools for Your DIY Wall Vase Project
One of the best aspects of this DIY is how few materials you’ll need, most of which are easily accessible at your local hardware store or even in your recycling bin. Here’s a detailed breakdown of what you’ll gather to make these charming wall vases:
Wood Materials:
You will need a 2x8x8 pine board. A single 8-foot board, typically costing around $7, is surprisingly efficient and will yield enough wood to craft approximately six individual wall vases. This makes the project highly economical when creating multiple pieces for a cohesive display.
For each vase, you will cut a piece of wood 16 inches in length. These dimensions provide a substantial base for the bottle, ensuring stability and a visually pleasing proportion once mounted on the wall.
Finishing Supplies:
- Wood Stain: For this project, a rich, dark stain like Rust-Oleum Ultimate Wood Stain in Dark Walnut is recommended. This particular stain is celebrated for its quick drying time (approximately one hour) and the fact that it usually requires only a single coat to achieve deep, even coloration.
- Vaseline: This household staple is crucial for the unique distressing technique employed in this tutorial. It acts as a resist, preventing paint from adhering to certain areas, which later allows for easy removal to reveal the underlying stain and wood.
- Spray Paint: A light, neutral shade like Rust-Oleum Painter’s Touch spray paint in Heirloom White works wonderfully to create a soft, weathered look that complements the dark stain.
- Optional (for distressing): An old cloth or shop rag for wiping off excess Vaseline and a tack cloth for removing dust before painting.
Hardware and Bottles:
- Bottle Holders/Straps: You’ll need specific hardware to securely attach the glass bottles to the wooden planks. These can often be found in the lumber or hardware sections of large home improvement stores like Lowe’s. Look for metal straps or holders designed to secure bottles or pipes.
- Glass Bottles: Repurposed coffee bottles, such as those from Target brand or Starbucks, are ideal for this project. Their sturdy glass construction and appealing round shape make them perfect for holding flowers. Ensure they are thoroughly cleaned and dry before use.
- Wood Screws: Small wood screws will be necessary to attach the hardware securely to the wooden boards.
- Sawtooth Hangers: To easily mount your finished vases on the wall, sawtooth hangers are an excellent choice. You’ll attach one or two to the back of each wood piece.
Tools You’ll Need:
- Saw: A miter saw or a circular saw will be needed to accurately cut the 2x8x8 pine board into 16-inch sections. Always prioritize safety when using power tools.
- Sander: While a hand sanding block can work, a power sander like the Ryobi Corner Cat Finish Sander is highly recommended for its efficiency and ease of use, especially for distressing.
- Drill/Screwdriver: To attach the hardware and sawtooth hangers.
- Safety Gear: Always wear safety glasses and hearing protection when operating power tools.
With your materials and tools at hand, you’re now ready to dive into the exciting process of creating your own personalized wall vases!
Step-by-Step Guide: Crafting Your Distressed Wood Wall Vases
Step 1: Preparing Your Wood Boards
Begin by cutting your 2x8x8 pine board into 16-inch sections. If you’re making six vases, you will need to cut six pieces. Precision in this step ensures a uniform and professional look for your finished vases. Always use appropriate safety measures when operating a saw, including safety glasses and ensuring the wood is securely clamped.
Step 2: The Art of Distressing with the Vaseline Method
To achieve that sought-after aged and weathered look, we’ll employ a clever distressing technique using Vaseline. This method allows the base stain to peek through the top coat of paint, creating a beautiful, worn effect. If you’re new to this technique or want a more in-depth visual, you can check out the full tutorial HERE!
Step 3: Staining for Depth and Character
The first step in finishing your wood is applying a rich stain. I chose Rust-Oleum Ultimate Wood Stain in Dark Walnut for its deep, warm tones and quick-drying properties. This particular stain is fantastic because it typically dries in about an hour and usually only requires a single coat, saving you time and effort. Apply the stain evenly with a brush or rag, wiping off any excess after a few minutes to prevent stickiness. Allow it to dry completely according to the manufacturer’s instructions.
This quick-drying formula means you won’t be waiting around for hours, eager to move on to the next step. The dark walnut hue provides a beautiful foundation, adding immediate character and a rustic feel that will perfectly contrast with the lighter paint layer to come.
Step 4: Painting with Heirloom White
Once your stain is thoroughly dry, it’s time to apply the Vaseline and then the top coat of paint. Gently rub a small amount of Vaseline onto the corners and a few other random spots along the edges and faces of each stained board. These are the areas where you want the underlying stain to show through later, mimicking natural wear and tear. Don’t overdo it; a thin, strategic application is key.
After applying the Vaseline, give each board one coat of Rust-Oleum Painter’s Touch spray paint in Heirloom White. This soft, off-white color is perfect for achieving that classic shabby chic or farmhouse look. When spray painting, work in a well-ventilated area and use smooth, even passes to ensure consistent coverage. Allow the paint to dry completely. The magic of the Vaseline will reveal itself in the next step!
Step 5: Revealing the Distress with Sanding
Now for the fun part – revealing the distressed beauty of your boards! Once the Heirloom White paint is dry, use a sander to gently distress the paint. As you sand over the areas where Vaseline was applied, the paint will flake or rub off easily, exposing the dark walnut stain beneath. This creates an authentic, aged look without excessive effort.
While a hand sanding block can certainly get the job done, I highly recommend using a power sander, especially one designed for detail work like the Ryobi Corner Cat Finish Sander. This tool makes the distressing process much quicker and easier, allowing you to achieve a beautiful, smooth finish without tiring your hands. You’ll be amazed at how effortlessly it transforms the painted surface into a wonderfully weathered piece.
Ryobi Corner Cat Finish Sander
Step 6: Attaching Your Hardware
With your beautifully distressed wood pieces ready, it’s time to add the hardware that will hold your glass bottles. I sourced my hardware from the lumber section at Lowe’s, where you can often find sturdy metal straps or pipe hangers that are perfect for this purpose. Look for pieces that will securely cradle your chosen glass bottles.
Carefully position the hardware on the wooden board, typically centered vertically and horizontally, leaving enough space at the top for the bottle’s neck and at the bottom for the base. Use small wood screws to securely attach the hardware to the board. Pre-drilling pilot holes can prevent the wood from splitting, especially with harder woods, though pine is quite forgiving.
Step 7: Repurposing Coffee Bottles as Vases
For the “vase” part of this project, I opted for Target brand coffee bottles due to their appealing round shape and sturdy construction. Starbucks bottles are another excellent alternative, but ultimately, any clean glass bottle of suitable size and shape will work. The key is to select bottles that complement the aesthetic you’re aiming for and fit snugly within your chosen hardware.
Once your hardware is attached to the board, you can simply slide your clean glass bottle into place. Some hardware pieces might require you to secure the bottle with an additional screw or clamp, while others will simply hold it in place by tension. The goal is a secure fit that allows for easy removal and replacement of the bottle for cleaning or changing flowers.
That’s it! I told you it was easy!!
Step 8: Final Touches and Hanging Your Masterpiece
Your DIY wall vases are almost complete! Now for the personal touch: filling them with beautiful stems. I found some lovely stems at Target that I absolutely adore. Michael’s craft stores also carry similar pretty options, though they tend to be more prevalent during the fall season. Choose stems that complement your home’s color scheme and the rustic aesthetic of the vases. Faux stems offer convenience and longevity, while fresh flowers can add a vibrant, changing element to your decor.
To hang your completed wall vases, attach sawtooth hangers to the back of each wooden board. These simple hangers make mounting effortless and allow the vases to sit flush against the wall. I chose to hang mine on each side of my LOVE sign, creating a balanced and charming display. Consider grouping several vases together for a larger statement, or placing them individually to add subtle accents throughout a room. The possibilities for styling are endless!
What do you think of these charming additions to your home?
The Incredible Value: Cost Breakdown of Your DIY Wall Vases
Now for the fun part! Let’s talk cost…
One of the most appealing aspects of this DIY project is its incredible affordability. When you break down the cost per vase, considering that a single 2x8x8 pine board (around $7) yields six pieces of wood, and factoring in the relatively low cost of paint, stain, hardware, and repurposed bottles, you’ll find that each of these adorable wall vases costs less than $5 to make! This makes it not just an enjoyable craft, but also an exceptionally smart way to decorate your home without breaking the bank.
Now that is my kind of DIY!
Compare this to similar distressed wood wall decor pieces or rustic wall sconces you might find in boutique stores, which can easily cost upwards of $20-$50 each. The savings are substantial, allowing you to create a beautiful, cohesive look for an entire wall at a fraction of the price. This project truly embodies the spirit of smart, stylish, and sustainable home decor.
Personalize Your Wall Vases: Tips for Customization
While the distressed Heirloom White and Dark Walnut combination is a classic, don’t hesitate to put your own creative spin on these wall vases. Consider these ideas:
- Different Paint Colors: Experiment with shades like light blue for a coastal feel, sage green for a natural look, or even black for a modern farmhouse vibe.
- Varying Stains: Choose lighter stains like Early American or weathered gray for a different base tone.
- Alternative Bottles: Use clear glass jars, apothecary bottles, or even small amber bottles for a unique touch.
- Embellishments: Add stenciled numbers, small metal tags, or even a twine wrap around the bottle neck for extra detail.
- Grouping: Create an asymmetrical arrangement on your wall by varying the heights or spacing of multiple vases.
This DIY wall vase project is a fantastic way to add character, charm, and a personalized touch to your living space without a hefty investment. It’s a testament to how simple materials and a little creativity can transform ordinary items into extraordinary home decor.
Thanks so much for stopping by! I would LOVE for you to SHARE and PIN this post below!
Let me know if you have any questions at all!
~Whitney