
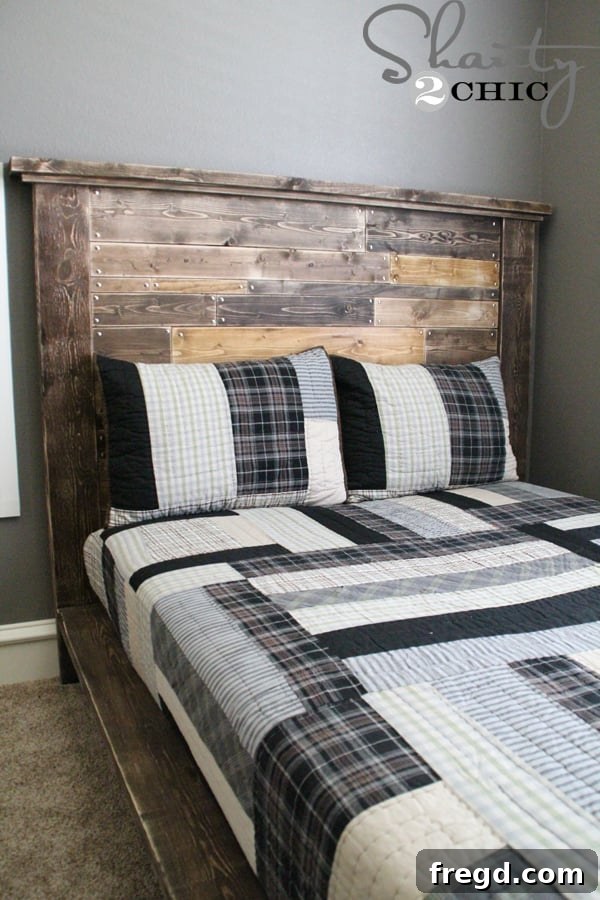
Transforming your living space with custom furniture adds unparalleled character and a personal touch that store-bought pieces often lack. Today, we’re thrilled to guide you through crafting a stunning, rustic planked headboard – a project that’s not only incredibly rewarding but surprisingly straightforward to build. If you’re eager to infuse your bedroom with farmhouse charm or industrial chic, this DIY headboard is your perfect next endeavor. And to ensure you never miss out on our latest projects and inspirations, be sure to subscribe to our mailing list and get our posts delivered straight to your inbox!
For those of you who follow us on Instagram, you might have already caught a glimpse of this captivating project. We’ve received numerous requests for the tutorial, and we’re so excited to finally share all the details on how you can create your very own planked headboard! We understand that life can sometimes delay even the most exciting reveals – finding a moment when our kids’ rooms are picture-perfect, especially during summer, can be quite the challenge! However, we persevered, and the final photos are here to inspire you.
This particular headboard completes the trio of custom beds we’ve built for our children. If you missed the previous two, you can explore the DIY Twin Storage Bed HERE and the innovative DIY Platform Bed on Wheels HERE. This final room proved to be the most challenging in terms of design, as I deliberated over the perfect aesthetic. Surprisingly, the inspiration for this unique planked look struck during a visit to a local restaurant, where I was captivated by a beautiful reclaimed wood floor. That serendipitous discovery sparked the entire vision for this headboard, proving that inspiration can truly be found in the most unexpected places!
Unlock Your Dream Headboard: Free Printable Plans Now Available!
We believe in making DIY accessible and enjoyable for everyone. That’s why we’re thrilled to announce a significant update: free printable plans for this beautiful planked headboard are now available! These comprehensive plans will guide you through every step, making your building process even smoother. Simply click the image below or access the plans HERE to download and print them. A special thank you goes out to Jay from Jay’s Custom Creations for his incredible work in translating our design into these easy-to-follow printable plans. His expertise ensures that even beginner woodworkers can confidently tackle this project.
Embark on Your DIY Journey: Building This Easy Planked Headboard
Inspired by that stunning reclaimed wood floor, I returned home eager to bring this vision to life. This headboard project is genuinely one of the easiest you’ll ever undertake. There’s no single “right” way to arrange the planks, which adds to its charm and allows for creative freedom. However, I’ll walk you through my specific approach and the design I ultimately settled on. This particular headboard is designed for a full-size mattress, but its design is incredibly versatile and can be effortlessly adjusted in width to perfectly fit any other mattress size, whether you need to expand it for a king or queen or reduce it for a twin. The beauty of DIY lies in customization, and this project truly shines in that regard.
Step 1: Preparing Your Plywood Base
Every great headboard needs a solid foundation. I began with a piece of 1/4″ Purebond Plywood, a material we absolutely adore for its durability and eco-friendly properties. For convenience, I had Home Depot cut it down to a precise 37.5″x52″ for my full-size headboard. The benefit of using Purebond Plywood goes beyond its structural integrity; it’s formaldehyde-free, making it a safer and healthier choice for your home. You can delve deeper into why we love Purebond Plywood HERE, but suffice it to say, it’s a fantastic material for a project like this.
Step 2: Crafting Your Planks for a Unique Aesthetic
With the plywood base ready, the next exciting step was cutting the individual planks. This is where the headboard truly starts to take on its unique, textured appearance. This project is also an excellent opportunity to put those wood scraps from previous projects to good use, promoting sustainability and saving on material costs! I selected a variety of common board sizes: 1×2, 1×4, and 1×6 boards. As you can see in the accompanying picture, I deliberately alternated these widths to create visual interest, specifically placing a 1×4 board between each row of varied planks. When making your cuts, the length of your first plank isn’t critical. However, it’s essential to stagger your joints as you progress, much like laying a brick wall, to ensure both structural integrity and a more appealing, less uniform look. I also strategically used longer pieces of wood under rows where I had previously used shorter pieces, helping to distribute weight and create a cohesive flow. The goal is for the planks to fit snugly and flush around all edges of the plywood, completely concealing the base and creating a seamless, robust surface.
Step 3: Staining for a Rich, Multi-Toned Finish
Once all the planks were cut to size, it was time to infuse them with rich, varied tones. This step is crucial for achieving that beautiful, reclaimed wood aesthetic. I stained each board individually using four of my favorite Varathane stains: Wheat, Early American, Dark Walnut, and Kona. These stains offer a wonderful palette, ranging from lighter, golden hues to deep, rich browns, perfect for creating depth and character. You can find these versatile stains HERE on Amazon. There’s no rigid pattern to follow when staining; the key is to randomly mix them up, ensuring that the same colors don’t frequently touch. This creates a natural, organic look, as if each piece of wood has its own unique history. A pro tip: try to keep your stained pieces generally close to their intended spots on the headboard base to avoid a frustrating jigsaw puzzle later! For the staining process, I found that a foam brush (using one dedicated brush per color) worked wonders. I applied a single, even coat, allowed the stain to penetrate for about five minutes, and then wiped off the excess with a clean, lint-free cloth. This technique provides a beautiful, controlled finish without oversaturating the wood.
Step 4: Distressing for Authentic Rustic Charm
After the stain had fully dried and cured, it was time to add an extra layer of authenticity and character: distressing. This step mimics the natural wear and tear of aged wood, enhancing the rustic appeal of the headboard. I used my Corner Cat Sander, a fantastic tool for getting into edges and corners, to gently distress the edges of each plank. The goal isn’t to create deep gouges, but rather to softly abrade the wood, allowing some of the lighter wood tones to peek through the darker stain, creating a beautifully weathered effect. This process gives each plank a unique story, contributing to the overall charm and aged feel of the finished piece.
Step 5: Assembling the Planked Surface
With all the planks stained and distressed, the assembly process began. I carefully applied wood glue to the back of each plank, ensuring good coverage, and then meticulously placed them onto their designated spots on the plywood base. Wood glue provides a strong, lasting bond, but it also offers a small window of opportunity to make minor adjustments while it’s still wet. This flexibility is incredibly helpful for ensuring perfect alignment and spacing. Once the planks were precisely where I wanted them, I secured each one using my trusty brad nailer. I used 1-inch brad nails, aiming for at least a few nails at each end and in the center of every plank. This combination of wood glue and brad nails creates an incredibly robust and durable bond, ensuring your planked surface remains securely in place for years to come.
Step 6: Attaching the Sturdy Headboard Legs
Once the glue had thoroughly dried, ensuring the planked surface was completely stable, it was time to prepare for attaching the headboard legs. I drilled 1 1/2″ Kreg Jig pocket holes into the back sides of the planked headboard. The Kreg Jig system is a game-changer for creating strong, concealed joints, perfect for attaching structural elements like legs. These strategically placed pocket holes (which are helpfully circled in the accompanying images for clarity) are essential for securely mounting the legs. The legs themselves are made from robust 2×6 boards, cut to a length of 53″. Prior to attachment, I stained these leg boards separately. While you can choose any stain that complements your design, I opted for Dark Walnut to match some of the darker tones in the planked section, providing a cohesive and elegant contrast. Once stained, I attached the legs using 2″ Kreg screws, driving them through the pocket holes into the legs, creating an incredibly strong and stable connection. This ensures your headboard stands firmly and proudly in your bedroom.
Step 7: Adding the Decorative Top Trim for a Finished Look
With the legs securely in place, the headboard was really taking shape! To give the top a more refined and complete appearance, I added a decorative trim. This step elevates the overall design, moving it from functional to truly fashionable. I started by applying a generous line of Gorilla Glue wood glue along the very top edge of the headboard. This strong adhesive provides an extra layer of security for the trim pieces. Next, I used my brad nailer with 1 1/4″ brad nails to attach the first piece of trim: a 1×3 board, cut to 65″ in length. This piece was carefully centered on the headboard, creating a slight overhang on both the front and back sides. This overhang adds visual depth and a custom, built-in feel. For the very top trim, I chose a more substantial 2×4 board, cut at 67″. I attached this piece using a combination of wood glue and 2 1/2″ Spax wood screws. When drilling into thicker 2x boards, I highly recommend using an impact driver if you have one – it makes the job much easier and saves your arms from fatigue! However, a standard drill will also work perfectly. This top 2×4 board was centered over the 1×3 trim piece, ensuring an overhang on the front and back, and also creating a consistent 1″ overhang on each end. This layered trim design adds a beautiful, finished crown to your headboard.
Here’s a look at the headboard with all the trim pieces attached. A valuable lesson learned during this process: I highly recommend staining the trim pieces *before* you attach them! In my excitement to finish the project, I skipped this step and found it quite a painstaking task to stain them after they were already secured. Learning from my experience will save you some effort and ensure a smoother finishing process. After the stain on the legs was completely dry, I also took the time to distress them, matching the worn, authentic look of the main planked surface. This consistent distressing ties the entire piece together beautifully, reinforcing its rustic charm.
The Unique Final Touch: Decorative Nail Heads
The headboard was almost complete, but it needed one last, distinctive finishing touch that would truly make it stand out. What I loved most about that inspiring restaurant floor was the visible, exposed nail heads adorning each plank – they added an unexpected layer of character and industrial charm. To replicate this detail, I picked up a package of nickel thumb tacks from Home Depot. These simple tacks were the perfect solution to achieve that authentic, decorative nail-head effect, adding a subtle yet impactful element to the design. This small detail elevates the headboard, giving it a high-end, bespoke feel without breaking the bank.
I simply hammered each thumb tack into the corners of the planks. This doesn’t require absolute precision; simply “eyeball” the placement for a naturally organic and handmade appearance. To further enhance this rustic, asymmetrical look, I deliberately offset the tacks from plank to plank, avoiding a perfectly uniform grid. This slight variation adds to the authenticity and charm, making it seem as though genuine antique nails were used. This final touch truly brings the entire planked headboard project together, creating a unique focal point for any bedroom.
Your Masterpiece Revealed: The Finished Planked Headboard!
And there you have it – a magnificent, custom planked headboard, ready to transform any bedroom into a stylish sanctuary! Now, all three of my kiddos have their mattresses elevated off the floor, resting on truly cute (and for my boys, wonderfully cool) custom-built beds. The satisfaction of creating something beautiful and functional with your own hands is truly unmatched. And the absolute best part? With all their beds complete, I can finally start designing and building my own! For those wondering about the bedding, I found the cozy quilt at Pottery Barn Teen, though I believe it may no longer be available. You can always explore their beautiful selection of quilts HERE for similar styles and inspiration.
To perfectly complement this planked headboard, I also designed a matching platform bed frame. This duo creates a cohesive and incredibly stylish bedroom setup. If you’re looking to complete the entire look, you can find the Free Plans for the Easy DIY Platform Bed HERE. Building both pieces ensures a perfectly matched and custom bedroom suite that truly reflects your style.
Thank you so much for joining us on this DIY journey! We hope this detailed tutorial empowers you to create a beautiful and unique planked headboard for your home. Happy building!
~Ashley
Discover More Inspiring DIY Bedroom Projects!
If you loved this project, be sure to check out the other custom beds we’ve built for our children. Each one offers unique design elements and practical solutions for creating functional and stylish kids’ rooms.
Explore the Twin Storage Bed for my daughter – a brilliant solution for maximizing space and keeping a tidy room.
Discover the Platform Bed on Wheels for my teen son – a modern and functional design perfect for a growing boy’s room, offering versatility and style.