
Unlock Smart Storage: Build Your Own Stylish DIY Locker Cabinet (HGTV-Inspired!)
Welcome, DIY enthusiasts and home decor lovers! We’re thrilled to share the excitement of our pilot “Open Concept” journey on HGTV. Your incredible support has been the driving force behind projects like the stunning DIY Locker Cabinet featured prominently in the show. If you haven’t seen the amazing transformations, you can catch a glimpse of the before and after magic by clicking HERE! Today, we’re diving deep into the details of how you can recreate this functional and beautiful piece for your own home. Get ready to transform your space with a custom storage solution that looks like it came straight from a high-end designer showroom, all while embracing the satisfaction of a do-it-yourself build.
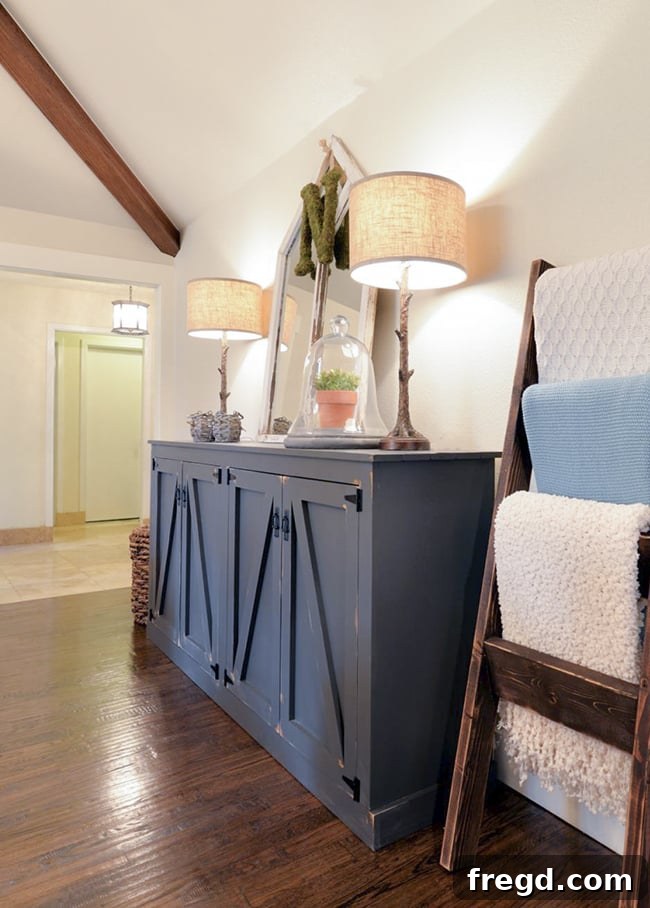
This custom locker cabinet isn’t just a pretty face; it’s a versatile storage powerhouse, perfect for organizing entryway clutter, mudroom essentials, or even dining room dishware. Imagine a dedicated spot for backpacks, shoes, coats, or even fine china – all neatly tucked away behind elegant doors. Its robust construction and customizable interior make it an ideal addition to any busy family home looking for both style and extreme functionality. Take a look at this magnificent piece in its new home:
Why Build Your Own Custom Locker System?
Building your own DIY locker cabinet offers a multitude of benefits that off-the-shelf solutions simply can’t match. Firstly, you gain complete control over the design, dimensions, and finishes, ensuring it perfectly complements your home’s aesthetic and meets your specific storage needs. No more settling for ill-fitting or aesthetically uninspiring furniture! Secondly, it’s a significantly more budget-friendly option than purchasing a custom-built piece of this caliber. You save on labor costs and can often source materials more affordably. Finally, there’s immense satisfaction in creating something beautiful and functional with your own hands. This isn’t just a piece of furniture; it’s a testament to your skill and dedication, a conversation starter, and a true focal point in any room.
Isn’t it absolutely gorgeous? We adore the rich color and classic design. As always, we’re here to guide you through every single step of this woodworking project. To make it even easier, you can download and print the comprehensive, free plans, including detailed cut lists and diagrams, by clicking HERE or simply using the button below. These plans are designed to simplify the build, making it accessible even for those relatively new to woodworking, yet satisfying for seasoned DIYers.
Ready to embark on this rewarding project? Let’s gather our tools and materials and get started on building a beautiful and functional DIY locker cabinet!
Materials Spotlight: The Versatility of Hardwood Plywood
The foundation of this impressive locker cabinet largely relies on hardwood plywood. If you’re asking, “What exactly is hardwood plywood?”, you’ve come to the right place for an explanation! Hardwood plywood is a high-quality sheet material, typically available in 4′ x 8′ sheets, and sometimes in smaller, more manageable sizes. Unlike standard construction plywood, its outer layers (or veneers) are made from attractive hardwoods such as oak, birch, or maple. This gives you the sophisticated appearance of solid hardwood at a significantly lower cost, making it an incredibly cost-effective choice for furniture building. Plus, we’ve found that hardwood plywood tends to be exceptionally straight and stable, which translates into easier, more accurate cuts and a smoother building process – a definite win in our book!
Our absolute favorite brand to work with is Purebond Plywood, widely available at Home Depot. Purebond stands out not only for its quality and beautiful hardwood veneers but also for being formaldehyde-free, making it a healthier choice for your home and family. Using this material allows us to achieve a premium, custom-built look without breaking the bank, marrying affordability with elegance and durability.
Precision Cutting: Laying the Foundation for Your Project
Working with full sheets of plywood can be a challenge, especially if you have a smaller vehicle (and a car full of kids, like we often do!). These 4′ x 8′ sheets are bulky and cumbersome. To overcome this, we highly recommend taking advantage of Home Depot’s convenient cutting service. They can make the initial “rip cuts” for you, breaking down the large sheets into more manageable sections that will easily fit into your car. This simple step saves a lot of hassle and ensures you get your materials home safely.
Once the plywood was safely home, I proceeded with most of my subsequent cuts using the Kreg RipCut. This ingenious attachment easily fastens to your circular saw, transforming it into a precise, straight-cutting machine. It allows you to set specific measurements, ensuring perfectly straight and accurate cuts every time. For projects where precision is paramount, like building a cabinet, the Kreg RipCut is an indispensable tool that significantly enhances the quality and ease of your woodworking.
Assembling the Core: Building the Robust Cabinet Box
Despite its impressive size, the core construction of this locker cabinet is surprisingly straightforward. The process involves building a sturdy main box, which forms the body of the cabinet, followed by adding the decorative trim and custom doors. For the primary assembly of the box, we relied heavily on our trusted Kreg Jig. This tool is a game-changer for creating strong, concealed joints, making your furniture pieces incredibly durable and professional-looking. We used the Kreg Jig K5 Model, which offers excellent features for efficiency and precision.
Building the Main Frame
Your first step will be to construct the fundamental frame of the cabinet. This involves joining the bottom, top, and side pieces to form the main outer shell. For all our joints throughout this project, we consistently used 3/4″ pocket holes and 1.25″ pocket hole screws. This combination ensures maximum strength and stability, crucial for a piece of furniture that will hold significant weight. Additionally, to reinforce each joint further and eliminate any potential for movement, we applied a generous line of Titebond 3 wood glue before fastening the screws. This creates an incredibly durable bond that will last for years.
Adding Essential Dividers and Shelves
Once the main frame is assembled, the next critical step is to incorporate the vertical dividers that define each locker compartment. We find it helpful to mark the precise placement of these dividers with a pencil and use a speed square to ensure they are perfectly perpendicular and evenly spaced. Accurate placement here is key to a symmetrical and professional finish. Attaching these dividers with pocket holes and screws ensures they are firmly integrated into the cabinet structure.
Following the vertical dividers, we installed the interior shelf pieces. One of the greatest advantages of DIY is customization! You have the flexibility to adjust these shelves to any height that best suits your specific storage requirements, whether you’re storing tall boots, stacks of dishes, or smaller items. Remember to strategically place your pocket holes to ensure secure attachment, as demonstrated in the images below. This thoughtful placement not only hides the fasteners but also provides optimal structural integrity.
For added support, especially since we anticipate this cabinet will be filled with heavy items like dishes, we opted to include a small brace piece in the middle of the longer shelves. This prevents any potential sagging over time, ensuring your shelves remain flat and strong. We created this brace by cutting a small piece of plywood to fit and attaching it securely with both wood glue and pocket hole screws, providing maximum reinforcement.
To attach all these components, you’ll use a drill equipped with the Kreg bit, which conveniently comes included with your Kreg Jig. For this project, we relied on our trusty Ryobi 18V One+ drill. We absolutely love this drill! It’s the perfect size for comfortable handling, yet it packs a powerful punch, making quick work of all drilling and driving tasks. In fact, we love it so much we often keep two on hand, saving us the time and effort of constantly switching bits – a little “lazy girl hack” that makes a big difference in workflow!
Refining the Exterior: Trim and Backing
Once the main cabinet box is fully assembled and structurally sound, it’s time to add the trim pieces that will give your locker cabinet its finished, refined appearance. The first step in this stage is to construct the face frame. This frame adds visual weight, conceals the plywood edges, and provides a solid surface for attaching the doors. Just like with the cabinet box, we used 3/4″ pocket holes and 1.25″ pocket hole screws for robust and seamless joints on the face frame, ensuring it’s both strong and aesthetically pleasing.
With the face frame built, we then securely attached it to the front of the cabinet. This step is critical for both the structural integrity and the aesthetic appeal of the final piece. We utilized 1.25″ pocket hole screws driven through the cleverly placed bottom pocket holes. For additional reinforcement and to ensure a tight, flush fit, we also employed our Ryobi 16V Finish Nailer. This battery-powered finish nailer is truly an amazing tool, offering incredible convenience and power without the need for a compressor. If you’re serious about DIY, it’s a tool you absolutely need in your arsenal!
As you can see, the base of our sideboard transformed beautifully once the face frame was in place. This framing provides a solid foundation and a clean, finished edge that elevates the entire piece.
And with that, the cabinet box is beautifully framed and ready for its back panel!
For the back of the cabinet, we used 1/4″ Purebond Plywood. This thinner plywood is ideal for back panels, providing stability without adding unnecessary bulk. Again, Home Depot’s cutting service can be invaluable here for getting these larger, thin sheets precisely cut to size. The most effective way to attach the back panel is using an 18-gauge stapler, which creates numerous small, strong fastenings. However, if you don’t have a stapler, a finish nailer can also be used to secure it firmly in place.
Constructing Custom Doors: Where Functionality Meets Style
The doors are a critical element of the locker cabinet, defining its aesthetic and providing practical access to your organized storage. For constructing these sturdy and stylish doors, we once again turned to our reliable Kreg Jig. This tool allows for the creation of robust door frames with concealed joints, ensuring a clean and professional appearance. We made the pocket holes on our shorter door pieces, then attached them to the longer ones using 1.25″ pocket hole screws, forming strong, rectangular frames.
Accurate Measurements are Key for Perfect Doors
While our free plans provide precise cut lists for the doors, we always recommend a crucial double-check: measure the exact openings of your cabinet before making your final door cuts. This simple step ensures a perfect fit, as slight variations can occur during assembly. Our preferred method is to make each door 1/8″ smaller all around than its respective opening. This translates to the door being 1/4″ smaller in both width and height than the opening, allowing for proper clearance when opening and closing. For each door, you will need two longer pieces without pocket holes, and two shorter pieces, each with pocket holes on both ends, like so:
Door Frame Assembly and Finishing Touches
Once all your door pieces are cut, join them with wood glue and 1.25″ pocket hole screws to create perfectly square and sturdy rectangular frames. The combination of glue and screws creates a joint that is virtually unbreakable, ensuring your doors remain stable and true over time.
Each door should now look like a perfect frame, ready for its backing and decorative elements!
Next, you’ll cover the back of each door frame with a piece of 1/4″ Purebond Plywood. This backing provides the solid surface for the door and is essential for its structural integrity. Attach the plywood securely using wood glue around the perimeter of the door frame and then fasten it with 3/4″ brad nails. These small nails hold the plywood firmly without splitting the wood. Finally, cut your horizontal trim pieces to size. These trim pieces are attached to the front of the door using wood glue and brad nails, driven from the back of the door into the trim. This method creates a clean, fastener-free look on the front, mimicking the classic locker door aesthetic.
The Finishing Touch: A Robust Planked Top
No custom cabinet is complete without a striking top, and for this DIY locker system, we opted for a beautiful and sturdy planked top. This not only adds a touch of rustic charm but also provides a durable surface for display or daily use. We created the plank top by taking five individual boards and drilling 3/4″ pocket holes along the edges of four of them. Then, using 1.25″ pocket hole screws, we joined all five boards together, creating a solid, seamless planked surface that feels incredibly substantial.
Attaching the Top Securely and Flawlessly
Before permanently attaching the planked top to the cabinet, we applied a generous amount of wood glue to the top edges of the sideboard frame. We had a little fun with this part, ensuring every inch was covered to create the strongest possible bond. The glue isn’t just for adhesion; it also helps prevent any minor shifting or creaking over time.
To attach the top, we utilized our wonderful new Kreg bar clamps. These clamps are truly fantastic – self-adjusting and incredibly easy to use, they make clamping large pieces effortless. We used them to firmly hold the planked top in perfect alignment on the cabinet while we secured it permanently. With the top held steady, we used our finish nailer to drive 1.25″ finish nails down through the planked top into the cabinet frame. The combination of strong wood glue and strategically placed finish nails ensures that your planked top is rock-solid and beautifully integrated with the rest of the cabinet.
And there you have it! The structural build is complete. This is what your DIY locker cabinet will look like, fully assembled and ready for the exciting stage of painting and hardware installation. It’s truly a sight to behold, showcasing the craftsmanship and effort you’ve put in.
Bringing It to Life: Paint, Hardware, and Personalization
With the entire structure built, it’s time for the truly transformative steps that bring your DIY locker cabinet to life and integrate it seamlessly into your home’s decor. This phase is where your personal style truly shines!
Choosing the Perfect Hue: Sherwin-Williams Urbane Bronze
For this specific piece, we used an absolutely amazing color: Urbane Bronze by Sherwin-Williams. Seriously, this shade is a design marvel. It’s not just a dark gray; it’s a sophisticated, warm, and grounding hue that acts like a neutral while adding incredible depth and character to any space. It can lean towards a deep brown, a rich bronze, or a muted charcoal depending on the light, making it incredibly versatile and stylish. This color choice elevates the locker cabinet from a simple storage unit to a statement piece, creating a sense of refined elegance.
Selecting and Installing Hardware
The right hardware can completely change the look and feel of a furniture piece. For our locker cabinet, we found the perfect accents at Home Depot. We opted for the Liberty 2-1/4 in. Center-to-Center Vertical Bail Pull (Model 62077BK). These pulls offer a classic, robust look that perfectly complements the locker aesthetic. Their vertical orientation adds a unique touch, enhancing the overall design. Using a drill, installation was straightforward and quick, completing the transformation of the doors. Remember to measure carefully and mark your drilling spots precisely for perfectly aligned hardware.
A good drill is indispensable for installing hardware neatly and securely.
Thoughtful Additions: Internal Hooks for Ultimate Organization
To truly maximize the functionality of this locker cabinet, especially if it’s destined for an entryway or mudroom, we added a small but impactful detail: hooks on the inside of each cabinet compartment. This simple addition provides a convenient spot for kids to hang their backpacks, coats, or other items, keeping them off the floor and out of sight. It’s these small, thoughtful touches that elevate a DIY project from merely functional to exceptionally practical and user-friendly, catering to the real-world needs of a busy household.
Your New DIY Locker Cabinet: A Showcase of Style and Function!
And with all the final details in place – the rich paint, elegant hardware, and thoughtful internal organization – here it is, finished and proudly on display! This DIY locker cabinet is more than just a piece of furniture; it’s a statement of style, a beacon of organization, and a testament to the power of DIY. We hope this comprehensive guide inspires you to tackle your own custom storage project and experience the joy of creating something truly spectacular for your home.
What do you think of this finished masterpiece? We’re absolutely smitten with it – so much so, we might just try to take it back! We hope you love it as much as we do and feel empowered to build your own version. Happy building, and remember to share your creations with us!