
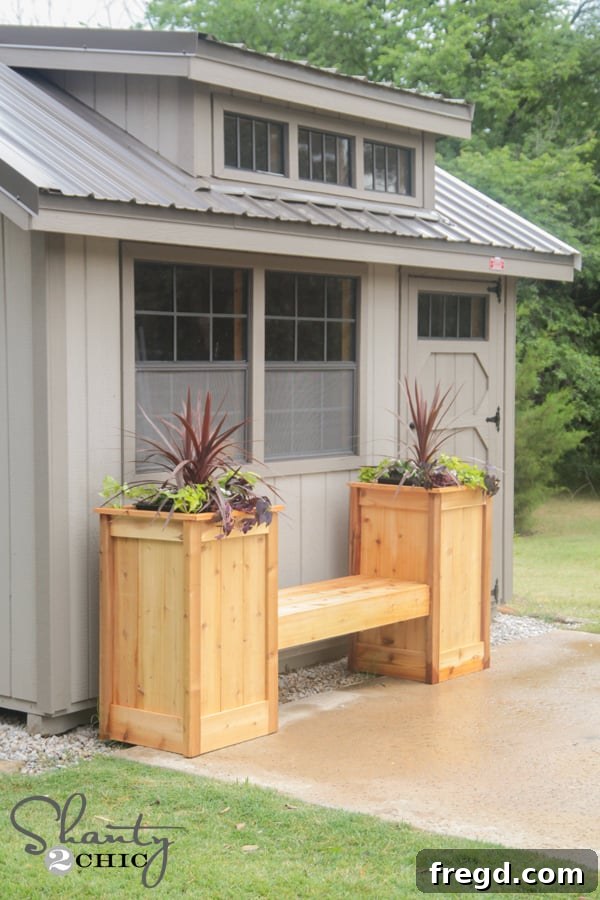
Welcome to a truly rewarding DIY journey! I’m thrilled to share a project that has completely transformed the front of my shed, adding both charm and practical functionality. Seriously, a shed this adorable deserves an equally delightful feature to complement it, don’t you agree? My goal was to introduce some vibrant flowers and create a convenient seating area simultaneously, and what I came up with exceeded all my expectations. Get ready to discover how to build your very own DIY Planter Box Bench!
DIY Planter Box Bench: Elevate Your Outdoor Space with Style & Functionality
How absolutely charming is that? I love that I now have a dedicated spot to sit comfortably and watch the kids play on the driveway. It’s also incredibly handy for storing their rollerblades and outdoor toys inside the shed, as this bench provides the perfect, elevated space for them to sit and put their gear on. It’s a true win-win situation for both aesthetics and practicality!
One of the best aspects of this project is that the majority of this sturdy bench is crafted from economical cedar fence pickets. This not only keeps the overall cost remarkably low but also ensures excellent durability and resistance to outdoor elements, meaning your beautiful creation will stand the test of time.
Why Build a DIY Planter Box Bench?
Beyond its undeniable cuteness, a DIY planter box bench offers a multitude of benefits that can significantly enhance your outdoor living area:
- Enhanced Curb Appeal: Instantly boost the aesthetic charm of your home, garden, or shed with a unique, custom-built feature. The combination of natural wood and vibrant flowers creates an inviting focal point.
- Practical Seating Solution: Provide comfortable seating for relaxing, entertaining, or simply watching the world go by. It’s perfect for those moments you want to take a break while enjoying your garden.
- Smart Storage Integration: As demonstrated, a bench near a shed or garage offers a convenient spot for kids (or adults!) to put on shoes, rollerblades, or other outdoor gear, keeping the area tidy and accessible.
- Cost-Effective DIY Project: Utilizing cedar fence pickets dramatically reduces material costs compared to traditional lumber, making this a budget-friendly project accessible to many DIY enthusiasts.
- Personalized Garden Display: The integrated planter boxes allow you to showcase your favorite flowers, herbs, or small shrubs, bringing life and color to your outdoor decor. You can change the plantings seasonally to refresh the look.
Download Your Free Planter Box Bench Plans!
Ready to start building? We’ve made it easy for you with detailed, step-by-step plans. You can click HERE or on the button below to download and/or print our free plans directly. These comprehensive plans will guide you through every cut and connection.
Essential Materials for Your Planter Bench Project
Before diving into the build, gathering your materials is key. For this project, I sourced all my wood and other essentials from my local Home Depot. Here’s a breakdown of what you’ll need, with some important considerations:
- Cedar Fence Pickets: This is the star material for keeping costs low and ensuring outdoor durability. Keep in mind that most fence pickets are typically 5/8″ thick. However, my Home Depot carries a particular picket that measures 3/4″ thick. I highly recommend opting for the 3/4″ thickness if available, especially if you’ll be using a Kreg Jig, as it generally provides a more robust joint and is easier to work with for pocket holes. If you can only find 5/8″ pickets, they will certainly work, but you will need to adjust your Kreg Jig settings accordingly for that specific thickness. While you could use full cedar boards for an even more premium look, this will significantly increase your material costs, which I often try to avoid for budget-friendly DIYs!
- 2×3 Cedar Boards: These will form the sturdy corner posts of your planter boxes, providing structural integrity. You can often find these in the fencing section alongside the pickets.
- Wood Glue: Essential for strong, long-lasting joints. Always use a high-quality, exterior-grade wood glue for projects exposed to the elements.
- 1 1/4″ Pocket Hole Screws: These specific screws are designed to work perfectly with pocket holes, creating tight and secure connections.
- 1 1/4″ Brad Nails: For attaching trim pieces cleanly and efficiently.
Tools You’ll Need
Having the right tools makes all the difference in a DIY project. Here are the main tools I used:
Power Tools
- Miter Saw (e.g., Ridgid Compound Miter Saw): This is arguably the most frequently used tool in my workshop for precise, repetitive cuts. A compound miter saw allows for angled and bevel cuts, crucial for perfect mitered corners on your trim.
- Kreg Jig (K5 or K4 Model): This incredible tool makes pocket hole joinery simple and strong. Many people often ask which Kreg Jig Ash and I use; we are both currently loving the newest K5 model. Before that, we relied on the K4 and built most of the furniture in our homes with it. Both are fantastic models, but the K5 offers a few upgrades that make it even more user-friendly, like a front-mounted clamp and improved storage. If you’re new to woodworking and have no idea what a Kreg Jig is, don’t worry! Ash and I have a quick video you can check out HERE explaining its function and basic operation. It’s a game-changer for woodworking!
- Cordless Drill (e.g., Ryobi 18V Drill): Essential for drilling pocket holes and driving screws. A cordless model offers unparalleled freedom and convenience, allowing you to move around your project without being tethered to an outlet.
- Brad Nailer (e.g., Ryobi Airstrike Brad Nailer): This tool is fantastic for quickly and securely attaching trim pieces without the need for cumbersome air compressors. Its cordless nature (using the same battery as my drill!) makes it incredibly convenient for finishing touches.
Hand Tools & Accessories
- Tape Measure & Pencil: For accurate measurements and markings. “Measure twice, cut once” is a golden rule here!
- Safety Glasses: Always protect your eyes when working with power tools.
- Wood Clamps: Indispensable for holding pieces securely while gluing and screwing, ensuring tight joints.
Step-by-Step Guide to Building Your Planter Box Bench
Let’s roll up our sleeves and get started on this exciting project!
Step 1: Material Preparation and Initial Cuts
I began by making all my necessary cuts according to the free plans. For precision and ease, I used my Ridgid compound miter saw. This tool is a workhorse in my garage and one of my absolute favorites for its accuracy and efficiency.
Since we are using fence pickets, you’ll find that many of them come with “dog-eared” ends (angled corners). This is perfectly fine and shouldn’t deter you. My strategy was to simply ensure these dog-eared ends were positioned at the bottom when I aligned all the pieces. I knew that the decorative trim would cover them later, effectively eliminating any wasted wood. You can see in the image below how I’ve already prepared a picket, complete with 3/4″ pocket holes drilled using my always-awesome Kreg Jig!
Step 2: Drilling Pocket Holes with Your Kreg Jig
The Kreg Jig is invaluable for creating strong, hidden joints. It allows you to drill angled holes into one piece of wood that will then accept a screw to join it to another piece. Remember, if you are using 5/8″ thick pickets, adjust your Kreg Jig collar depth setting to match that thickness. For my preferred 3/4″ thick pickets, the standard 3/4″ setting works perfectly.
As you can see here, I carefully lined up the pickets in the Kreg Jig to create all my pocket holes. My reliable Ryobi 18V drill made quick work of drilling all the necessary holes for a strong framework.
It’s crucial to ensure you’re making 3/4″ pocket holes because that is the thickness of the wood you will be attaching this piece to. Each side of the planter box will consist of three pickets joined together. Here they are, all prepped with their pocket holes, ready for assembly.
Step 3: Assembling the Planter Box Sides
Next, for maximum strength and durability, I applied a generous line of wood glue down each edge of the pickets before attaching them. Then, I secured the pickets together using 1 1/4″ pocket hole screws. The combination of glue and screws creates a joint that is significantly stronger than screws alone, essential for outdoor furniture.
The corners of my planter boxes are robust 2×3 cedar boards, which I conveniently found in the fencing section at Home Depot. For this part, I used longer screws to firmly attach my picket sides to these corner posts. Always remember to first run a line of wood glue down the edge where the pieces meet for extra stability.
This is what the completed sides look like from the bottom, showcasing the sturdy construction.
And here is a finished side from the front, ready to be joined with its counterparts!
Step 4: Constructing the Planter Boxes
Once all my individual sides were finished, it was time for the exciting step of joining them to form the planter boxes. I started by attaching one side (without a corner piece) to a side that already had a corner piece attached. Again, I used wood glue along the joining edges and secured them with 1 1/4″ screws through the pre-drilled pocket holes.
At this stage, your planter box assembly should begin to take shape, looking much like this:
Repeat the same process for the second side, ensuring tight and square connections.
To attach the final side and close the box, I found it easiest to set the partially assembled box upright. I carefully lined up the last side and attached it using the same method of glue and pocket hole screws. Due to the depth of the box, reaching some of the interior pocket holes can be a bit tricky, especially if you’re like me (only 5’2″!). For those hard-to-reach spots, don’t hesitate to flip the box over to complete the connections comfortably and securely.
Bada Bing Bada Boom…
Step 5: Adding Decorative Trim
Once both planter boxes were fully constructed, it was time to add the finishing trim, which is where the project really starts to shine. This part is incredibly simple thanks to my awesome Ryobi Airstrike Brad Nailer. This cordless tool is fantastic for its ease of use and convenience, using the same 18V battery as my drill. For each trim piece, I applied a line of wood glue and then attached it using 1 1/4″ brad nails, inserted from the inside of the box for a clean exterior finish. A crucial tip here: always measure each individual space before you cut your trim pieces. The width of cedar fence pickets can vary ever so slightly, so custom-fitting each trim piece ensures a perfect, professional look.
After all the sides were neatly trimmed, I moved on to adding the mitered top trim. This step is surprisingly simple and a great way to practice your miter cuts if you’re new to them. You’ll make simple 45-degree cuts at the ends of your trim pieces to create seamless corners. Once again, I applied a line of wood glue along each side before attaching the trim securely with my brad nailer.
Step 6: Building the Bench Seat
Finally, it’s time to construct the bench seat itself! I created the pocket holes for the bench planks in the same manner as I did for the planter box sides, ensuring strong, invisible joints. Consistency in technique is key for a cohesive build.
I then used wood glue along the edges and secured the three main pieces of the bench seat together using 1 1/4″ pocket hole screws, creating a solid and stable surface.
Don’t forget the middle support piece! This crucial element adds significant strength and prevents sagging in the center of the bench over time. You can clearly see where I added pocket holes to this support piece before attaching it to the underside of the seat. This ensures even weight distribution and longevity for your bench.
Once you’ve attached the seat, the entire structure should begin to look like this, a promising indication of your progress!
You can get a better sense of the overall structure and how all the components fit together in this shot.
Step 7: Final Assembly – Attaching the Bench
The final structural step is attaching the bench to the two planter boxes. You’ll simply secure these pieces using pocket hole screws driven through the pre-drilled holes on the bench supports, connecting them firmly to the inside of the planter boxes. It’s truly easy-peasy! Once the bench is secured, you’ll add the remaining trim pieces to the front and back of the bench structure to complete the polished look.
The Finishing Touch: Planting Your Flowers
My absolute favorite final step was filling the planter boxes with beautiful flowers after positioning the bench in front of the shed! The day before, we took the entire gang to Home Depot to pick out the perfect blooms. We even had one of Ashley’s kids join us on the flower hunt. How many kids does it take to find flowers? Apparently, quite a lot! (And yes, my little one had on one lime green sock, which I still have no explanation for, but it added to the fun!) Remember to add drainage holes to the bottom of your planter boxes if you haven’t already, or place plastic liners with drainage inside to ensure your plants thrive.
I got the flowers home and planted them just in time before we got some much-needed rain. Here it is, sitting pretty and looking absolutely perfect in front of my shed:
Conclusion: Your New Favorite Outdoor Feature
Oh, I absolutely adore it! Almost as much as I love my shed itself! The shed has been one of my favorite additions to my property so far, as it truly opened up my garage space, giving me ample room to work on projects like this. The kids affectionately call it our “little house,” and now with this charming planter box bench, it feels even more like a welcoming outdoor extension of our home.
This DIY planter box bench is more than just a piece of furniture; it’s a statement of style, a functional seating area, and a vibrant display for your favorite plants, all achieved through the satisfaction of building it yourself. With affordable cedar fence pickets and a few essential tools, you can create a beautiful and durable addition to any outdoor space.
Thank you so much for stopping by, everyone! I would truly LOVE for you to share and PIN this project with all your friends and fellow DIY enthusiasts!
Have Questions?
Please don’t hesitate to let me know if you have any questions at all about the build process, materials, or anything else. Happy building!