
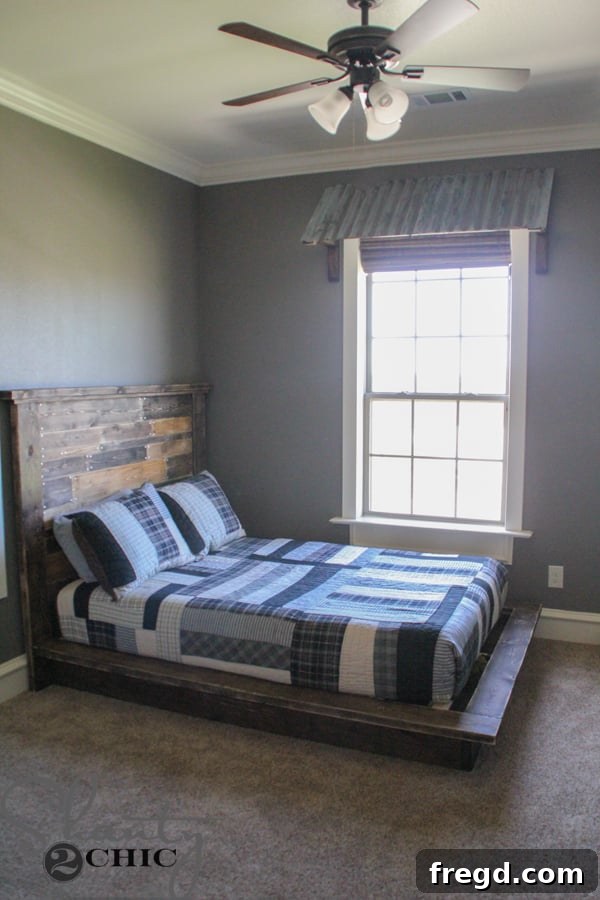
Welcome back to my ongoing series of DIY home transformations! This week, our creative journey brings us back to my son’s room, where we’re adding a distinctive touch that perfectly aligns with his unique style: a custom-built, DIY Corrugated Metal Awning. If you’re looking to infuse a blend of rustic charm and industrial chic into any space, especially a boy’s room or a study area, this project is for you.
I’ve long envisioned something truly special for his windows, a design element that would not only be functional but also deeply characterful. Inspiration, as always, can strike anywhere, and for this project, it came from the most delightful place: my hairstylist’s newly decorated salon. It’s absolutely adorable, and its charming aesthetic instantly sparked an idea for my son’s room.
The salon featured the cutest little metal awnings, adding an unexpected touch of rustic industrial flair. My hairstylist shared that these delightful pieces were built by her friend’s grandfather – a true artisan – using only scrap metal and wood he had around his home. He had seen similar awnings in Canton and, with his incredible talent, whipped these up and installed them himself. What a genuinely sweet and resourceful man! His creations were precisely the unique, character-filled element I had been searching for. I immediately knew these DIY metal awnings would be perfect for my son’s space, transforming his windows from ordinary to extraordinary.
Armed with a quick photo and a head full of ideas, I rushed home, eager to begin designing my own version. The best part? This guide is essentially two tutorials rolled into one! Not only will I walk you through the step-by-step process of constructing these robust and stylish corrugated metal awnings, but I’ll also reveal a clever technique to make brand-new, shiny metal look beautifully aged and weathered, as if it has been exposed to the elements for years. You absolutely don’t need a stash of scrap materials to achieve this look. I sourced everything I needed from my local Home Depot, and incredibly, each awning cost me roughly $10 in materials. Get ready to add some serious character to your windows!
DIY Corrugated Metal Window Awning: Step-by-Step Guide
This project offers a fantastic way to introduce a bespoke, high-impact design element into your home without breaking the bank. Follow along as we transform simple materials into stunning window features.
Gather Your Materials and Tools
Before diving into the build, ensure you have all your necessary supplies on hand. Preparation is key to a smooth DIY process.
Materials List:
- 2×3 lumber (The length will depend on your window size; estimate about 12-15 linear feet per awning for a standard window).
- Corrugated metal sheet (Approximately 2 ft x 8 ft sheet is usually enough for two standard-sized awnings).
- Wood glue (e.g., Titebond III)
- 2 1/2-inch pocket hole screws
- 2-inch wood screws (e.g., Spax multi-purpose screws for easy driving)
- 1-inch multi-material construction screws (for attaching metal)
- 80-grit sandpaper
- Acidic toilet bowl cleaner (e.g., Zep brand)
- Steel wool
Tools List:
- Miter saw (highly recommended for accurate angle cuts) or a hand saw and miter box
- Kreg Jig (for drilling pocket holes)
- Drill/driver
- Tin snips (heavy-duty ones will make cutting metal easier)
- Measuring tape
- Pencil
- Safety glasses
- Heavy-duty gloves (especially for handling metal and acidic cleaner)
Constructing the Awning Frame
The wooden frame forms the sturdy foundation for your corrugated metal awning. Precision in cutting and assembly is important for a professional finish.
I began by working with 2×3 boards, which provide ample strength without being overly bulky. First, cut your long back piece. This piece will attach directly to the wall above your window. Ensure it is approximately 6 inches wider than your window’s width to provide a nice overhang on each side. Next, cut two side pieces, each 19 inches long. On one end of each side piece, make a decorative 45-degree cut. This angle will create a visually appealing slope for the awning’s profile.
Achieving a clean 45-degree cut is straightforward with a miter saw. Simply adjust the saw’s base to 45 degrees. If you don’t have a miter saw, a simple hand saw paired with a miter box will also do the trick, allowing you to guide your saw for accurate angled cuts. Always wear safety glasses when operating saws.
With your cuts made, it’s time to prepare for assembly. Using a Kreg Jig, drill 1 1/2-inch pocket holes into one end of each of the short side pieces. Make sure to drill these holes on the end *without* the decorative 45-degree cut, and position them so they will be on the inner face of the board once assembled. This ensures they are hidden from view and create strong joints.
Now, attach these side pieces to the ends of your long back board. Apply a generous amount of wood glue to the joint surfaces, then secure them firmly with 2 1/2-inch pocket hole screws. The combination of glue and screws creates a robust connection that will withstand the test of time.
Next, we’ll add the angled support pieces that give the awning its characteristic slope. Cut two more 2×3 pieces, each 21 inches long, measuring from long point to long point. One end of each of these pieces should have a 45-degree angle that aligns with the slope of your side pieces, while the other end will feature another decorative 45-degree cut. Crucially, these two angles should not be parallel; one will be for attachment, the other for visual appeal. These pieces are vital for supporting the corrugated metal and giving the awning its projected shape.
Attach these angled support pieces to the top side of your back board and the outer edge of your side pieces, ensuring the angles align properly. Use a combination of wood glue and 2-inch wood screws for a strong bond. I prefer using Spax screws as they are self-tapping and often eliminate the need for pre-drilling, saving time and effort.
At this stage, your awning frame should be taking clear shape, resembling the basic structure that will hold the metal canopy. The main back piece and two angled supports should be firmly in place.
Now, measure the distance between the two front-most angled support pieces. Cut another 2×3 board to fit snugly in this space. Drill 1 1/2-inch pocket holes into each end of this new piece. Attach it to the frame using 2 1/2-inch pocket hole screws and wood glue. Position this board approximately 2 inches up from the bottom edge of the side pieces, ensuring the pocket holes face upwards (these will be concealed by the metal later). This piece adds structural integrity and provides an additional anchor point for the metal.
To further enhance the frame’s stability and aesthetic, we’ll add cross braces. Cut two 11-inch pieces of 2×3, each with a 45-degree angle on one end. These pieces will serve as diagonal supports, adding a finished look and preventing any sagging.
Attach these cross braces on each side of the frame, ensuring the angled end sits flush against the back wall piece and the other end connects to the front framework. I positioned mine 7 inches up from the back, aligning them level with the previously added horizontal support. Secure them with 2-inch wood screws and wood glue, creating a strong, triangular support system.
Congratulations, your sturdy wooden frame is now fully assembled and ready for its metal skin! Take a moment to admire your handiwork and ensure all joints are tight and square.
Preparing and Aging the Corrugated Metal
This section is where we add the “metal” to our metal awning and give it that desirable vintage character.
I purchased a standard sheet of corrugated metal from Home Depot for around $10, and it was sufficient for two awnings, making this project even more cost-effective. You’ll be surprised at how manageable this material is to work with.
To cut the corrugated metal, you only need a pair of tin snips (also found in the hand tools section at Home Depot) and, crucially, a sturdy pair of gloves. The edges of cut metal can be very sharp, so always prioritize safety.
Cutting the metal to size is surprisingly simple. I cut across the ripples of the metal sheet. First, measure your awning frame and mark a precise cut line on the metal. Then, wearing your gloves, cut slowly and deliberately, following your line one ripple at a time. I cut my metal pieces to be 20 inches wide. If your window is longer than the width of a single sheet, you can easily overlap multiple pieces on the frame to achieve the desired length. This step is far less intimidating than it sounds!
Upon purchase, corrugated metal is typically quite shiny. While a bright, new look might suit some aesthetics, I was aiming for a more rustic, weathered, and industrial appeal. After some research, I discovered an ingenious and surprisingly effective method for aging metal: acidic toilet bowl cleaner! I used the Zep brand, readily available at Home Depot. This acidic solution reacts with the metal to create a beautiful, oxidized patina.
Before applying the cleaner, lightly sand the entire surface of the metal sheet with 80-grit sandpaper. This isn’t about removing material, but rather scuffing the surface to give the acidic cleaner something to grab onto, ensuring an even and effective aging process. A quick pass over the entire sheet is all you need.
Now for the aging magic! Wearing heavy-duty gloves (this is an absolute must when working with acidic cleaners), carefully pour the toilet bowl cleaner over the metal. Be generous and ensure even coverage across the entire surface. If you’re doing this outdoors, be mindful of where the runoff goes; it can harm grass and plants. Rub the cleaner all over the metal using steel wool, which helps to distribute the acid and further abrade the surface for a more pronounced aged effect. Let the cleaner sit on the metal for at least one hour, ideally in direct sunlight, which helps accelerate the chemical reaction. I let mine sit all day to achieve a truly deep, weathered patina.
Once the metal has achieved your desired level of aging, it’s time to neutralize and clean it. Again, wearing your gloves, rinse the metal thoroughly with a water hose. As you rinse, continue to scrub the surface with steel wool. This removes any remaining cleaner and loose oxidation, leaving you with a beautifully aged, authentic finish. Repeat the rinsing and scrubbing until the water runs clear and you’re satisfied with the look.
Inspect your newly aged metal. If you’re happy with the depth and character of the patina, it’s ready for attachment. If you prefer an even deeper aged look, you can repeat the cleaning and aging process until you achieve perfection. The beauty of this technique is its customizability.
Attaching the Metal and Installing the Awning
The final steps bring your vision to life, securing the metal to the frame and installing the finished awning above your window.
To attach the aged corrugated metal to your wooden frame, I recommend using 1-inch multi-material construction screws. These screws provide excellent grip and durability for this type of application.
Begin by securing the metal at the corners of the frame. Drive the screws straight through the metal and firmly into the underlying wood structure. Ensure the metal is taut and properly aligned as you proceed.
Continue to place additional screws every few ripples across the entire surface of the metal sheet. If you used multiple metal pieces and overlapped them, make sure to drive screws through the overlapping sections to keep them securely joined. Fasten the metal along the top, bottom, and side edges of the frame to ensure a robust and stable canopy. This creates a beautifully finished and secure awning.
Your beautifully crafted and aged corrugated metal awning is now fully assembled and ready to be hung! The transformation is truly satisfying.
For installation, I highly recommend temporarily removing the metal pieces from the frame before mounting the wooden structure to the wall. While it might seem like an extra step, it makes the frame installation much easier and more precise. You can certainly reattach the metal after the frame is hung, especially if you pre-marked your screw holes. However, for higher windows, aligning and securing the metal flush to the frame once it’s already mounted on the wall can be tricky. It’s often simpler to work with the bare frame.
Locate the header board above your window and any studs along the sides. Drive sturdy wood screws through the back of your awning frame and directly into these studs or the header. This ensures a secure and level installation. If there are no studs directly on the sides of your window, don’t worry; securing the top portion firmly into the header will provide sufficient support. The frame will be perfectly secure once installed. Once the frame is plumb and level, reattach your aged corrugated metal panels, and your project is complete!
And just like that, you’re DONE! Reattach the metal to your now-mounted frame, and stand back to admire your handiwork. These DIY corrugated metal awnings add such incredible character and an instant boost of style to any window.
My son’s room features two windows, and I absolutely adore how these awnings complement both of them. They create a cohesive and stylish look, particularly enhancing his little study area with their rustic, industrial appeal. It’s a design element that truly sets the room apart.
His room has truly become a pretty cool and inspiring space! It’s incredible to think that when we first started building our home, this area was nothing more than a walled-up, wasted space. My step-dad, who built our house, recognized its potential. We decided to open up the wall to what is now my son’s study area and added a few steps to comply with building codes. The result is an awesome, dedicated study that wouldn’t have existed otherwise – a testament to thoughtful design and making the most of every corner.
Honestly, I’m now tempted to install metal awnings all over my house! While that thought might pass, it speaks volumes about how much I’m loving these unique window treatments. They truly add an unparalleled touch of character and warmth.
Everything you see in his room, including these fantastic awnings, is a DIY project, and I’ve shared detailed tutorials for each piece. If you’re inspired to continue your DIY journey and replicate other elements of this charming room, be sure to check out the links below:
- Planked Headboard: Learn how to create a stunning, rustic headboard that brings warmth and texture to any bedroom.
- Platform Bed: A simple yet stylish bed frame project perfect for maximizing space and achieving a modern look.
- Board and Batten Hat Rack: A functional and decorative piece that adds charming architectural detail and organization.
- Trophy Shelves: Display achievements and personality with these custom-built shelves, perfect for a teen’s room.
Stay tuned for even more projects from this room! Upcoming tutorials will include a custom-built Student Desk and a Large Framed Photo to further personalize the space.
Thank you so much for stopping by and sharing in our DIY adventures!
~Ashley