
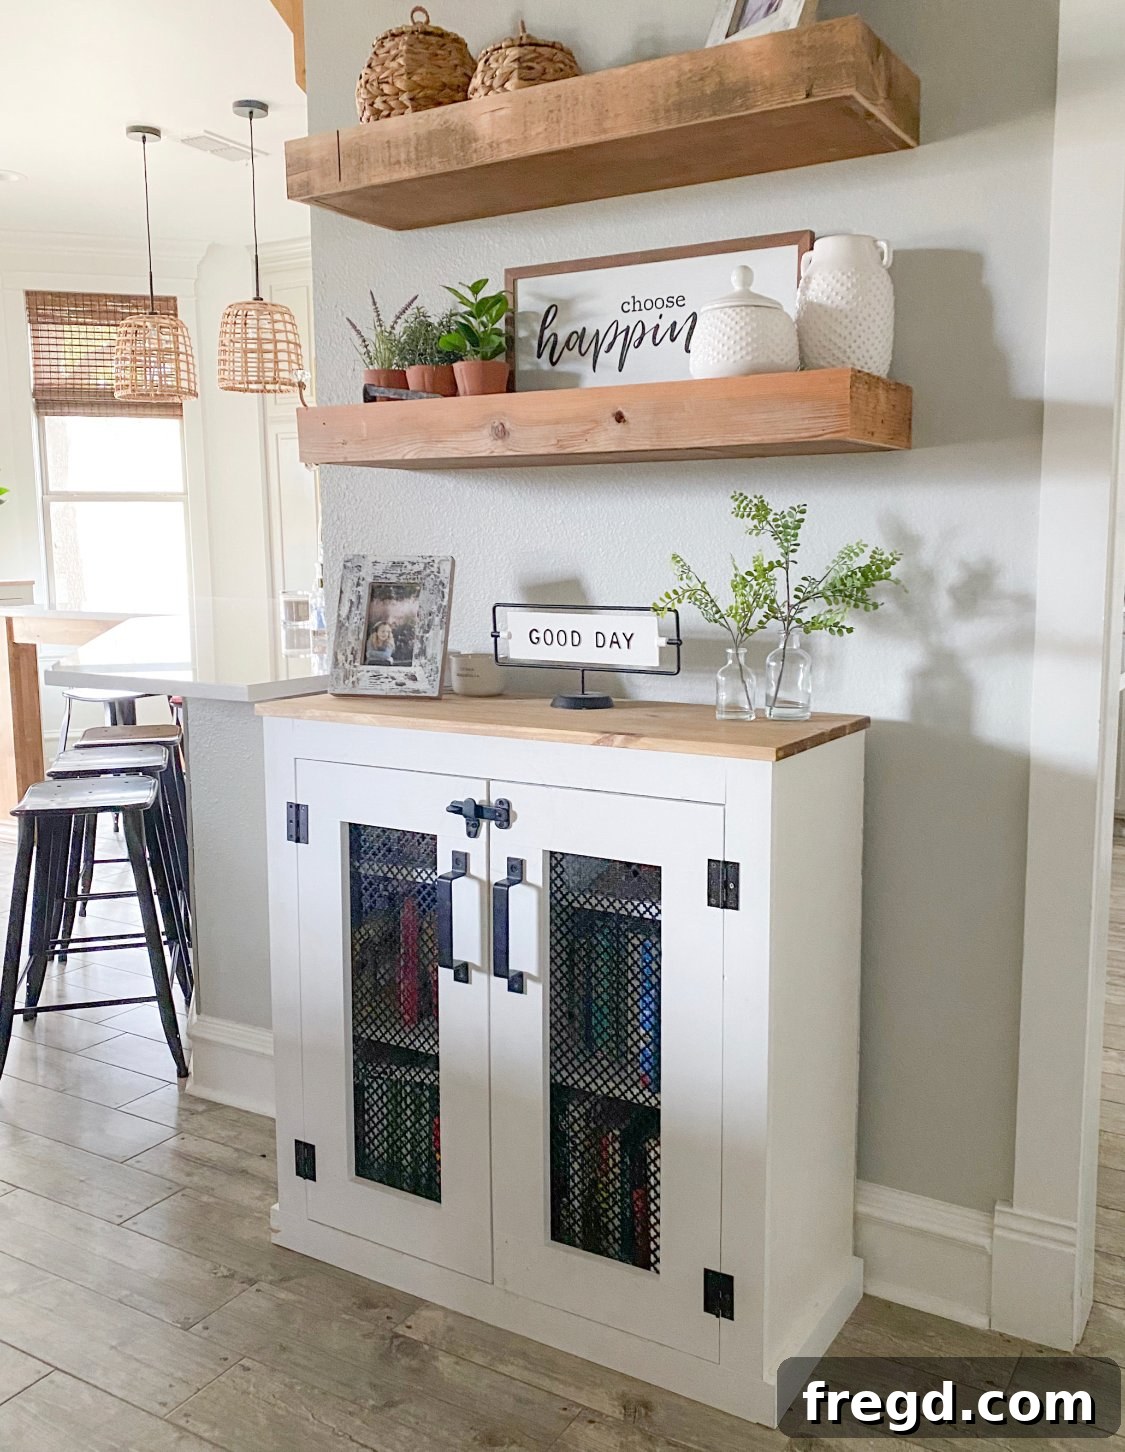
As homeowners and DIY enthusiasts, we constantly seek ways to combine functionality with personal style. There’s immense satisfaction in crafting something with your own hands, especially when it solves a practical problem and adds charm to your living space. Today, we’re diving into a project that perfectly embodies this spirit: building a gorgeous DIY Library Cabinet. This isn’t just any storage unit; it’s a testament to thoughtful design, built with love, and perfectly tailored to bring order and beauty into your home.
For me, this project was born out of a very personal need. My youngest son, who is autistic, possesses an incredible passion for books – a love that truly surpasses any toy. His ever-growing collection, while a source of immense joy, had begun to gracefully (or not so gracefully!) take over our living room. It became clear that a dedicated, beautiful home for his literary treasures was essential. The solution? A custom-built DIY Library Cabinet that not only stores his beloved books but also serves as a stylish focal point in our home. It’s a true win-win, and I’m thrilled to share how you can create one too, with a little help from our friends at Purdy Paint Products!
Getting Started: Plans and Preparation for Your Custom Cabinet
Embarking on a woodworking project requires careful planning, and this DIY Library Cabinet is no exception. To ensure a smooth build, we’ve provided comprehensive, free plans to guide you every step of the way. While the foundational design is based on our popular DIY Tin Door Cabinet, we’ll walk you through the specific modifications needed to create this versatile library unit, including door design and shelving configuration. Precision is paramount in woodworking, so take your time, review the plans thoroughly, and prepare your workspace.
You can download the FREE plans for this versatile cabinet by clicking HERE! Remember, the core design principles remain consistent, but this guide will highlight the key adjustments for your custom library cabinet.
Essential Tools and Materials Overview
Before you begin cutting, gather all necessary tools and materials. While the detailed list is in the downloadable plans, a few key items will be indispensable: high-quality plywood or lumber for the cabinet body, wood glue for strong joints, screws (especially pocket hole screws), and a reliable Kreg Jig for effortless joinery. For the finishing touches, you’ll want to have your Purdy brushes and paint pail ready!
Step-by-Step Construction Guide: Building Your DIY Library Cabinet
Let’s dive into the exciting part: bringing your custom library cabinet to life. Follow these detailed steps to construct a sturdy and beautiful piece of furniture that will last for years.
1. Assembling the Cabinet Base and Side Panels
The foundation of any strong cabinet begins with its base. Apply a generous amount of wood glue at every joint to ensure maximum stability. Begin by securing the bottom panel to the side panels. It’s crucial at this stage to position your pocket holes on all pieces strategically, as they will later be used to firmly attach the front face frame. Pay close attention to the placement: the top edge of your bottom shelf should be precisely 3-1/2 inches from the ground, ensuring adequate clearance and a balanced aesthetic. For creating these precise ¾-inch pocket holes throughout the entire build, I highly recommend using a Kreg Jig, an essential tool for robust and hidden joinery.
The Kreg Jig simplifies creating strong, hidden joints, making it a favorite among DIYers for projects like this. Its precision and ease of use ensure a professional finish. You can find our favorite Kreg Jig model here – it’s a staple in nearly every one of our builds!
2. Constructing the Face Frame
The face frame is what gives your cabinet a finished, professional look and adds significant structural integrity. Assemble the face frame using pocket hole screws, ensuring each joint is tight and square. A key detail here is the bottom board, which should be perfectly centered with a ¾-inch overhang on both ends. This overhang not only contributes to the cabinet’s aesthetic but also provides a sturdy base for subsequent trim work.
3. Attaching the Face Frame to the Cabinet Body
With the main cabinet box and face frame constructed, it’s time to bring them together. Apply wood glue generously along the edges where the face frame will meet the plywood panels. Then, securely screw the front face frame onto the assembled plywood body using the pre-drilled pocket holes. This step creates a robust and seamless transition between the structural elements and the decorative frame.
4. Adding Lower Side Trim Boards
Trim work adds character and refined detailing to your cabinet. For the lower side trim boards, use both wood glue and brad nails to ensure a secure attachment. These pieces will cover the exposed plywood edges, creating a cleaner, more finished look. Take your time to align them perfectly for a crisp, professional appearance.
5. Installing the Center Trim Board and Divider
If your design includes a center divider, this step is crucial for both structure and aesthetics. Attach the center trim board to the middle divider using glue and brad nails. This trim board should be precisely centered on the plywood panel. Once the trim is in place, secure the entire center divider. Use pocket hole screws on the bottom end for strong, hidden fastening, and reinforce the top by driving brad nails through the top of the center trim board into the top of the face frame. This creates a solid, stable internal structure.
6. Customizing and Installing Shelves
This is where your library cabinet truly becomes customized to your needs. I opted for two shelf boards on each side of my cabinet, resulting in six distinct shelves perfect for organizing various book sizes. However, the beauty of DIY is tailoring it to your specific collection. You can add as few or as many shelves as you like, adjusting the spacing to perfectly accommodate what you plan to store, be it large art books, smaller paperbacks, or even decorative items. Assemble each shelf using either pocket holes on the bottom of the plywood for a clean look or brad nails for quicker assembly, depending on your preference and the desired finish.
7. Attaching the Top Panel and Back Panel
The top panel not only caps off your cabinet but also provides a surface for display. Assemble your planked top using pocket hole screws for a durable and attractive finish. Alternatively, you can use a pre-made project panel for your cabinet top; just ensure you select a “stain grade” option if you intend to stain it, as I did. Center the assembled top precisely on the cabinet and secure it with pocket hole screws driven through the vertical side panels and the center divider. Finally, attach the ¼-inch plywood panel for the back of the cabinet using a combination of wood glue and brad nails. This provides structural rigidity and a finished look.
8. Building and Preparing the Cabinet Doors
The doors are a significant design element, adding character and protecting your stored items. Assemble both door frames using wood glue and pocket hole screws, ensuring they are perfectly square. Adjust your dimensions as needed to allow for a slight ⅛-inch spacing around each door, ensuring they open and close smoothly without rubbing. Before attaching the decorative metal sheet, it’s a good practice to paint the frame of the door and let it dry completely. If you’re using a metal sheet as an insert, as I did, this is also the ideal time to paint it – I used black spray paint for a contrasting effect. Once dry, carefully staple the metal sheet to the inside of the door panels. Metal sheets can be found at local craft stores, or conveniently online HERE on Amazon or HERE at Lowe’s.
The Finishing Touches: Painting and Staining with Purdy
Once the construction is complete, the true artistry of your DIY Library Cabinet emerges through its finish. This is where high-quality tools make all the difference, transforming your meticulously built structure into a stunning piece of furniture. After filling any nail holes and sanding all surfaces smooth – working through progressively finer grits – it’s time to apply your chosen finish. For this critical stage, my Purdy tools were absolutely indispensable, proving that the right tools not only save time but elevate your results to a professional level.
Achieving a Flawless Painted Finish with Purdy
For the main body of the cabinet, I envisioned a smooth, pristine painted finish that would complement any decor. To achieve this, I relied on my trusted Purdy Pail with Purdy Pail liners, paired with the exceptional Purdy Nylox brush. These tools are designed to work in harmony, providing an effortless painting experience and superior results.
The Purdy Pail is, without exaggeration, a game-changer for any painting project. If you don’t own one yet, now is the time! This innovative pail is specifically designed to make painting more efficient and less messy. The brilliance lies in its disposable liners; you simply insert a new liner for each project or paint color, making cleanup incredibly fast and easy. No more struggling to wash out a sticky paint pail – just dispose of the liner and you’re ready for the next task!
Once your liner is in place, fill the pail with your desired paint. For my cabinet, I chose the classic and versatile Pure White by Sherwin-Williams, a color that brightens any room and provides a clean backdrop for books and decor.
One of my absolute favorite features of the Purdy Pail is the integrated brush magnet. This clever addition acts like an extra hand, securely holding your brush when you need to move ladders, adjust your position, or simply take a quick break. It prevents messy drips, keeps your brush suspended safely out of the paint (preventing it from soaking too deeply), and ultimately saves you time and frustration during your project.
To apply the Pure White paint, I specifically chose my Purdy Nylox brush. These brushes are renowned for their ability to deliver an exceptionally smooth, streak-free finish. Their synthetic filaments are designed to hold and release paint evenly, minimizing brush marks and creating a factory-like appearance that truly elevates the quality of your handmade furniture.
Staining the Cabinet Top for Contrast and Depth
To add a touch of warmth and visual interest, I decided to stain the top of my cabinet. For this application, a different Purdy brush proved ideal: the Purdy XL brush. These versatile brushes are perfect for both indoor and outdoor projects, compatible with all types of paints and stains. Their robust construction and excellent cleanability make them a go-to choice for various finishing tasks. After meticulously sanding the surface, I applied the stain evenly with the XL brush, always moving with the grain of the wood to enhance its natural beauty. Immediately after application, I wiped away any excess stain with a painter’s cloth, revealing a rich, deep finish. Simple, yet incredibly effective!
The synergy between high-quality tools and proper technique is undeniable. Choosing the right Purdy brush for each specific task – whether it’s painting broad surfaces or staining intricate details – not only ensures a superior finish but also significantly streamlines the entire process, saving you valuable time and effort.
You can find these exceptional Purdy products and explore their entire range by visiting Purdy’s official website HERE!
Final Assembly and Personalization
With all paint and stain thoroughly dry and cured, the final assembly brings your DIY Library Cabinet to completion. Carefully attach the doors to the cabinet using your chosen decorative hinges. Take your time to align them perfectly for smooth operation and a polished look. Next, install any door pulls or knobs that complement your aesthetic vision. This is the stage where your unique style truly shines through. Whether you prefer antique bronze pulls, modern chrome knobs, or something completely custom, these small details make a big impact.
The beauty of this custom cabinet extends far beyond just storing books. While it’s perfect for a substantial collection of cherished volumes – perhaps even 24 Sandra Boynton board books, as was my original inspiration – its versatile design means it can be adapted for almost any room and purpose. Imagine it in a home office organizing supplies, in a dining room displaying fine china, in a bedroom as an elegant wardrobe, or even in an entryway providing stylish storage for essentials. Personalize it further with decorative items on top, framed photos, or even small plants to truly make it your own. Make it look awesome, because it is!
Where to Find Your Purdy Tools
Elevate your next DIY project with the unparalleled quality of Purdy tools. You can find the incredibly useful Purdy Pail, along with its essential disposable liners, and a wide array of other Purdy painting tools at your local Sherwin-Williams stores. Stock up on those liners – you’ll thank me later for the effortless cleanup!
For those looking for specific brush types, like the highly-regarded Purdy Chinex Elite brushes, they are available at all authorized Purdy retailers. Investing in Purdy means investing in a smoother, more efficient, and ultimately more rewarding DIY experience.
This project was proudly sponsored by Purdy, and while their support was invaluable, all opinions, insights, and excitement shared about their fantastic products are entirely my own, born from genuine experience.
To delve deeper into the craftsmanship and innovation behind Purdy products, and to understand “The Purdy Difference,” CLICK HERE!
Unsure which Purdy tool is best for your upcoming project? Their comprehensive tool selector can help guide you! To find the right Purdy tool for your next project, CLICK HERE!
Ready to get started? Locate your nearest Purdy retailer and get equipped for success! See where to buy your Purdy tools for your next project, CLICK HERE!