
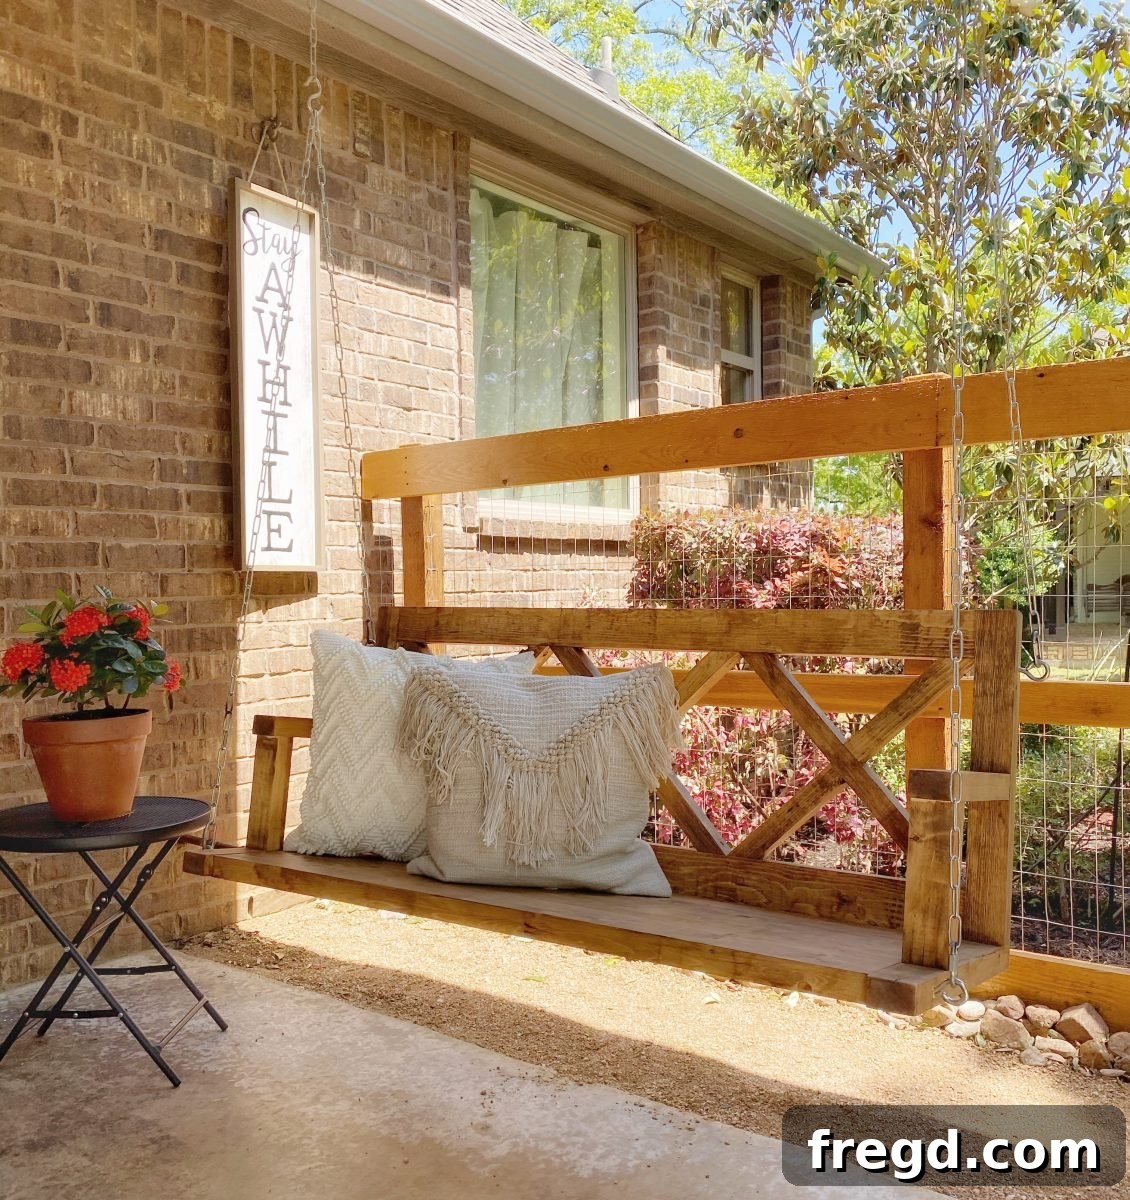
Welcome, fellow DIY enthusiasts and friends! I hope you’re all making the most of this precious time at home, cherishing moments with loved ones and perhaps even tackling those long-awaited projects. Today, I’m thrilled to share a project that has brought immense joy and functionality to our family: an incredible DIY X-Back Porch Swing, built for around $20!
A few weeks ago, I opened up on social media about a significant chapter in our family’s life. My youngest son received a diagnosis of severe autism late last year. This journey has been transformative, prompting us to learn extensively about autism and how to create the best possible environment for him to thrive. As his mother, I am endlessly proud of him and deeply committed to supporting his unique needs. Your overwhelming messages of encouragement and support during that time truly uplifted my spirit, and for that, I am profoundly grateful. For those who may have missed it, you can view the original post here:
View this post on Instagram
Creating an Accessible Outdoor Haven for Family Fun
My son has three great loves in his life: me (of course!), being outdoors, and running. Recognizing his need for a safe and stimulating environment, my stepfather and I dedicated the past few weeks to building a new outdoor space specifically designed for him to run and play freely. This new area has been an absolute game-changer for our entire family, providing a secure and joyful place for him to expend energy and explore. While the space was perfect for him, I realized it was missing one crucial element: a dedicated spot for me to relax and supervise. Spending countless hours out there, I longed for a comfortable place to sit and prop up my feet. Building a new porch swing quickly emerged as the ideal solution, blending perfectly with the rustic charm of our outdoor area and offering a much-needed sanctuary for me.
The vision was clear: a sturdy, beautiful, and most importantly, affordable X-back porch swing. This design not only adds visual appeal but also provides excellent back support for ultimate comfort. I’m excited to share how this project unfolded. You can see the full build in action:
Watch the full DIY X-Back Porch Swing build video:
I couldn’t be happier with the final result! This porch swing exceeded all my expectations, combining comfort, durability, and a classic aesthetic. It’s now the perfect spot for me to unwind while my son enjoys his outdoor adventures. This truly makes our outdoor space complete, creating a harmonious environment for the whole family.
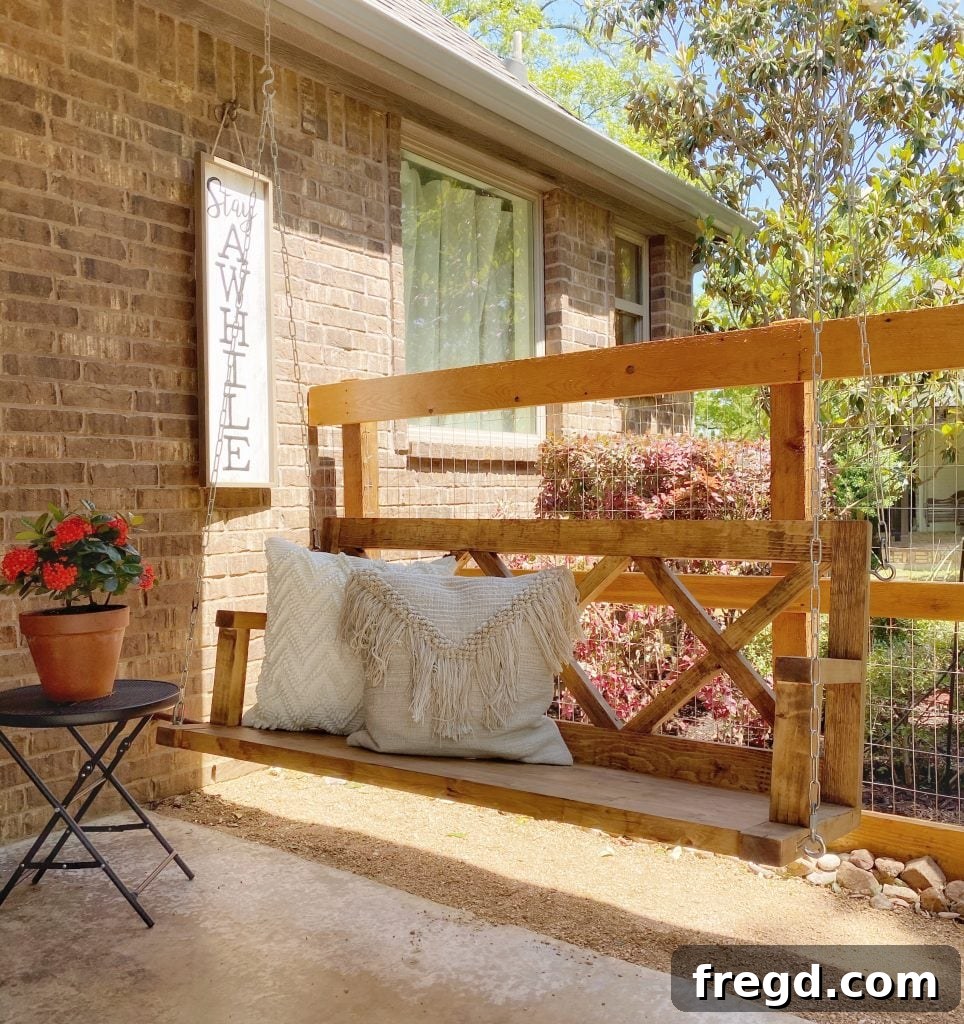
Before we dive into the detailed building instructions, remember to download the free, printable plans for this versatile DIY X-Back Porch Swing at the very end of this post!
Choosing Your Materials: Affordable and Efficient Lumber Selection
To keep the cost of this project incredibly low, I strategically utilized 2×6 lumber. I had a substantial pile of 2x6s in my garage, making it an excellent, budget-friendly choice. By cutting these larger boards into smaller, more specific dimensions using a table saw, I was able to maximize my material efficiency and minimize waste. This technique is often referred to as “ripping” lumber. For certain parts of this swing, you could also opt to use 2x4s directly if you prefer, which might save you a step if you don’t have a table saw or access to 2x6s. However, if you choose to use standard 2x4s or other non-ripped boards, please ensure you adjust the overall dimensions provided in the plans to accommodate the different board widths and thicknesses, maintaining the structural integrity and desired aesthetic of your porch swing.
Essential Tools for Your DIY Porch Swing Project:
- Miter Saw or Circular Saw: For precise cuts to length.
- Table Saw (optional but recommended): For ripping 2x6s into smaller dimensions.
- Pocket Hole Jig (e.g., Kreg Jig): Crucial for strong, concealed joints.
- Drill/Driver: For pilot holes and driving screws.
- Measuring Tape and Pencil: For accurate measurements.
- Wood Glue: For enhanced joint strength.
- Clamps: To hold pieces securely during assembly and gluing.
- Orbital Sander or Sandpaper: For smooth finishes.
Step-by-Step Guide: Building Your X-Back Porch Swing
Step 1: Constructing the Seat Base
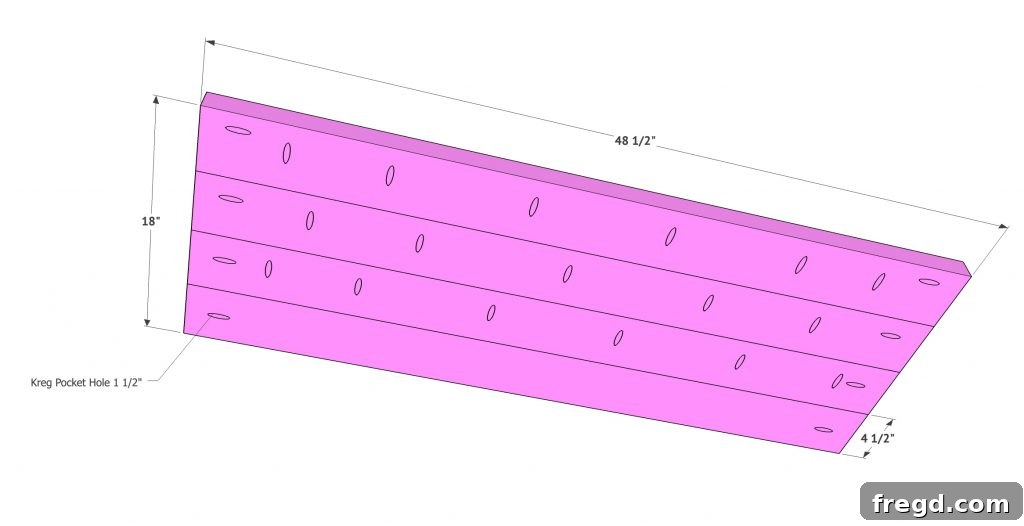
Begin your porch swing project by building the seat. For this, I used 2×6 boards that I ripped down to 4.5 inches wide each. This specific width creates a comfortable and sturdy seating surface. Carefully measure and cut four of these boards to a length of 48.5 inches each. Accuracy in this step is crucial, as these four boards will form the main body of your swing’s seat, so ensure all cuts are straight and precise for a cohesive final product. Lay them out side-by-side to visualize the seat and ensure they fit together snugly.
Step 2: Attaching the Seat Breadboards
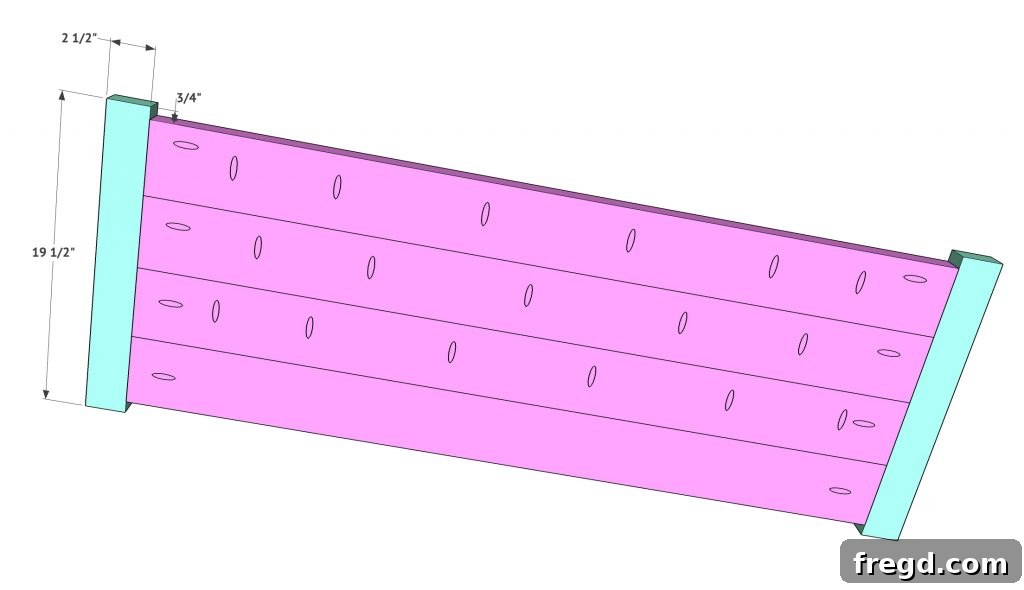
Next, you will attach the breadboards to the ends of the seat planks. These breadboards serve to hold the seat planks together and provide a finished edge. Similar to the seat planks, I ripped 2x boards down to 2.5 inches wide for these pieces. Once cut, position a breadboard at each end of the assembled seat planks. You’ll want a 3/4-inch overhang on both ends of the breadboards relative to the seat width. Secure these breadboards by drilling 2.5-inch pocket holes through the ends of each seat plank and driving 2.5-inch outdoor-rated pocket hole screws into the breadboards. Adding wood glue during this step will create an even stronger, more durable connection, essential for a long-lasting swing.
Step 3: Assembling the Back Frame
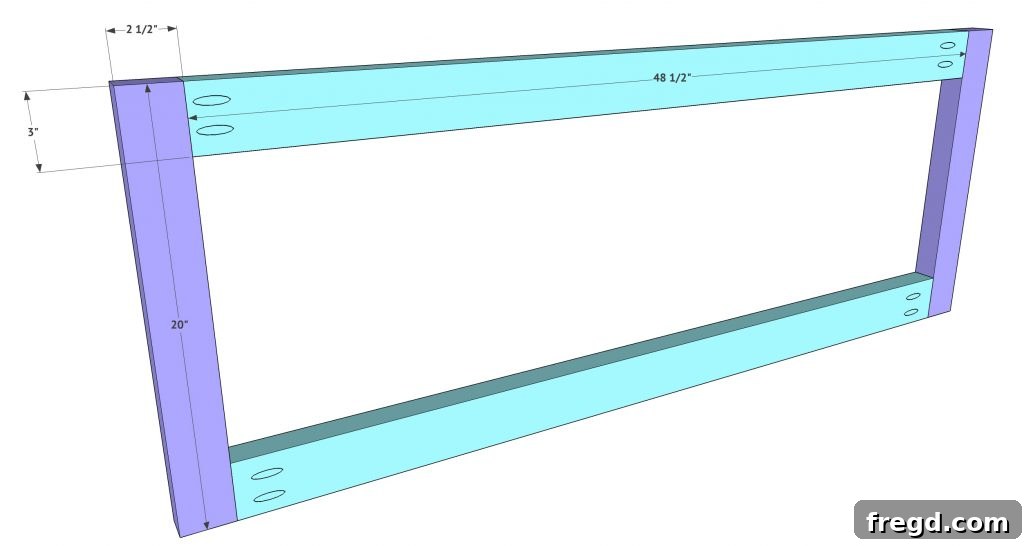
Now it’s time to construct the back of your porch swing. This will begin with a simple, sturdy rectangular frame. For the top and bottom boards of this frame, use material that is 3 inches wide. For the vertical side boards, use material that is 2.5 inches wide. Ensure all cuts are square and accurate for a strong, plumb frame. Assemble these four pieces by applying wood glue to the joints where the top and bottom boards meet the side boards. Then, reinforce these connections using 2.5-inch pocket hole screws, driving them into the side boards from the top and bottom boards. This method creates a very strong and concealed joint, perfect for the back support of your swing.
Step 4: Crafting the Longer X-Pieces
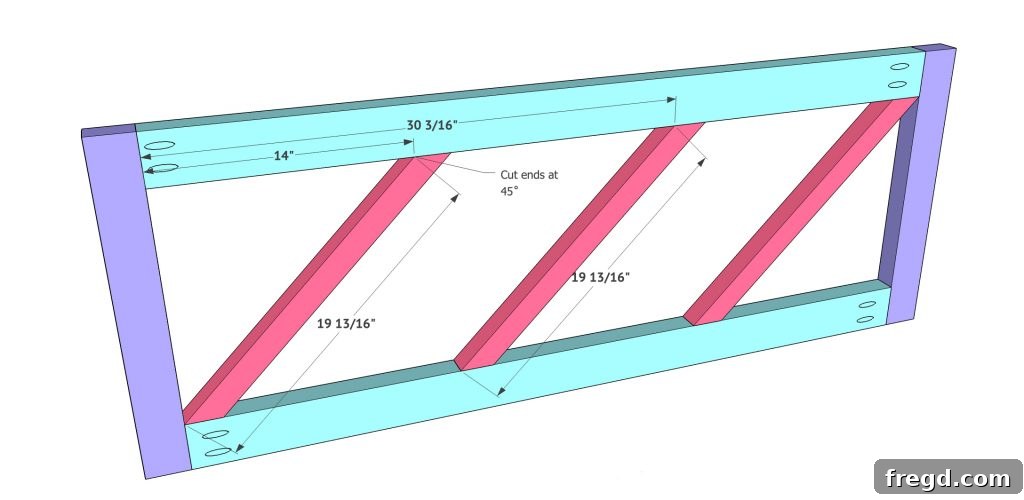
The distinctive X-back design is next! This part requires careful measurement and dry-fitting before any permanent attachments are made. Begin by cutting the longer diagonal pieces of the “X.” I used 2x boards ripped to 1.5 inches wide for these, which provides a sleek yet strong cross-brace. Each end of these longer pieces needs to be cut at a precise 45-degree angle. This angle is essential for them to fit snugly within the rectangular back frame and meet at the center. Cut and dry-fit each piece individually into the frame to ensure a perfect fit before moving on, adjusting angles as needed to achieve a tight, gap-free joint.
Step 5: Attaching the Shorter X-Pieces
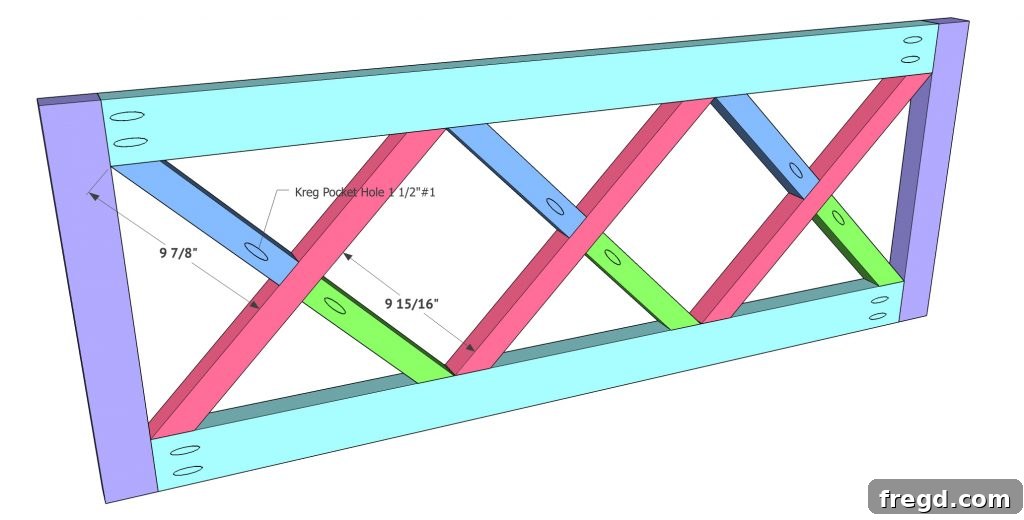
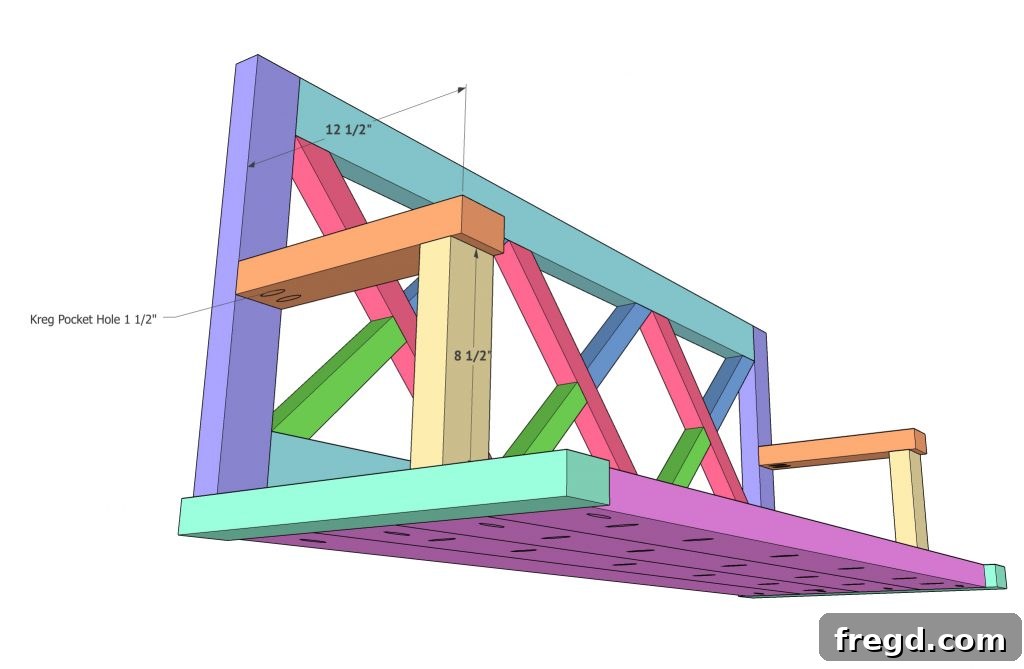
Once your longer X-pieces are perfectly dry-fitted, it’s time to incorporate the shorter X-pieces that complete the pattern. Measure and cut these shorter segments to fit between the longer diagonals, also at 45-degree angles on their ends where they meet the longer pieces. For these shorter pieces, drill 1.5-inch pocket holes into the ends that will connect to the longer boards. After dry-fitting all X-pieces to confirm precise alignment and minimal gaps, apply wood glue generously to all mating surfaces. Then, secure the shorter pieces to the longer pieces using 2.5-inch pocket hole screws, ensuring a robust and attractive X-pattern that will define the swing’s backrest.
Step 6: Joining the X-Back to the Seat
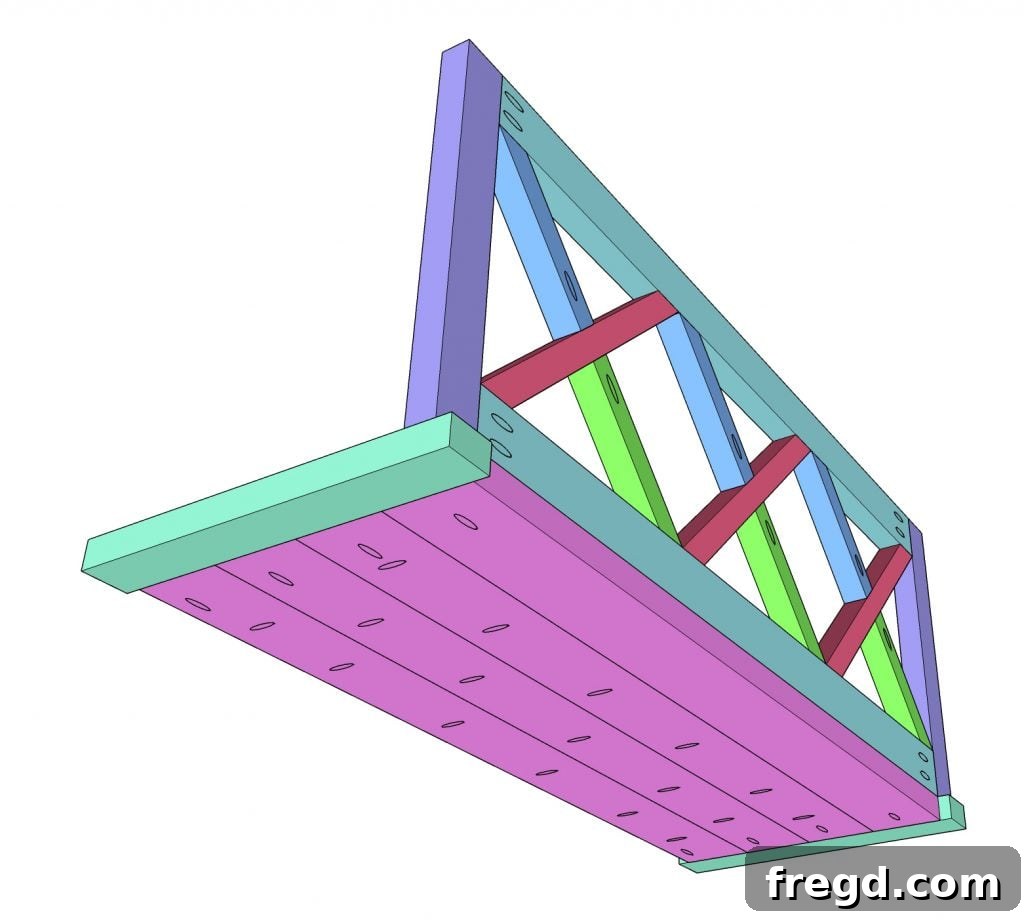
With the X-back assembly complete, it’s time to marry it with the seat. First, attach the entire X-back structure to the back frame (which you built in Step 3) using a combination of wood glue and outdoor-rated deck or wood screws. This ensures the X-pattern is rigidly held within its frame. Next, carefully align the bottom edge of this back frame so that it is perfectly flush with the back plank of the swing’s seat. Once aligned, apply wood glue along the contact surface and secure the back to the seat using 2.5-inch deck or outdoor screws. Drive these screws from the bottom of the seat into the back frame, creating a strong and stable connection between these two primary components of the porch swing.
Step 7: Installing the Arm Rests
The final structural step is creating and attaching the arm rests, which provide both comfort and additional stability to your porch swing. For the arm rests, I used 2x material ripped down to 2.5 inches wide, creating a proportional and comfortable arm surface. Cut both the longer and shorter pieces for each armrest according to your plans. Attach the shorter piece to the longer piece using wood glue and 2.5-inch pocket hole screws for a seamless joint. Then, attach the complete armrest assembly to the swing. Apply wood glue to the contact points and use 2.5-inch deck or wood screws. Drive these screws through the back of the swing and through the base of the swing, into the arm rest. While you might find it challenging to fit a drill bit for pocket hole screws in the tight space under the armrest, the robust wood screws driven from the back and base will provide a perfectly secure attachment, ensuring sturdy and reliable armrests for years of enjoyment.
Finishing Touches: Staining, Sealing, and Hanging Your Swing
Once your DIY X-Back Porch Swing is fully assembled, it’s time for the crucial finishing steps to protect it from the elements and enhance its beauty. I began by staining the entire swing with Varathane stain in the Golden Oak shade. This particular stain provides a rich, warm color that highlights the natural grain of the wood, adding a timeless appeal to the piece. You can find this high-quality stain HERE. After applying the stain, allow it ample time to dry completely according to the manufacturer’s instructions. Proper drying is essential for the next step.
Following the stain, I applied a durable water protectant over the entire swing. This step is non-negotiable for any outdoor furniture, especially something as exposed as a porch swing. The protectant forms a barrier against moisture, UV rays, and general wear and tear, significantly extending the lifespan and maintaining the appearance of your swing. I used THIS water protectant, which offers excellent defense against the elements. A good protectant prevents warping, cracking, and fading, ensuring your swing remains a cherished piece for many seasons to come.
Finally, the moment comes to hang your newly built porch swing! I utilized the same reliable method I employed for my previous porch swing project. While I can share the general approach HERE, it’s paramount to understand that every porch and installation space is unique. Factors such as ceiling joist location, material, and structural integrity will dictate the safest and most effective hanging method. Therefore, I strongly urge you to conduct thorough research and, if necessary, consult with a professional to ensure your swing is hung securely and safely. Your family’s safety is the top priority, so invest the time to choose appropriate heavy-duty swing hardware and follow best practices for installation.
Get Your Free Plans and Start Building Today!
This DIY X-Back Porch Swing is more than just a piece of furniture; it’s an invitation to relax, connect, and enjoy the beauty of your outdoor space. It’s a testament to what you can create with a little effort and the right guidance. Imagine unwinding on your beautifully crafted swing, sipping a drink, reading a book, or simply watching your loved ones play. The satisfaction of building something so functional and beautiful with your own hands is truly unmatched. This project offers both the joy of creation and the long-term pleasure of a perfect outdoor retreat.
Ready to embark on your own porch swing adventure? Don’t wait! You can grab the free, printable plans for this DIY X-Back Porch Swing by clicking the link below. These comprehensive plans will guide you through every step, making the process straightforward and enjoyable. Get your tools ready, select your lumber, and prepare to enhance your outdoor living area with a charming and comfortable porch swing that will be enjoyed for years to come!
DIY X Back Porch Swing
Create a super cute porch swing with just a few boards! Click HERE for the free printable plans!
Supply List
- 4 x 2x6x10 framing lumber (or equivalent if ripping from different stock)
- Several 2.5″ outdoor Kreg pocket hole screws
- Several 2.5″ outdoor wood or deck screws
- Wood glue
- Swing hardware (chains, hooks, hangers – suited for your specific installation)
- Optional: Wood stain (e.g., Varathane Golden Oak), Outdoor water protectant
Instructions Summary
- Build the seat of the swing first using four 4.5″ wide boards cut to 48.5″ each.
- Attach the seat breadboards (2.5″ wide) with a 3/4″ overhang using pocket hole screws and wood glue.
- Construct the rectangular back frame: top/bottom boards 3″ wide, side boards 2.5″ wide, secured with wood glue and pocket hole screws.
- Create the X-pieces: rip 2x boards to 1.5″ wide, cut longer diagonals with 45˚ ends, and dry fit.
- Measure and cut smaller X-pieces, securing them to the longer pieces with pocket hole screws and wood glue after dry-fitting.
- Attach the completed X-back assembly to the back frame using wood glue and deck screws. Then, align the back frame flush with the seat’s back plank and secure with wood glue and 2.5″ deck/outdoor screws.
- Build and attach the arm rests (2.5″ wide ripped 2x material) using wood glue and 2.5″ pocket hole screws to join the armrest components, and then 2.5″ deck/wood screws to attach the armrests to the swing’s back and base.
For detailed, step-by-step instructions with accompanying images, please refer to the comprehensive guide above and download the free plans.