
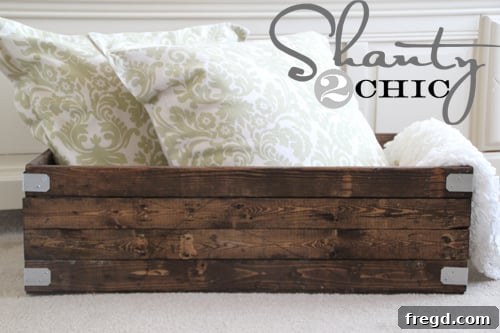
DIY Industrial Wood Storage Crate: Build Your Own for Under $20!
Are you searching for a fun, easy, and incredibly affordable project to add character and functionality to your home? Look no further! Today, I’m thrilled to share a fantastic DIY wood storage crate tutorial that combines rustic charm with an industrial edge. This project is not only budget-friendly, costing under $20 to make, but it also delivers a stylish storage solution you’ll want in every room.
Imagine versatile storage that doubles as a unique piece of decor. From organizing blankets in the living room to tidying up toys in a child’s bedroom or storing magazines in a cozy reading nook, this industrial-style wood crate is designed to meet a variety of needs. It’s perfect for those who love the look of custom furniture but prefer the satisfaction and savings of building it themselves. Get ready to transform simple lumber into a standout piece that truly elevates your home’s aesthetic!
Ready to create your own? Here’s how I crafted this incredible storage crate for an astonishing $17!
Gather Your Materials and Tools for This Budget-Friendly Build
One of the best aspects of this DIY project is its accessibility. The materials are inexpensive and readily available at most hardware stores like Lowe’s. You don’t need a huge array of specialized tools either, making it an ideal project for beginners in woodworking.
Materials List:
- 5 – 1×3 Furring Strips: These are typically the most economical lumber option and are perfect for the sides of your crate. Their lightweight nature makes them easy to work with.
- 1 – 2×2 Scrap Piece: You’ll only need approximately a 4-inch piece, so check the scrap bin at your local hardware store to save even more money! This will be cut into smaller pieces to form the sturdy corner posts.
- 1 – 1/4″ Sheet of Plywood (36×20 inches): This forms the base of your crate, providing a solid foundation for storing items.
- 1 Package – 1/2″ Wood Screws: Essential for securely attaching the metal accents and reinforcing joints.
- 8 – Metal Angles (approx. $0.60 each): Found in the roofing or hardware section, these angles are key to achieving the desired industrial aesthetic while also providing some structural reinforcement.
- Gorilla Wood Glue: A strong adhesive is crucial for creating durable joints that will stand the test of time, complementing the nails and screws.
- Wood Stain (e.g., Rust-Oleum Dark Walnut Stain): To give your crate a rich, finished look. The dark walnut stain enhances the distressed features beautifully.
Tools You’ll Need:
- Saw: A miter saw or circular saw will make quick work of cutting your lumber. If you don’t own one, many hardware stores offer cutting services for a small fee, or sometimes even for free with your purchase!
- Measuring Tape: Accuracy is key for a well-built crate.
- Pencil: For marking your cuts.
- Nail Gun or Hammer: For assembling the main frame. A nail gun speeds up the process, but a hammer and finishing nails work just as well.
- Drill: To pre-drill holes for screws, preventing wood splitting, especially when attaching the metal angles.
- Screwdriver: To secure the wood screws, or use your drill with a compatible bit.
- Safety Glasses: Always wear eye protection when cutting or nailing wood.
- Sandpaper (optional): For smoothing any rough edges before staining.
- Rag or Brush: For applying the wood stain.
- Hammer, Bolts, Screwdriver: For the distressing process.
My shopping trip concluded with a package of 1/2-inch wood screws and 8 metal angles. These angles, often found near roofing products or in the general hardware section, are incredibly inexpensive at about $0.60 each and add significant character!
Precision Cutting: Preparing Your Wood Pieces
Accurate cuts are fundamental to ensuring your crate comes together perfectly square and sturdy. If you’re new to woodworking or don’t have access to power tools, remember that many hardware stores, like Lowe’s, offer board cutting services. This can save you time and ensure precise measurements.
Cutting Dimensions:
- From the 1×3 Furring Strips:
- Cut 8 pieces at 36 inches long. These will form the longer sides of your crate.
- Cut 8 pieces at 20 inches long. These will be used for the shorter end panels.
- From the 2×2 Scrap Piece:
- Cut 4 pieces at 9.5 inches long. These will serve as the vertical corner posts, providing the main structural support for your crate.
- 1/4″ Plywood:
- Ensure your plywood sheet is cut to 36×20 inches. This will form the solid bottom of your storage crate.
Once all your pieces are cut, you’re ready to move on to assembly. Double-check your measurements before making each cut to avoid waste and ensure a smooth building process.
Step-by-Step Assembly Guide for Your DIY Crate
Building this crate is surprisingly straightforward, relying on a combination of wood glue and nails for maximum durability. Taking your time with each step will ensure a strong and visually appealing final product.
Step 1: Constructing the Side Panels
Begin by creating the two shorter side panels of your crate. Each side panel will consist of two 9.5-inch 2×2 posts and four 20-inch 1×3 furring strips. Lay two 2×2 pieces parallel to each other. Apply a generous bead of Gorilla Wood Glue along the edges of one 20-inch 1×3 furring strip where it will meet the 2x2s. Position the 1×3 flush with the top edge of the 2x2s and nail it into place from the outside of the 1×3 into the 2×2. Repeat this process for the other three 20-inch 1x3s, spacing them evenly or as desired along the length of the 2x2s. Ensure consistent spacing for a uniform look. You should have two identical side panels once this step is complete.
Step 2: Connecting the Side Panels to Form the Frame
Now, it’s time to connect your two side panels using the longer 36-inch 1×3 furring strips. Stand your two assembled side panels upright and parallel. Take one of the 36-inch 1x3s, apply wood glue to its ends, and position it flush with the top outer edge of the 2×2 posts on one side, connecting the two shorter panels. Nail it securely into the 2×2 posts. Repeat this for the remaining three 36-inch 1x3s, aligning them with the previously attached short strips to form a complete rectangular frame. This forms the complete structure of your crate. Use a measuring tape to ensure the frame is square before the glue sets, making any necessary adjustments.
Step 3: Attaching the Plywood Base
With the main frame assembled, it’s time to add the bottom. Position the 36×20-inch plywood sheet neatly onto the bottom edges of the 1×3 furring strips that form the base of your crate. Apply wood glue along the top edges of these bottom furring strips where the plywood will sit. Carefully place the plywood on top, ensuring it’s flush with all edges. Then, secure the plywood by nailing it directly into the bottom of the furring strips. This creates a solid and sturdy base for your storage crate, ready to hold whatever you need.
Distressing and Finishing for That Perfect Industrial Look
This is where your crate truly comes alive and gains its unique character. The goal is to make the new wood look aged and well-loved, then enhance it with a rich stain and industrial hardware.
Achieving the Distressed Effect:
Before applying any finish, you want to “age” the wood. This is a super easy and fun step! Grab a hammer, some bolts, chains, or anything heavy and metal you can find around the house. Gently but firmly beat the entire crate, focusing on edges and surfaces where natural wear and tear would occur. Don’t be afraid to make dents, dings, and scratches. I also took a flathead screwdriver and dragged it across the boards to create deeper gouges and lines, mimicking years of use. This process is about embracing imperfection and creating a story for your piece.
Staining for Depth and Richness:
Once you’re satisfied with the distressing, it’s time to stain. I highly recommend my favorite Rust-Oleum Dark Walnut Stain. This stain penetrates the wood fibers, highlighting all the beautiful distressing you just created and giving the crate a deep, rich, and antique appearance. Apply the stain evenly with a rag or brush, working in the direction of the wood grain. Allow it to soak in for a few minutes, then wipe off any excess. For a deeper color, apply a second coat after the first has dried. Make sure to work in a well-ventilated area.
Adding the Industrial Accents:
The final touch for that authentic industrial look is the metal angles. To achieve this, take one metal angle and position it at the top corner of one of the four edges of your crate. Pre-drill small pilot holes through the holes in the metal angle into the wood to prevent splitting. Then, secure it firmly with the 1/2-inch wood screws. Repeat this process for all four top corners and all four bottom corners, for a total of eight metal angles. This not only enhances the industrial aesthetic but also adds a layer of protection to the corners. Easy, right?
Beyond the Build: Customization and Styling Your Industrial Crate
Congratulations, you’ve built a stylish and functional industrial wood storage crate! But the journey doesn’t have to end here. One of the greatest joys of DIY is the ability to customize and adapt your creations to perfectly suit your needs and personal style.
Enhance Durability and Style:
- Sealant: For added protection, especially if your crate will be in a high-traffic area or used outdoors (though it’s primarily designed for indoor use), consider applying a clear polyurethane or lacquer finish over the stain. This will protect the wood from moisture, scratches, and everyday wear, ensuring your beautiful distressed finish lasts for years.
- Casters: Want to make your crate easily movable? Attach four industrial-style casters to the bottom. This is especially useful if you plan to store heavy items like books or if you want to frequently reconfigure your living space.
- Handles: While the cut-out gaps in the furring strips can serve as handles, you could also add decorative rope handles or metal pull handles to the short ends for an extra touch of farmhouse or industrial charm.
Personalize Your Crate:
- Different Stains or Paints: While dark walnut is classic, don’t be afraid to experiment! A lighter stain could give it a more farmhouse feel, a grey wash could lean towards a coastal aesthetic, or even a pop of color with chalk paint could make it a vibrant accent piece.
- Stenciling: Add stenciled letters or numbers to the sides of your crate for a vintage shipping container look or to label its contents (e.g., “TOYS,” “BLANKETS,” “BOOKS”).
- Liners: For softer storage, like blankets or clothing, consider lining the inside of the crate with fabric. This can prevent snags and add a cozy touch.
Where to Use Your Versatile Wood Crate
The beauty of this industrial wood storage crate lies in its incredible versatility. Here are just a few ideas for integrating it into your home decor:
- Living Room: Perfect for holding extra throw blankets, magazines, remote controls, or even serving as a stylish side table with a tray on top.
- Bedroom: Use it at the foot of the bed for extra pillows, sweaters, or as a unique nightstand.
- Kids’ Room/Playroom: An excellent solution for toy storage, encouraging easy clean-up while adding to the room’s decor.
- Office/Study: Organize books, files, craft supplies, or stationery in an aesthetically pleasing way.
- Entryway/Mudroom: Ideal for shoe storage, scarves, hats, or bags, helping to keep clutter at bay right as you walk in the door.
- Bathroom: Store extra towels, toiletries, or even laundry.
Your Next Favorite DIY Project Awaits!
This industrial wood storage crate project truly exemplifies how rewarding and impactful DIY can be. It’s one of the quickest and most budget-friendly endeavors I’ve tackled, yet it yields a stunning and highly functional piece of home decor. You get custom storage that perfectly fits your style without breaking the bank.
Not only will you save money compared to buying similar store-bought items, but you’ll also gain the immense satisfaction of creating something beautiful with your own hands. This crate proves that you don’t need extensive woodworking experience or expensive tools to craft something truly special for your home. It’s an accessible project for everyone, from seasoned DIYers to those just starting their crafting journey.
If you’ve been inspired by this tutorial, I would be so grateful if you could share it with others! Pin it to your Pinterest boards, share it on social media, and spread the word about how easy and affordable it is to create custom, stylish storage. Your support means the world and helps others discover the joy of DIY!
Thanks so much for stopping by and taking the time to explore this project. I hope it brings a touch of industrial charm and organizational bliss to your home. Have a fantastic week, and happy crafting!
~Ashley