
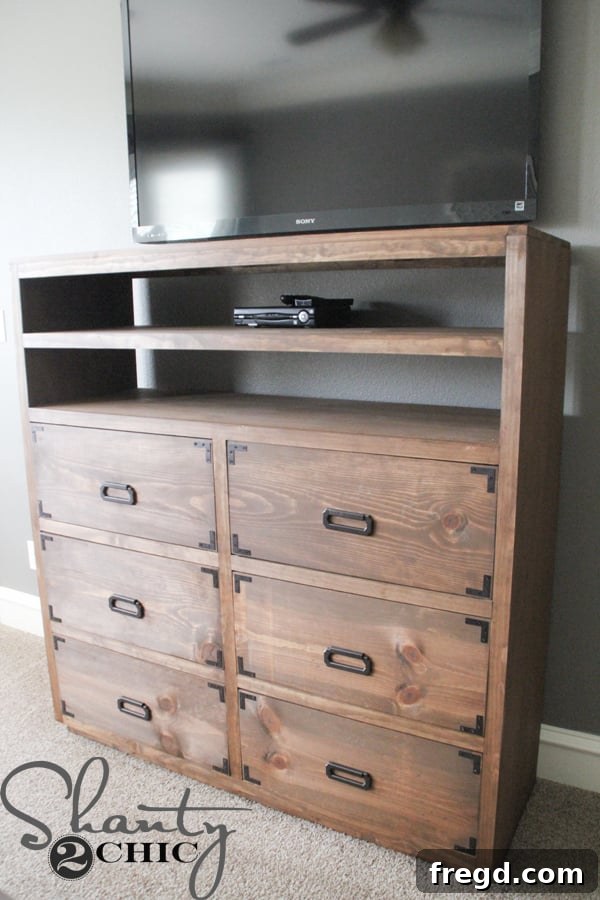
Embarking on a significant DIY project can be incredibly rewarding, and for our master bedroom, I envisioned a truly grand piece: a custom-built media dresser boasting six spacious drawers. This magnificent furniture item is not just a standalone project but also the central component of an ambitious six-piece integrated unit that I am thrilled to bring to life for our cherished master retreat.
While this dresser stands as one of the largest single furniture pieces I’ve ever constructed, its substantial size should not be mistaken for complexity. I can assure you, the build process remains incredibly straightforward and accessible, even for those with moderate woodworking experience. It’s simply… large! But don’t let that intimidate you; the techniques involved are standard and easy to master, resulting in a robust and beautiful piece that adds significant storage and style to any room.
Before installing the drawers and truly bringing this piece to life, I had my son snap a quick photo of me with the dresser frame. It was a moment of pride, captured perfectly to share with our amazing community on Instagram, highlighting the scale and progress of this exciting custom furniture build.
Get Started with Our Free DIY Media Dresser Plans!
As always, we believe in empowering fellow DIY enthusiasts, which is why we’re delighted to offer you the complete, detailed plans for this impressive media storage dresser absolutely FREE! These plans are meticulously designed to guide you through every step, ensuring a successful and enjoyable build from start to finish. Our comprehensive guide includes precise cut lists, clear diagrams, and step-by-step instructions to make your woodworking journey as smooth and rewarding as possible. You can easily access and print them by clicking RIGHT HERE or by simply clicking on the image below. Don’t hesitate to download them and kickstart your next home improvement project!
Once you have your detailed plans in hand, you can follow along with my personal build journey, documented with helpful images and practical tips for each stage of construction. We’re here to help you every step of the way to create your own beautiful, functional, and custom media dresser for your home.
Prepping Your Materials: The Foundation of a Great Build
Every successful woodworking project begins with careful material selection and preparation. This image captures the “before” – the raw lumber, ready to be transformed into a functional piece of furniture. I truly believe that the most challenging part of any build often isn’t the cutting or assembly, but the initial phase of acquiring and unloading all that lumber! For all the plywood components in this media dresser, I chose our absolute favorite: Purebond plywood. This isn’t just a preference; it’s a commitment to quality, durability, and most importantly, safety for our family and workshop environment.
Purebond plywood is our top choice because it’s a formaldehyde-free product. This means that as Whitney and I are working on our projects, we’re not exposed to harmful chemicals, ensuring a healthier workshop environment for us and our children. More importantly, when these beautiful pieces find their home within our house, we can rest assured that they won’t negatively impact the air quality our family breathes. Beyond its health benefits, Purebond plywood also takes stain exceptionally well, yielding absolutely stunning results that truly make your furniture pop and highlight the natural beauty of the wood grain. You can dive deeper into our commitment to Purebond and learn more about why we advocate for it by checking out the Purebond pledge HERE.
Precision Cutting with the Kreg Rip Cut
To make transporting the large Purebond sheets manageable, the helpful team at Home Depot kindly performed initial rips so they would fit comfortably into my car. This pre-cutting service is a real time-saver for large sheets of plywood. Once back in my workshop, I refined these cuts and brought the boards down to their precise dimensions using my indispensable Kreg Rip Cut. This tool is a game-changer for any DIYer who needs to make accurate, straight cuts with a circular saw. It’s affordable, incredibly compact, and delivers consistently straight rips, transforming your handheld circular saw into a highly accurate ripping machine. It simply attaches to your existing circular saw, using a guide to ensure perfect, straight rips every time, making it an essential addition to any home workshop for plywood projects.
Assembling the Dresser Carcass: Step-by-Step Guide
The foundation of your media dresser begins with the robust carcass, which will define its overall structure and gracefully support the six spacious drawers. This stage requires careful measurement, precise cutting, and meticulous assembly to ensure stability, proper alignment, and a long-lasting piece of custom furniture.
Cutting and Notching Side Panels
Begin by cutting your main side pieces according to the dimensions provided in the free plans. Precision here is paramount for a professional finish. Once these are cut, use a jigsaw to carefully cut out specific notches in the front corner of each side piece. These notches are crucial for the later addition of decorative trim, ensuring a clean, integrated, and flush look for your finished dresser’s base.
Upon completion, each side panel should distinctly feature this carefully cut corner notch, as shown in the image. This detail is essential for the aesthetic and structural integrity of the dresser. Double-check your measurements against the plans to ensure consistency and symmetry across both side pieces, as any discrepancies now can affect later steps.
Preparing and Attaching Shelves
Next, cut all the shelf pieces to their specified lengths. For robust joinery that is both strong and hidden, drill 3/4-inch pocket holes at each end of these shelf boards. Pocket holes, created with a Kreg Jig, are an excellent choice for achieving a clean finish and strong connections, especially for pieces like this media dresser that will hold substantial weight and require lasting durability.
With your pocket holes drilled, it’s time to attach each shelf piece to one of the side panels. Use 1 1/4-inch pocket screws along with a good quality wood glue for maximum strength and durability. An essential tip here is to ensure that the notch on the side piece remains correctly oriented and positioned when you are attaching the shelves. This attention to detail now will prevent fitment issues later when adding the face frame and trim, guaranteeing a smooth assembly process.
Once all shelves are securely attached to the first side panel, proceed to attach the second side panel in exactly the same manner. Again, double-check that the notch in this second side piece is in its correct, mirrored location to maintain perfect symmetry and proper fit for future components. This stage completes the foundational box of your dresser, creating the robust compartments that will house your drawers.
Adding Essential Bracing and Trim
Structural integrity is paramount for a piece as substantial and functional as this media dresser. Therefore, your next step is to add the front and back braces to the bottom of the assembled carcass. These braces significantly enhance the rigidity and stability of the entire unit, preventing racking and ensuring the dresser remains sturdy for years to come.
Pay close attention to the placement of the back brace; it should be flush with the very back edge of the bottom shelf. This precision ensures a neat finish for the back panel and proper support for the dresser’s backing later on. A flush surface allows the backing to sit perfectly flat, contributing to the overall strength and finished appearance of the dresser.
With the internal braces securely in place, you can now attach the front trim piece. This piece requires a bit of preparatory work: notch the top corners to precisely fit around the sides of the dresser. Although I didn’t capture an image of this specific notching process, I used my jigsaw to carefully cut a 3/4-inch by 3/4-inch notch out of each of the top corners of the 1×4 trim piece. You can clearly observe its effect in the image, where it’s nestled perfectly at the bottom front of the dresser, providing a clean, professional, and finished aesthetic that elevates the piece’s overall design.
Building and Attaching the Face Frame: The Aesthetic Touch
The face frame is more than just a decorative element; it provides crucial structural integrity to the front of the dresser, covers exposed plywood edges for a refined look, and creates precise, defined openings for each of the six drawers, ensuring a truly custom-built appearance and smooth drawer operation.
Construct your face frame by assembling the 1×2 pieces, utilizing 3/4-inch pocket holes and 1 1/4-inch pocket hole screws for strong, clean, and concealed joints. Refer meticulously to the detailed diagram within the free PDF plans for the exact placement, orientation, and dimensions of each 1×2 piece. This diagram is absolutely crucial for ensuring that your drawer openings are perfectly sized and precisely aligned, which is key to a professional-looking and functional dresser.
Once the face frame is meticulously assembled, attach it to the main dresser carcass. I prefer to use 1 1/4-inch brad nails and a high-quality wood glue for this step, applied with my 18-gauge brad nailer for efficiency and minimal visible fasteners. The brad nailer makes quick work of securing the frame while the glue sets. Alternatively, a traditional hammer and finishing nails will also achieve excellent results, just remember to use a nail set to recess the nail heads. The combination of glue and nails provides a lasting, secure bond that holds the face frame firmly in place.
Adding Internal Bracing and Drawer Runners
To further enhance the internal structure of your media dresser and prepare it for the smooth operation of its drawers, you’ll need to install additional internal bracing and the essential drawer runners. Install the top horizontal braces and the back vertical braces first. These unseen components are vital for the dresser’s long-term stability and structural integrity. Again, use 1 1/4-inch pocket screws and wood glue for these connections to ensure robust, unyielding support throughout the life of the dresser. These internal components, though not always visible, are critical for the dresser’s stability and functionality, especially when it’s fully loaded with items.
The next crucial step is attaching the drawer runners. Refer meticulously to your plans for their precise placement within the dresser frame. A sturdy clamp can be incredibly helpful here, holding the board perfectly in place and ensuring it doesn’t shift while you secure it with 1 1/4-inch pocket screws and wood glue. Accurate placement and secure attachment of these runners are absolutely vital for smooth and trouble-free drawer operation.
After attaching the runners, use a reliable spirit level to meticulously check that each one is perfectly level. This step is non-negotiable! Level runners ensure that your drawers will slide in and out effortlessly, without sticking, binding, or wobbling. Investing a few extra minutes here to achieve perfect levelness will save you considerable frustration and adjustments later, guaranteeing seamless functionality for your drawers.
Here’s a clear view of all the drawer runners installed, demonstrating the complete internal framework that will precisely cradle your drawers. Each one is carefully positioned and level, forming the critical guides for your media dresser’s storage compartments.
Finally, add the drawer guides. These small but important pieces help ensure that the drawers remain centered and track smoothly along the runners, preventing any undesirable side-to-side wobbling. They provide that extra bit of precision that makes a huge difference in the feel and functionality of your custom-built drawers.
Finishing the Carcass: Backing and Readiness
With the internal framework complete and the drawer runners firmly in place, it’s time to attach the plywood backing to the rear of the dresser. For this, I recommend using an 18-volt stapler, as staples tend to grip the thinner 1/4-inch plywood more effectively, providing a secure and even hold that prevents bowing. However, finish or brad nails can also be successfully used for this step, provided they are accompanied by a generous and continuous application of wood glue. The glue is absolutely crucial here, creating a strong, silent bond that prevents rattling and significantly adds to the overall rigidity and stability of the entire piece. Ensure the backing is perfectly square and flush with the edges before securing it for a professional finish.
At this exciting point, your dresser carcass is fully assembled and structurally sound! It’s a significant milestone in your DIY journey, standing ready and waiting for the final, functional elements that will truly bring it to life: the drawers themselves. Take a moment to appreciate the solid structure you’ve built.
Crafting the Drawers: Precision is Paramount
The drawers are arguably the most used and interacted with part of any dresser, so their construction requires meticulous attention to detail and, most importantly, unparalleled precision in measurements. Properly built drawers ensure smooth functionality and a refined finish.
The Golden Rule: Measure Before You Cut!
I cannot emphasize this enough: ALWAYS measure for your drawers before you cut them! This is a cardinal rule in woodworking, especially for fitted components like drawers. Each drawer opening, even within the same piece of furniture, can vary ever so slightly due to minor inconsistencies in lumber dimensions or subtle shifts during assembly. Therefore, you must meticulously measure both the length and the width of EACH individual drawer opening, and then cut your drawer components to precisely fit those unique dimensions. Trust me on this – I’ve learned the hard way many, many times over. Attempting to cut all drawers to the exact same dimension, building them, and then trying to slide them in often leads to immense frustration, wasted material, and drawers that stick, bind, or don’t fit at all. Take your time with this critical step; it truly makes all the difference between a frustrating fit and perfectly gliding drawers.
Assembling the Drawer Boxes
Once you have carefully measured and cut all the individual pieces for your six drawers, proceed to drill 3/4-inch pocket holes as indicated in the plans. Then, assemble each drawer box using 1 1/4-inch pocket screws and a reliable wood glue. This combination ensures a strong, durable box that will withstand years of heavy use, providing robust storage for all your media and personal items.
After assembly, you will have six sturdy drawer boxes, each looking uniform, precisely constructed, and perfectly sized, ready for their bottoms to be attached.
The next step is to attach the 1/4-inch plywood bottoms to each drawer. Similar to the dresser’s backing, I used my stapler for quick and firm attachment, as it provides excellent grip on the thinner plywood. However, finish or brad nails, along with a generous bead of wood glue, will also provide excellent results and ensure a secure, rattle-free bottom for each drawer.
Ah, the satisfying sight of six perfectly fitted drawer boxes, smoothly sliding into their respective compartments! This glorious moment indicates that your meticulous measurements and careful assembly paid off. Now, it’s time for the final aesthetic touch that truly makes the dresser shine: the drawer faces.
Adding Drawer Faces and the Dresser Top
The drawer faces are what give your media dresser its finished, polished look, covering the raw drawer boxes and integrating seamlessly with the face frame. The top provides the elegant crowning surface, completing the transformation. Both steps require careful attention to detail for a professional result.
Attaching Drawer Faces
Once again, precision is paramount. Measure each drawer face individually and cut them to fit perfectly, allowing for even, consistent gaps around all sides when placed in their respective openings. I attached the drawer faces using a combination of wood glue for a strong bond and a few small nails driven through the front of each drawer to temporarily hold them precisely in place. Then, for a much cleaner finish with fewer visible nail holes on the exterior, I turned the drawer over and secured the face from the inside with numerous nails, ensuring a strong and seamless permanent attachment. This method minimizes the amount of puttying and sanding required on the visible exterior of your beautifully finished dresser.
Before you remove the drawers for staining, here’s a crucial and time-saving tip to prevent future frustration: number your drawers and their corresponding openings on the dresser. This simple organizational step will prevent you from playing “musical drawers” when the stain is dry and it’s time to re-install them. Each drawer, though appearing similar, truly fits its specific opening best, and numbering ensures they return to their perfect, snug homes without any guesswork.
Constructing and Attaching the Dresser Top
The final structural step in completing your media dresser is to build its top. Assemble the top pieces using a strong wood glue and your 18-gauge nailer, creating a solid, flat, and attractive surface. Ensure all edges are perfectly flush and smooth for a truly professional appearance. This top piece will be the crowning glory of your dresser.
Once the top is fully built and sanded, simply attach it securely to the dresser carcass. Use wood glue for a strong bond and nails or screws driven from underneath to hide all fasteners, maintaining the clean lines of the design. This completes the core construction of your stunning media dresser, making it ready for the finishing touches.
The Finishing Touches: Staining and Hardware
With the construction complete, it’s time to truly elevate your DIY media dresser with the perfect finish and hardware, transforming it from a raw wooden structure into a polished, elegant, and functional piece of furniture that complements your home decor.
Applying the Stain: Varathane Early American
Now, for the exciting and transformative part – time for stain! I chose one of my absolute favorite shades, “Early American” by Varathane, to beautifully stain the entire piece. This classic hue brings out the natural grain of the Purebond plywood and other wood components, adding warmth, depth, and character that perfectly complements a master bedroom or any living space. Applying stain can be a meditative and incredibly satisfying process, watching the wood transform before your eyes as it absorbs the rich color.
If you happened to tune into our live “Coffee Talk” on Periscope (now viewable on our YouTube channel), you would have seen Whitney and me rave about our preferred method for applying stain: lamb’s wool stain applicators, readily available at Home Depot. These applicators provide an incredibly smooth, even coat of stain, making the process much easier, faster, and yielding professional-looking results without streaks or uneven patches. For more staining tips and to catch up on our live chats, be sure to follow us @shanty2chic on social media! Lamb’s wool applicators are truly a worthwhile investment for any staining project, especially on larger pieces.
Adding Elegant Hardware: Liberty Campaign Hardware
Once the stain has thoroughly dried and cured according to the manufacturer’s instructions, it’s time for the truly transformative element: the hardware. My husband and I carefully maneuvered this substantial piece into its new home in the master bedroom. We firmly believe that the right hardware can truly elevate a piece of furniture, making it special and unique, and this media dresser is certainly no exception. I opted for another favorite – the exquisite Campaign Hardware from Liberty Hardware. The vintage-style cocoa bronze finish of this hardware, which you can find HERE at Home Depot, adds a touch of sophistication, charm, and a subtle industrial edge that perfectly aligns with the dresser’s robust character. I loved this hardware so much that I also used the same set on the DIY nightstands I built for our bedroom, creating a cohesive and elegant look across the entire room. The hardware truly is the jewelry of your furniture, so choose wisely!
The Grand Reveal: Your Completed DIY Media Dresser
And just like that, with the last piece of hardware meticulously installed, your magnificent DIY media dresser is complete! This stunning, handcrafted piece now offers abundant storage and serves as a stylish focal point for your master bedroom or any living space requiring both elegance and functionality. Witnessing the transformation from raw lumber and simple plans to a finished, functional masterpiece is truly one of the most gratifying aspects of DIY and custom furniture building.
As you admire your new custom furniture, you might also be interested in other complementary pieces visible in our master bedroom. The beautiful bed in this picture also has free plans available for download HERE, allowing you to create a cohesive bedroom set. And that versatile bench or coffee table positioned elegantly in front of the couch? That’s also a fantastic DIY project, incredibly budget-friendly at only $20 to build! You can find its comprehensive plans HERE. Imagine the satisfaction of completing your entire bedroom with handcrafted, custom pieces that truly reflect your style!
Exciting Future Plans: A Complete Master Bedroom Media Wall
Building this media dresser has only intensified my excitement for the broader vision – the completion of our entire master bedroom furniture set! I literally cannot wait to see it all come together. This dresser is just one piece of a much larger, integrated media wall unit, designed to transform our bedroom into a truly functional, aesthetically cohesive, and beautifully organized sanctuary.
The final media wall concept will integrate custom-built bookshelves on either side of this magnificent dresser, creating ample display and storage opportunities for books, decor, and personal items. The truly innovative feature will be the set of sliding barn doors that will cover the entire unit. These doors will offer incredible versatility and style, allowing us to either gracefully conceal the dresser and television for a clean, minimalist look, or slide them to cover the bookshelves, showcasing the central media console as a focal point. It’s a design that marries rustic chic aesthetics with unparalleled functionality, and I am absolutely thrilled about bringing this grand vision to fruition!
Until then, I’m thoroughly enjoying this incredibly pretty and functional dresser, which already provides tons of essential storage and brings a touch of handcrafted elegance to our home. It’s a testament to what can be achieved with a little dedication, careful planning, and some good old-fashioned DIY spirit.
Thank you so much for stopping by and joining me on this woodworking adventure! We hope this comprehensive guide inspires you to pick up your tools and create something beautiful and functional for your own home. Happy building!
~Ashley