
Crafting a Heartfelt Tribute: Your DIY Father’s Day Hero Gift & Free Printables
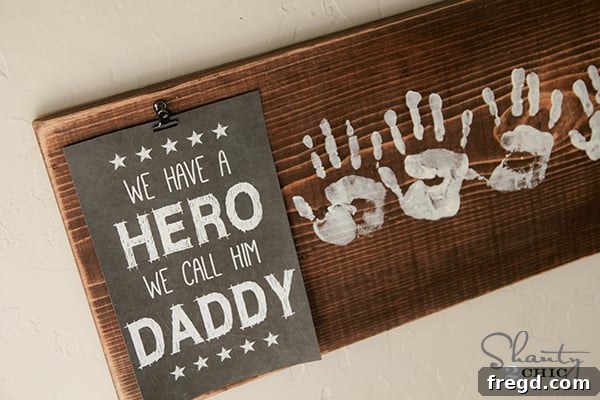
Hello, lovely readers! With Father’s Day swiftly approaching, the quest for a truly meaningful gift begins. This year, instead of browsing store aisles, let’s dive into a project that promises to deliver warmth, personality, and a lasting memory. I’m thrilled to share a beautiful, handcrafted gift idea that your children can help create for the special dads, grandads, or papas in their lives. It’s a personalized keepsake designed to proudly adorn an office desk or hang in a cherished spot, constantly reminding him of the love and admiration he inspires. I recently crafted one for my husband’s office, and the outcome was absolutely delightful!
The Charm of Handmade Gifts: Why DIY This Father’s Day?
In an era dominated by mass-produced items, a handmade gift stands out. It’s more than just an object; it’s a tangible expression of love, effort, and personal connection. A DIY Father’s Day gift, especially one involving the kids, becomes a cherished memory in the making. This project, combining a rustic wooden plaque with a heartfelt printable and the irreplaceable touch of your children’s handprints, embodies everything wonderful about personalized gifting. It’s a true keepsake that captures a moment in time, offering a glimpse into their tiny hands and growing hearts. Imagine the smile on his face every time he looks at it, remembering the joy and laughter shared during its creation.
Your Exclusive Free Father’s Day Printables!
To make this project even easier and more special for you, I’ve designed a selection of “We Have A Hero” and “I Have A Hero” themed printables, completely free for your personal use! These aren’t just generic designs; they come in various versions to perfectly suit your family’s needs, whether you’re celebrating “Dad,” “Daddy,” “Papa,” “Grandad,” or “Grandpa.” Providing a variety ensures that every hero in your life can receive a personalized touch. Each printable is designed as an 8×10 inch print, making it ideal for framing or attaching to our DIY wooden board project.
How to Access Your Free Printables:
Getting your hands on these wonderful printables couldn’t be simpler! Just scroll down and click on the image of the printable that best fits your needs. This action will open a new window directly to the high-resolution PDF file. From there, you can easily print it directly from your browser’s print option. For the best results, I recommend using a good quality cardstock or a slightly heavier paper, which will give your printable a more professional and durable finish. It’s truly “easy peasy” to bring this personalized touch to your Father’s Day gift!
Explore the Full Collection of “Hero” Printables:
Below, you’ll find the entire collection of free printables. Take your time to choose the perfect one that speaks to your heart and will resonate with your special hero. Whether it’s for Dad, Grandpa, or Papa, there’s a design waiting to be personalized with those precious little handprints.
Crafting Your Hero Board: A Step-by-Step Guide
This project is designed to be incredibly simple yet yield stunning results. Even if you’re new to DIY, you’ll find this a rewarding and straightforward craft. The key is to have fun with it and enjoy the process of creating something truly unique.
Materials You’ll Need:
- **White Wood Board (1×12 inch):** The length will depend on how many handprints you plan to include. I needed space for 5 handprints, so my board was larger. You can typically find 4-foot pieces at hardware stores like Lowe’s for around $5, and they often offer free cutting services! Don’t hesitate to ask for assistance in getting the perfect size.
- **Wood Stain:** My personal favorite is Rust-Oleum Ultimate Wood Stain in Dark Walnut. It provides a rich, classic finish that enhances the natural beauty of the wood.
- **Tim Holtz Clips:** These vintage-style clips add a charming, industrial touch and are perfect for holding your printable. I found mine at Hobby Lobby, but they are also readily available online.
- **Gorilla Super Glue Gel:** For a strong, reliable bond to attach the clip to the wood.
- **Cream-Colored Acrylic Paint:** Or any color you prefer for the handprints. Acrylic paint is easy to work with and dries quickly.
- **Paint Brush or Rag:** For applying the wood stain.
- **Fine-Grit Sandpaper:** For smoothing edges and distress effects.
Step 1: Preparing Your Wooden Board
Once you have your 1×12 white wood board cut to the desired length (remember to adjust for the number of handprints!), it’s time for some light preparation. Give the entire board a quick, gentle sanding, especially focusing on the edges and any rough spots. This creates a smooth surface for staining and painting. After sanding, wipe the board down thoroughly with a damp cloth to remove any dust or debris, ensuring a clean canvas for the next step.
Step 2: Staining for a Rustic Finish
Now for my favorite part: adding that gorgeous rustic depth! I applied a single coat of Rust-Oleum Ultimate Wood Stain in Dark Walnut. This stain is incredibly easy to work with and delivers a rich, consistent color. Using a brush or a clean rag, apply the stain evenly over the entire surface of the wood. Allow it to penetrate for a few minutes, then wipe off any excess with a clean cloth. The beauty of a single coat is that it allows some of the natural wood grain to show through, adding to its charm. Let the stain dry completely according to the manufacturer’s instructions, which typically takes a few hours.
Step 3: Adding Character and the Clip
Once the stain is fully dry, you can enhance its character by lightly sanding the edges again. This subtle distressing technique gives the board a charming, aged look, highlighting its handcrafted appeal. Next, it’s time to attach the Tim Holtz clip. These clips are fantastic for their antique aesthetic and functionality. Position the clip strategically on the side of your board where your chosen printable will hang. I recommend placing it towards the top center for optimal display. Using Gorilla Super Glue Gel, apply a small amount to the back of the clip and firmly press it onto the wood. Hold it in place for a few moments, and then allow ample time for the glue to cure completely as per product instructions for a secure hold.
Step 4: The Most Fun Part – Handprints!
This is where the real magic happens and the kids get to have a blast! Gather your little ones and some cream-colored acrylic paint (or any color that complements your stain). Arrange them in order of age if you have multiple children, as this creates a sweet visual progression. Liberally apply paint to one child’s hand, then carefully press it onto the wooden board, ensuring a clear impression. Repeat for each child, allowing a few minutes for the paint to set between prints to avoid smudging. This part is not just about the final product, but the wonderful memories created during the process itself. Don’t worry about perfection; the charm lies in the authenticity of each unique handprint. Once all handprints are complete, let the paint dry thoroughly before handling the board further.
Final Touches and Display
Once everything is dry and set, clip your chosen “Hero” printable onto the Tim Holtz clip. Stand back and admire your beautiful, simple, yet incredibly sweet creation! This personalized gift is now ready to be presented to the special man in your life. It’s a gift that goes beyond material value, offering a daily reminder of the love and appreciation from his children. It’s truly a labor of love that speaks volumes.
Making It Even More Personal: Customization Ideas
While the project as described is wonderful, there are countless ways to infuse even more personality into your “Hero” board:
- **Alternative Stains/Paints:** Experiment with different wood stain shades – perhaps a lighter oak for a more contemporary look, or even a pop of colored paint if that suits his style.
- **Handprint Colors:** Instead of a single cream color, consider using different shades for each child’s handprint, or even their favorite colors! Just ensure they contrast enough with your board to be visible.
- **Embellishments:** Add small, subtle embellishments like small wooden letters spelling out “DAD” or “PAPA” at the top, or tiny decorative tacks around the edges.
- **Photos:** Instead of a printable, you could attach a cherished photo of the children, making the clip a rotating display.
- **Backing:** Add felt pads to the back of the board if it will be placed on furniture, protecting surfaces.
- **Sealing:** For extra durability and protection, especially if the gift might be handled often, consider applying a clear, matte sealant over the entire finished piece (after all paint and glue are fully cured).
These small touches can make an already special gift truly unforgettable.
Share Your Creations!
What do you think of this heartfelt Father’s Day gift idea? I truly hope you love it as much as I do! There’s nothing quite like seeing the joy that a handmade present brings. If you decide to create one of these “Hero” boards for your loved ones, please consider sharing your results and inspiring others. Pin this project to your favorite craft boards, share it on social media, and spread the word about these free printables!
Thank you so much for joining me on this creative journey. Happy crafting, and here’s to making Father’s Day extra special this year!
~Whitney