
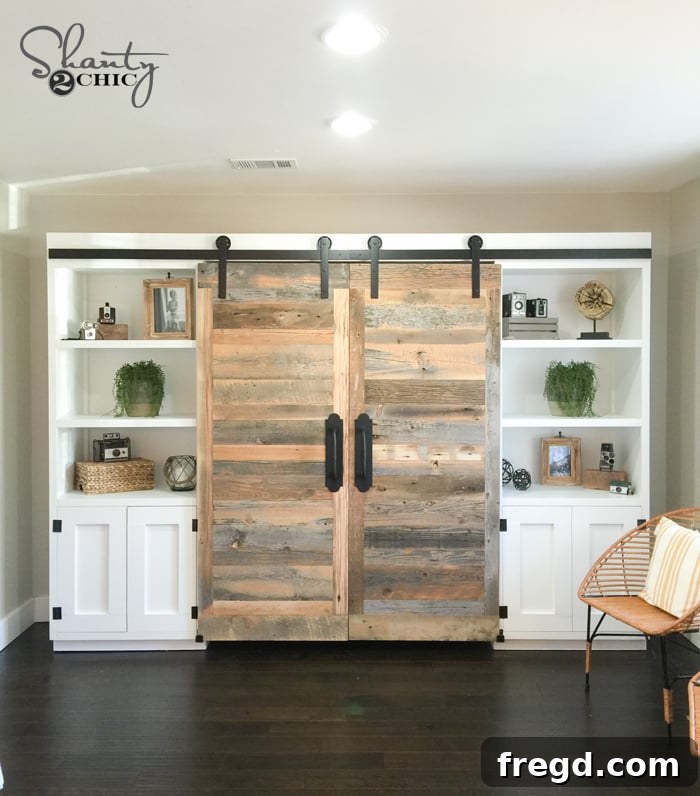
Unveiling Our DIY Hidden Study: Transforming an Entryway into a Dream Home Office with Sliding Barn Doors
We are absolutely thrilled to finally share one of our most ambitious and rewarding home renovation projects to date! The challenge was clear: create a dedicated, functional office space within an open dining room and entryway. This required not just creativity, but a truly innovative approach to design and construction. The solution we devised is a spectacular DIY Hidden Study with Sliding Barn Doors – a space-saving marvel that blends seamlessly into its surroundings while offering unparalleled functionality. Join us as we walk you through the journey from concept to completion, and see how this transformation brought a new level of versatility and style to our clients’ home.
Before the Transformation: A Blank Canvas Awaiting Innovation
To truly appreciate the “after,” it’s essential to understand the “before.” This project began with a common dilemma faced by many homeowners: how to integrate a necessary workspace without sacrificing the aesthetic harmony of communal living areas. The initial space, located right off the main entryway, was largely open and undefined, primarily serving as a dining area with direct visibility from the front door.
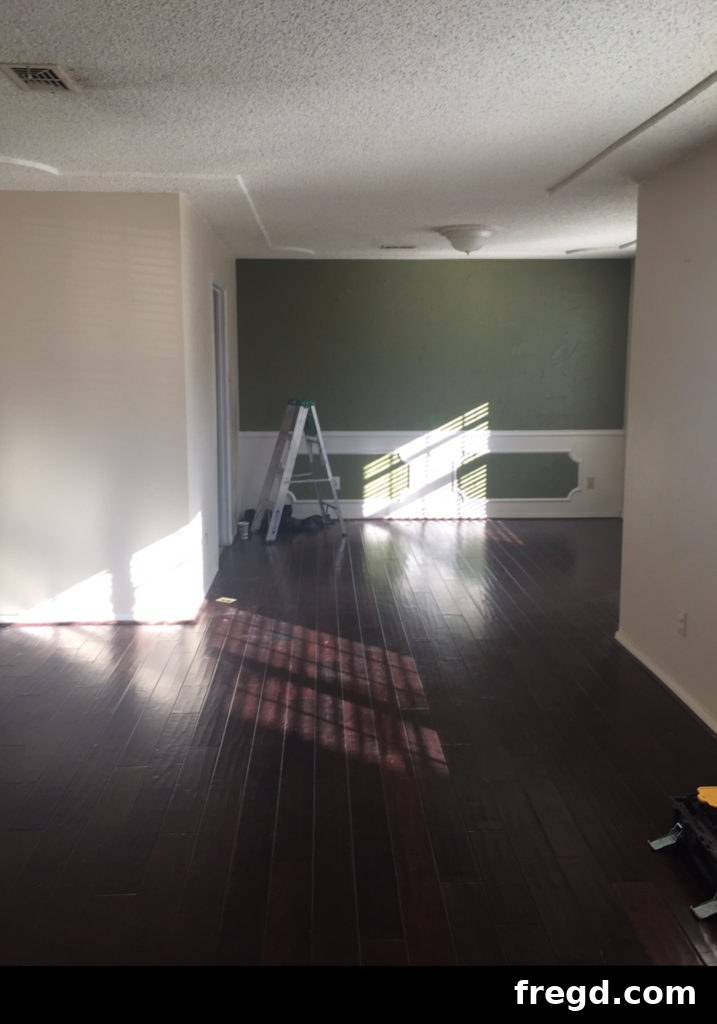
Stepping through the front door, this is the view that greeted visitors to the right. While functional as a dining area, it lacked any personal nooks or dedicated zones. The goal was to introduce a private, yet accessible, office without disrupting the open feel or creating a visual clutter, ensuring the home retained its welcoming aesthetic. This challenge sparked our creative process, leading to the elegant solution you’re about to see.
The Reveal: A Seamless Blend of Style and Functionality
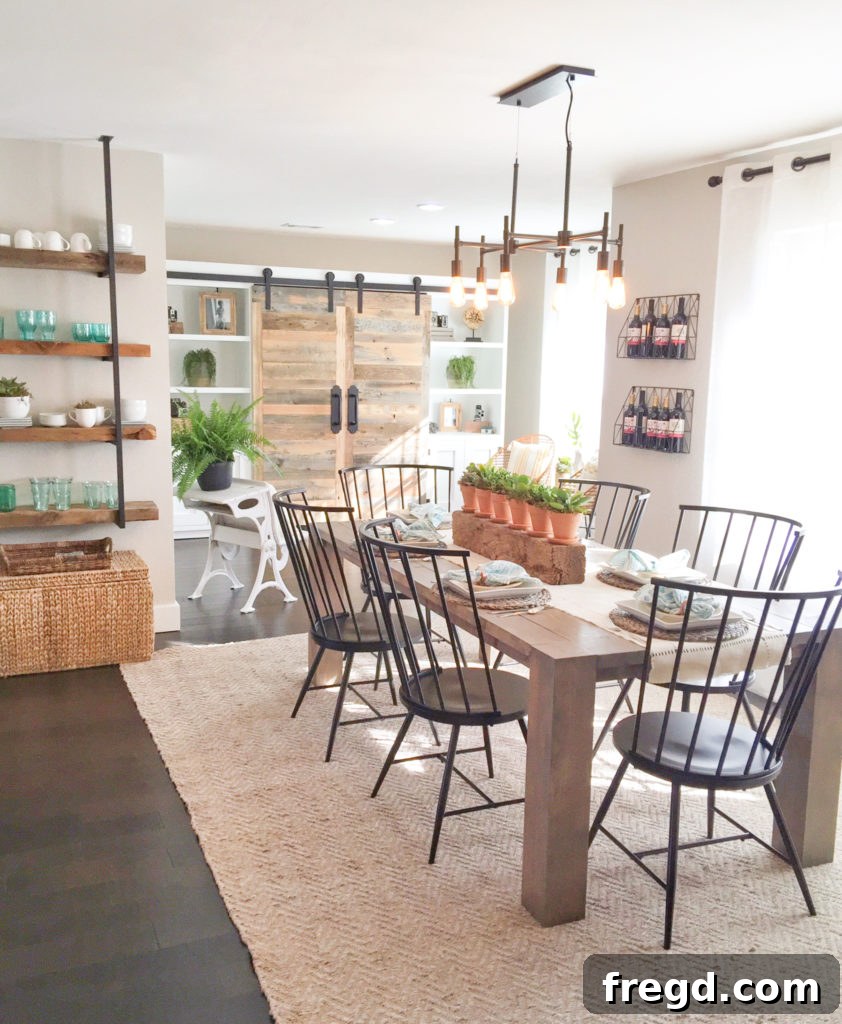
And here it is! A view from the same spot, post-renovation. The transformation is striking, turning an open, somewhat unutilized corner into a feature-rich, dynamic part of the home. What looks like a beautiful, custom built-in cabinet system now conceals a fully functional office – a truly ingenious space-saving solution for modern living.
We are incredibly proud of this piece. The elegant sliding barn doors serve as a sophisticated backdrop for the newly defined dining room, adding a touch of modern farmhouse charm and architectural interest. Yet, their true magic lies in what they conceal: a perfectly organized, dedicated workspace ready for productivity. This custom built-in desk and shelving unit embodies our philosophy of blending form and function, proving that even the most challenging multi-functional spaces can be reimagined with creativity and expert craftsmanship, creating a functional yet beautiful entryway office.
Project Overview: A Four-Part Masterpiece of Woodworking
This DIY hidden study unit is a true testament to modular design, constructed as a robust four-part system. It comprises two sturdy towers, a connecting desk, and the show-stopping sliding barn doors. Each component was meticulously planned and executed, allowing for precision and ease of assembly. We each tackled the construction of one tower, then collaborated to seamlessly integrate them, add the central desk, and finally, install the beautiful barn doors. The result is a cohesive, high-quality piece of furniture that looks as if it was always meant to be there, seamlessly integrated into the home’s architecture.
To empower you to create your own custom home office, we’ve broken down this complex project into three comprehensive plan posts, complete with detailed instructions, material lists, and plenty of visual aids. Whether you’re an experienced DIYer or looking to tackle an ambitious woodworking project, these plans provide everything you need to build a functional and beautiful home office nook.
- Free Plans for the Towers: The Foundation of Your Hidden Study
- Free Plans for the Desk and Top Brace: Crafting Your Functional Workspace
- Free Plans for the Barn Doors: Adding Elegance and Concealment
Phase 1: Constructing the Robust Towers – The Core of Your Custom Built-in
The towers form the structural backbone of our hidden study. For their construction, we opted for high-quality hardwood plywood, specifically PureBond Plywood in Birch, sourced from Home Depot. PureBond plywood is an excellent choice for custom furniture projects due to its formaldehyde-free adhesive, ensuring better indoor air quality, and its beautiful, smooth finish that’s ideal for painting or staining. The birch veneer provides a clean, consistent surface, making it perfect for custom built-ins that demand a refined appearance and durable construction.
Step 1: Precision Cutting the Tower Sides for Flawless Fit
Your journey begins with precise cuts. The first step involves cutting the main side pieces of each tower, which will include a small, carefully measured notch at the bottom. This notch is crucial for the base trim and ensuring a flush finish that conceals the toe kick area. Accuracy here is paramount for the overall integrity and appearance of your finished unit, setting the stage for all subsequent assembly.
We initially used our table saws to rip the larger plywood sheets into the correct widths for the side panels. This provides straight, consistent edges, which are critical for any professional-looking cabinetry. Following this, a jigsaw was employed to meticulously cut out the small, distinctive notches at the bottom of each panel. This two-step cutting process ensures both efficiency for long straight cuts and precision for intricate details, a common technique in advanced plywood projects.
Step 2: Preparing the Shelves with Robust Pocket Holes
Next, focus on the shelves. Each tower will house five shelves, meaning you’ll need a total of ten identical shelf pieces for both units. Once cut to size, these shelves are prepared for robust joinery using pocket holes, a technique known for its strength and discreet finish.
For strong and concealed connections, we utilized our K5 Kreg Jig to create 3/4″ pocket holes on the shelf edges. The Kreg Jig system is a DIYer’s best friend, allowing for incredibly strong, hidden joints with minimal effort. Carefully refer to the provided pictures to ensure accurate placement of your pocket holes, as proper alignment is key to a seamless assembly and a stable structure, making this a perfect example of Kreg Jig projects for home improvement.
Step 3: Assembling the Tower Structure with Precision and Strength
With the shelves prepped, it’s time to bring the tower sides and shelves together. To ensure maximum durability and strength, we applied a generous line of wood glue along the inside edge of the tower sides where each shelf would align. Wood glue creates a bond stronger than the wood itself, complementing the mechanical strength of the screws and preventing any future loosening.
Next, we attached the shelves using 1.25″ pocket hole screws. To aid in holding the shelves perfectly in place during this crucial step, we utilized our indispensable Kreg right angle clamp. This tool acts like a much-needed third hand, ensuring accurate 90-degree alignment and preventing any shifting as the screws are driven in. This attention to detail in assembly guarantees a sturdy and long-lasting structure, essential for a frequently used home office furniture piece.
All remaining shelves were attached following the same meticulous process of glue application, precise alignment, and securing with pocket hole screws. Consistency in these steps ensures a symmetrical and structurally sound tower, which will bear weight reliably for years to come.
Observe the spacing of the shelves in the image below. This layout was carefully planned to accommodate a variety of office supplies, books, and decorative items, optimizing the storage potential within the compact hidden study. Even though the study will be concealed, organized and well-designed shelving is key to a functional and efficient workspace.
A close-up of the bottom shelf attached to the side reveals the clean joinery and robust construction. This foundational shelf is critical for the stability of the entire tower, anchoring it firmly to the base.
Once assembled, the top of the cabinet will present a neat, finished edge, ready for subsequent components and trim. This clean line is crucial for the overall polished look of the custom built-in.
Step 4: Reinforcing the Base with Sturdy Support Boards
To further enhance the stability and provide a solid foundation for the unit, we incorporated bottom support boards. These were carefully cut from 1×4 pine boards, chosen for their inherent strength and ease of workability. Similar to the shelves, each support board received strategically placed pocket holes to facilitate robust attachment, ensuring maximum load-bearing capacity.
These support boards were then securely attached to the bases of the towers using both wood glue for a permanent bond and 1.25″ pocket hole screws for mechanical fastening. This dual-attachment method guarantees exceptional rigidity and eliminates any potential for wobble, which is essential for a heavy-duty custom built-in unit designed for longevity and frequent use.
Step 5: Adding Decorative Trim and Adjustable Shelf Pin Holes for Versatility
Once the structural elements were in place, we moved on to the aesthetic details that truly elevate the custom built-in look. First, trim boards were cut to elegantly conceal the bottom support boards. Using our jigsaw, we precisely cut corresponding notches into these trim pieces, ensuring they fit perfectly around the existing structure and provide a clean, finished appearance at the base of the unit.
At this stage, before applying all the final trim, we also integrated a highly practical feature: adjustable shelving. Using our Kreg Shelf Pin Jig, we created a series of neatly spaced shelf pin holes along the interior sides of the cabinets. This simple addition provides invaluable flexibility, allowing the homeowners to easily adjust the height of their shelves as their storage needs evolve. It’s a small detail that makes a big difference in long-term functionality and customization for any DIY desk plans or cabinetry.
Now, for the remaining trim pieces that define the outer aesthetic of the towers, giving them a truly finished and integrated appearance!
The placement of each trim piece is critical for a polished, built-in appearance. We began by attaching the long side pieces, cut from 1×2 pine boards. These were secured using a combination of wood glue for a strong, lasting bond and 1.25″ finish nails for immediate hold and discrete fastening. A finish nailer makes quick work of this, ensuring a professional look with minimal visible fasteners, ideal for high-quality home renovation projects.
Following the long side pieces, we added the smaller 1×2 trim sections that span from side to side. These were attached using the same method of wood glue and finish nails, creating a continuous, framed look that enhances the custom feel of the towers and prepares them for the final back panel.
Finally, we attached additional 1×2 pieces on the inside and back of the cabinet structure. These serve a dual purpose: they further reinforce the overall rigidity of the towers and provide a solid surface for securely attaching the back panel of the cabinet later on, creating a fully enclosed and sturdy unit. Again, glue and nails ensured a strong, lasting bond.
With all structural elements and trim in place, the towers were nearly complete and ready for the next phase: the integration of the sliding barn doors. At this stage, they already looked like impressive pieces of custom cabinetry, a testament to careful planning and execution.
Phase 2: Crafting the Elegant Barn Doors for Optimal Concealment
The barn doors are undoubtedly the aesthetic centerpiece of this hidden study. Not only do they provide the “hidden” aspect, but their design and material choice elevate the entire project, adding a unique character to the dining room. We started by building sturdy door frames that would serve as the skeleton for the beautiful reclaimed wood panels.
Step 1: Assembling the Robust Door Frames
The door frames were constructed with precision, ensuring they were perfectly square and robust. This involved attaching the frame joints using 3/4″ pocket holes and 1.25″ pocket hole screws. Pocket hole joinery is ideal here as it provides strong, hidden connections, allowing the focus to remain on the beautiful reclaimed wood face of the doors, without visible fasteners detracting from the aesthetic.
Once the frames were assembled, we applied a generous amount of wood glue to the back of each frame. This adhesive layer is crucial for securely attaching the inner panel, creating a solid, rattle-free door structure that will withstand years of use and ensure stability for the outer reclaimed wood layer.
The inside panel was then attached to the glued frame using 5/8″ staples. Staples, combined with wood glue, offer excellent holding power across a wider surface area, which is perfect for securing thin panels without splitting the wood. This method creates a stable core for the decorative reclaimed wood planks that will be applied next, completing the door’s structure.
Phase 3: Integrating the Bridge, Desk, and Hardware for Full Functionality
With the towers constructed and door frames ready, the next phase involved bringing the entire unit together, installing the vital connecting elements, and preparing for the final barn door application. This is where the individual components truly begin to form a cohesive, functional home office solution.
Step 1: Installing Tower Back Panels and the Critical Connecting Bridge
First, we installed 1/4″ plywood back panels to the rear of each tower, securing them with staples. These panels provide structural rigidity, prevent items from falling behind the unit, and offer a finished look to the back of the custom built-in units, especially important if the back is visible.
Once the individual towers were constructed, they were carefully moved into their final position within the home. This allowed us to accurately measure and begin working on the crucial “bridge” that spans the gap between the two towers. This bridge serves multiple functions: it ties the two towers together structurally, provides a mounting point for the barn door hardware, and supports the hidden desk, making it a pivotal piece in the entire assembly.
This meticulously constructed bridge is specifically designed to bear the weight and facilitate the smooth operation of the sliding barn door hardware. Its robust construction ensures that the doors will glide effortlessly and quietly, revealing and concealing the workspace as needed, offering both aesthetic appeal and crucial structural integrity.
Step 2: Building and Installing the Essential Hidden Desk
A crucial component of any functional office is a sturdy desk. We custom-built the hidden desk that neatly fits between both towers, designed to be robust yet discreet. This desk was engineered for durability and stability, utilizing 1.5″ pocket holes and 2.5″ pocket hole screws for exceptionally strong joints. The dimensions were carefully considered to provide ample workspace while still allowing the barn doors to close completely, a hallmark of excellent DIY desk plans.
To ensure maximum weight-bearing capacity and long-term stability, we attached the desk to the towers and further reinforced it with metal brackets from Home Depot. These brackets provide essential additional support, especially given the potential for heavy use in a home office setting. Before starting on the barn door panels, we meticulously painted the desk to perfectly match the towers, ensuring a cohesive and integrated look when the study is revealed, creating a seamless space-saving office nook.
Phase 4: Crafting the Stunning Reclaimed Wood Barn Doors for Aesthetic Appeal
The aesthetic appeal of this hidden study largely hinges on the beauty of its barn doors. For this crucial element, we had the pleasure of teaming up with Reclaimed Designworks, a truly outstanding company specializing in reclaimed wood products. Their commitment to sourcing and preparing high-quality reclaimed wood is exceptional, making them an ideal partner for achieving a rustic yet refined look.
We specifically chose their Mixed Softwood Blend for its rich character, varying tones, and authentic rustic charm. What makes Reclaimed Designworks stand out is not just their beautiful materials, but also their meticulous preparation – the wood is cleaned, prepped, and free of bugs, making it incredibly user-friendly for DIY projects. Plus, they ship nationwide, making their unique products accessible to everyone looking for sustainable and stylish building materials.
Step 1: Attaching Reclaimed Planks to Door Frames for Rustic Charm
With our sturdy door frames ready, the next step was to transform them into stunning barn doors. We began by attaching the reclaimed wood strips to the perimeter of the plywood inner panel first. This creates a solid border and provides a reference for the interior planks, ensuring a neat and symmetrical layout.
Next, we carefully measured and cut the individual reclaimed wood planks for the main body of the doors. Each plank was then meticulously attached to the plywood panel using a combination of wood glue for a permanent bond and 5/8″ brad nails for immediate, secure fastening. The brad nails are small and virtually invisible, preserving the natural beauty and texture of the reclaimed wood. This process, while painstaking, is what gives the barn doors their authentic, high-quality finish and unmistakable character, perfectly aligning with a modern farmhouse design aesthetic.
Phase 5: Final Assembly and the Grand Unveiling of the Hidden Study
With the barn doors masterfully crafted and the entire unit structurally complete, the final steps involved installing the specialized hardware and bringing the entire hidden study to life. The choice of hardware is crucial not only for functionality but also for complementing the rustic elegance of the reclaimed wood and ensuring a seamless user experience.
Step 1: Installing Premium Barn Door Hardware for Smooth Operation
For the sliding barn door hardware, we collaborated with the incredibly talented Tyler Wayne of Wayne Works. His custom-crafted hardware is renowned for its quality, durability, and aesthetic appeal, perfectly suiting the modern farmhouse style of our hidden study. High-quality hardware ensures that the barn doors glide smoothly and quietly, enhancing the user experience and providing reliable long-term functionality.
Once the track was securely mounted, we attached the hangers to the top of the barn doors. This crucial step was followed by carefully hanging the doors onto the track, making any necessary adjustments to ensure a perfect fit and smooth, unhindered operation. The moment the doors slide into place, revealing or concealing the study, is truly the culmination of weeks of hard work and careful planning, resulting in a beautiful and highly functional DIY home office.
But the absolute best part? Witnessing the entire hidden study come to life and seeing how it instantly transformed the room’s functionality and aesthetic. The satisfaction of a well-executed DIY project, especially one as impactful as this, is truly unmatched. It’s not just a desk; it’s a dedicated space for creativity and productivity, discreetly tucked away.
If you caught our sneak peek on Instagram over the weekend, you already know the excitement this project generated! For those who missed it, be sure to follow us for more behind-the-scenes content and project reveals. We love sharing our journey and inspiring others to create beautiful, functional spaces in their homes.
We believe this DIY hidden study is more than just a piece of furniture; it’s a testament to smart design, efficient space utilization, and the joy of custom craftsmanship. It offers homeowners the flexibility of a dedicated home office without compromising the elegance and openness of their main living areas. It’s a true game-changer for multi-functional spaces, proving that you don’t need an extra room to have a dedicated workspace.
The Finished Masterpiece: A Gallery of Inspiration for Your Home
Here are a few more shots of this incredible custom built-in, now fully finished and serving its purpose beautifully. Witness how this unique home office solution seamlessly integrates into the dining room/entryway, offering both a stunning visual focal point and invaluable functionality for modern living.
We hope this comprehensive guide inspires you to embark on your own home improvement projects. Remember, with detailed plans, quality materials, and a little perseverance, you can create custom solutions that perfectly fit your home and lifestyle. Don’t be afraid to reimagine your space and build something truly unique. Happy building!