
Welcome, fellow DIY enthusiasts!
Build Your Own Custom Bookshelf Nightstand: A Comprehensive DIY Guide
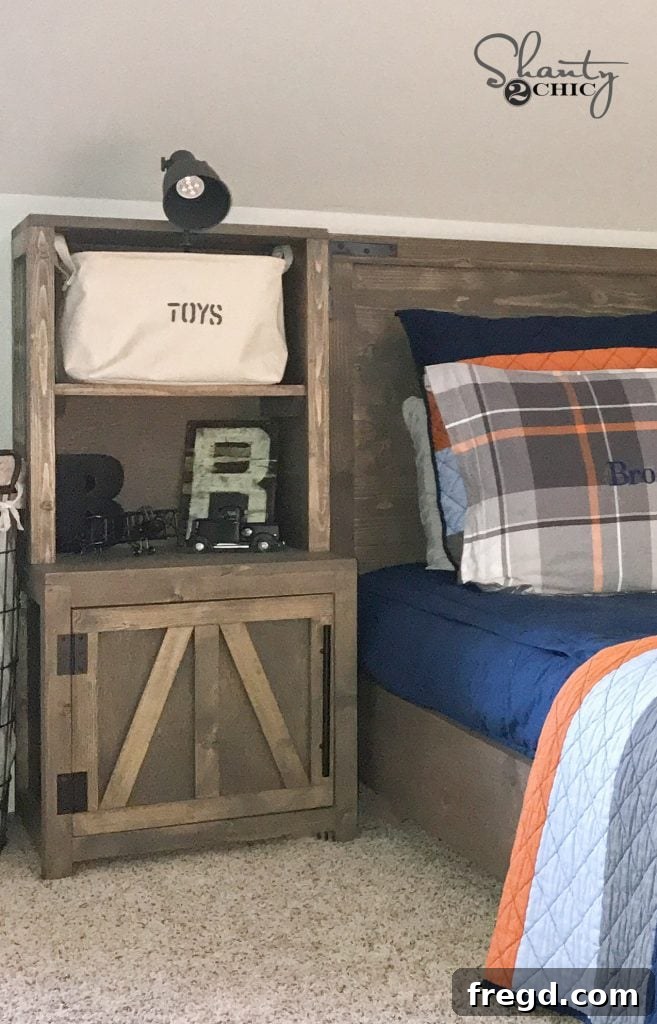
Ready to transform your bedroom with stylish and functional furniture? Today, we’re thrilled to share the complete plans for building a beautiful matching bookshelf nightstand, perfectly complementing the bed design we introduced a few weeks ago. This project is not just about adding a piece of furniture; it’s about creating a personalized storage solution that brings both charm and practicality to your space.
For those who prefer a visual walkthrough, we’ve created an in-depth YouTube video tutorial. You can access the step-by-step guide HERE, or simply scroll down to find the embedded video. We meticulously cover every stage of building these DIY Bookshelf Nightstands, ensuring you have all the information you need to succeed.
Why DIY Your Bookshelf Nightstand?
Crafting your own furniture offers numerous benefits beyond saving money. A DIY bookshelf nightstand provides:
- Customization: Tailor dimensions, finishes, and hardware to perfectly match your bedroom decor.
- Space Optimization: Integrate shelving for books, decor, and essentials, minimizing clutter and maximizing floor space.
- Personal Touch: Infuse your personality and craftsmanship into your home, creating unique pieces that tell a story.
- Durability: Choose high-quality materials and construction techniques for a piece that lasts.
- Sense of Accomplishment: There’s immense satisfaction in building something beautiful and functional with your own hands.
Before diving into the build, we want to address the occasional hiccup of DIY projects. While we strive to provide comprehensive visual guidance, some actual process photos for this post were unfortunately lost. Please don’t hesitate to ask any questions in the comments if a step isn’t perfectly clear – we’re here to help! To get started, make sure to download and print your FREE PLANS by clicking HERE! These plans contain all the necessary measurements and cut lists to guide you through this rewarding woodworking endeavor.
Comprehensive Step-by-Step Building Guide
Step 1: Constructing the Sturdy Base Cabinet
The foundation of your bookshelf nightstand begins with building the robust base cabinet. Precision in your cuts is paramount here. Once all your wood pieces are cut according to the free plans, you’ll need to create 3/4-inch pocket holes. These holes should be drilled on each of your horizontal boards for both side frames. We highly recommend using a quality pocket hole jig, such as our K5 Kreg Jig, for consistent and strong joints. You can find the Kreg Jig HERE on Amazon. When attaching the horizontal boards to the leg pieces, use 1.25-inch pocket hole screws. Pay close attention to alignment: the top horizontal boards will be flush with the top of the legs, while the bottom horizontal boards will be positioned 1.5 inches from the base of the legs, creating a slight recess for stability and aesthetics.
Step 2: Adding Side Planks for Structure and Style
With the frames assembled, it’s time to add the side planks. These planks not only contribute to the structural integrity but also define the aesthetic of your nightstand. Apply a generous bead of wood glue along the edges where the planks will meet the frame, then secure them using 1.25-inch brad nails. Our Ryobi 18G nailer proved invaluable for this task, making quick work of securing the planks. Start by ensuring the top plank is flush with the top of your assembled frame, then systematically work your way down, attaching the remaining planks. This ensures a clean, uniform finish and a strong bond for the side panels.
Step 3: Securing the Bottom Panel
Next, we will install the bottom panel of the base cabinet. For this component, we opted for a pine project panel due to its smooth finish and ease of use, but plywood is also a perfectly suitable alternative. Before attaching, drill 3/4-inch pocket holes along the bottom edges of both sides and the front of this piece. These pocket holes will allow for discreet and strong attachment points. Apply wood glue between all connecting joints for maximum durability. Crucially, when attaching the bottom panel to each side using 1.25-inch pocket hole screws, ensure the pocket holes are facing down. This clever technique hides the screws, resulting in a professional and clean appearance for your finished nightstand.
Step 4: Assembling the Front Frame
The front frame is integral to the nightstand’s structure and aesthetic. This frame is constructed in the same manner as the two side frames, with the primary difference being that the horizontal boards are slightly longer to span the front opening. Once you have successfully built the front frame, carefully align it with the front of the cabinet. Secure it firmly using wood glue for a strong bond and 1.25-inch brad nails for immediate hold. Subsequently, use the remaining pocket holes you drilled on the bottom base board to attach the front frame, ensuring a robust and unified cabinet structure.
Step 5: Installing the Top Surface
Adding the top surface transforms the base cabinet into a functional piece. We recommend using another project panel for the top. Project panels are ideal for this design because they offer a smooth, pre-sanded surface that takes stain beautifully and provides a uniform appearance. If you opt for plywood, you will need to adjust your cuts to account for the plywood’s raw edges and likely add edge banding or trim for a finished look. Secure the top board to the base cabinet by applying wood glue along the edges and then using nails, ensuring a strong and seamless attachment. This top will serve as the surface for your nightstand, perfect for lamps, drinks, and other bedside necessities.
Step 6: Crafting the Functional Door
Now, let’s move on to building the door that will conceal the cabinet’s interior. Begin by making all the necessary cuts for the door components. Once cut, add 3/4-inch pocket holes to the appropriate pieces. Assemble the door frame by attaching the vertical boards to the two horizontal boards using 1.25-inch pocket hole screws, creating a sturdy rectangular frame. After the frame is built, attach a 1/4-inch plywood panel to the back of the door. Use wood glue and either 5/8-inch staples or brad nails to secure it firmly. Next, flip the door over and meticulously mark your diagonal boards. These pieces add a decorative touch and should be cut for an exact fit. Attach these diagonal boards by applying wood glue and then driving nails or staples through the back of the plywood panel and into the diagonal pieces, creating a clean front surface.
Step 7: Building the Integrated Shelf Support System
The upper bookshelf portion of the nightstand begins now. We will attach the door later, after the finishing touches like staining are complete. First, cut your shelf supports and drill 3/4-inch pocket holes into them. These supports will form the structure for your upper shelf. Carefully line up the boards as depicted in the accompanying image, ensuring they are positioned correctly. Then, securely attach them to the top of the base cabinet using wood glue and 1.25-inch pocket hole screws. This creates a robust framework for your open shelving, adding crucial storage space above the cabinet.
Step 8: Attaching the Shelf Top
Once the shelf supports are in place, it’s time to secure the top of the shelf unit. Similar to the main cabinet top, we recommend using a project panel for this section as well. Its smooth surface and excellent staining properties make it an ideal choice for the visible top of your bookshelf. Apply wood glue to the top edges of the shelf supports and then attach the project panel using 1.25-inch pocket hole screws, driven through the pocket holes previously drilled in the supports. This technique ensures a clean, screw-free visible surface, giving your bookshelf a polished and professional appearance.
Step 9: Adding Interior Planks to the Shelf Unit
Just as we did with the base cabinet, we will now add planks to the inside of the upper shelf support boards. These planks add structural stability and enhance the overall aesthetic of the open shelving. Apply wood glue generously to the contact surfaces, then secure each plank using 1.25-inch brad nails. For the final plank, especially if it’s a snug fit, you may find a rubber mallet helpful to gently tap it into place. This ensures a tight, seamless fit and a strong, durable construction for your integrated bookshelf.
Step 10: Installing Front Trim Pieces
To give the front of your bookshelf unit a more refined and finished appearance, you will now add two front trim pieces. These pieces serve to frame the opening and add a touch of decorative detail. Apply wood glue to the back of the trim pieces and then secure them firmly in place using 1.25-inch brad nails. Ensure these pieces are flush and properly aligned to create a clean, crisp edge for your open shelving, elevating the overall design of the nightstand.
Step 11: Positioning the Adjustable Shelf Supports
Now it’s time to add the internal shelf supports that will hold your adjustable shelf. These supports are designed with a 45-degree angle cut on the front, purely for aesthetic appeal, adding a subtle detail to the design. We positioned ours flush with the second plank from the top, providing ample space for books and decorative items. However, the beauty of DIY is customization: feel free to adjust the placement of these supports to best suit your specific storage needs. Attach them to the inside of the planks using a combination of wood glue and 1.25-inch brad nails for a strong and stable hold.
Step 12: Securing the Main Shelf Board
With the shelf supports firmly in place, you can now attach the main shelf board. This board will be the primary surface for displaying your cherished books, photos, or other bedside essentials. Apply a thin layer of wood glue along the top edges of the installed shelf supports. Then, carefully position the shelf board on top, ensuring it aligns perfectly. Secure it by driving 1.25-inch brad nails through the top of the shelf board and into the shelf supports. This creates a solid and reliable shelf that can withstand the weight of your items, completing the core structure of your bookshelf unit.
Step 13: Finishing with Side Trim Details
To give your bookshelf nightstand a truly finished and polished appearance, the next step is to add the side trim pieces. These pieces run along the outer edges of the open shelving unit, effectively concealing any exposed ends and creating a seamless, high-quality look. Attach these trims in the same manner as previous trim pieces: apply wood glue along their back surface for a strong bond, then secure them with brad nails. Pay attention to alignment to ensure straight and even edges, enhancing the overall craftsmanship of your DIY furniture piece.
Step 14: Backing with Plywood for Stability
The final structural step in building your nightstand is to add the 1/4-inch plywood backing. This piece serves multiple crucial functions: it squares up the entire unit, prevents items from falling out the back, and adds significant stability to the overall structure. We prefer using staples for this part, as they offer quick and secure fastening over a large area. However, if you don’t have a stapler, brad nails will also work effectively. Ensure the plywood is evenly aligned with the back edges of your nightstand before securing it in place, completing the robust shell of your new furniture piece.
The Finishing Touches: Stain, Hardware, and Lighting
Staining for a Perfect Finish
Once your bookshelf nightstand is fully assembled, it’s time to bring out its character with a beautiful stain. For this particular project, we used Rust-Oleum’s Varathane stain in the captivating shade of Briarsmoke. This rich, smoky hue provides a sophisticated and timeless look that complements a variety of bedroom decors. If you’re having trouble locating it at your local Home Depot, you can easily find it HERE on Amazon. Remember to apply the stain evenly, following the wood grain, and allow for proper drying time between coats for the best results.
Adding Hardware for Functionality and Style
After the stain has cured completely, it’s time to install the hardware. The right pulls can dramatically enhance the look of your nightstand door. We selected a style that perfectly matched our aesthetic vision, and you can find the exact pulls we used HERE on Amazon. When installing, carefully measure and mark the placement for each pull to ensure consistency and symmetry. For the door hinges, which are crucial for smooth operation, you can find a reliable set HERE on Amazon. Attach the hinges securely to both the door and the cabinet frame, making sure the door swings freely and closes perfectly flush with the cabinet. This attention to detail in hardware selection and installation will ensure your nightstand is both beautiful and highly functional.
Illuminating Your Space with Perfect Lighting
No nightstand is complete without appropriate lighting. We absolutely adore the lights we chose for this project – they add such a cute and functional element to the nightstand! We discovered these fantastic and affordable wall/clamp spotlights at Ikea, and you can find them HERE at Ikea. What makes them particularly great is the convenient switch located directly on the cord, allowing for easy operation. This means you or your loved ones can effortlessly turn the lights on and off without reaching for a wall switch, perfect for bedtime reading or a subtle ambient glow.
Bringing Your Vision to Life
Congratulations! You’ve successfully built your very own DIY Bookshelf Nightstand. This project is a testament to the fact that creating functional and beautiful furniture doesn’t require extensive professional experience, just a willingness to learn and follow detailed instructions. From the sturdy base cabinet to the charming open shelving and the perfectly finished door, every component comes together to form a piece that will enhance any bedroom. Enjoy the added storage, the personalized aesthetic, and the immense satisfaction that comes from a successful DIY endeavor.
Remember, if you encounter any challenges during a step, don’t hesitate to refer back to our detailed YouTube video tutorial. We’ve put in our best effort to guide you through every stage of the process. Thank you so much for joining us on this creative journey! We would absolutely LOVE for you to share your finished projects and this guide with your friends, family, and fellow DIY enthusiasts!