
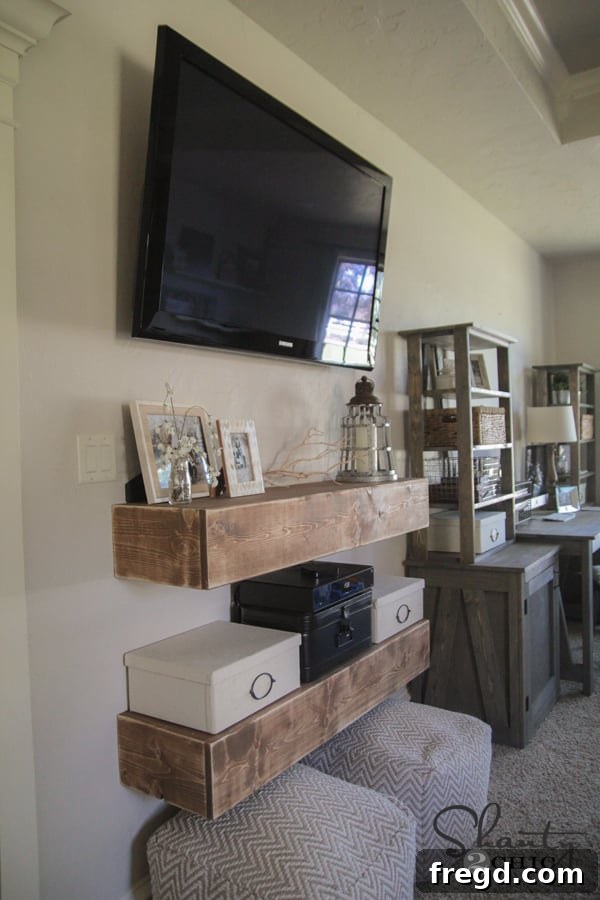
Welcome back, fellow DIY enthusiasts! If you’ve been following along, you know I’ve embarked on a major bedroom transformation that doubles as my home office. We recently dove into the initial phases with Part 1 and Part 2 of my brand new custom desk system, and trust me, Part 3 next week is going to be a game-changer! Today, however, we’re tackling a different, yet equally exciting, project born out of necessity: these incredible DIY floating media shelves. They came about as the perfect solution to a classic renovation mishap.
You see, my husband and I decided to mount our television on the wall. I gave him very precise instructions on the ideal height and placement. Fast forward just 15 minutes, and to my surprise, the TV was mounted approximately 12 inches higher than requested. Yes, he won that round! This unexpected placement meant my original plans for a traditional media console were out the window. But every challenge presents an opportunity for creativity, right? So, I pivoted, ditched the console idea, and designed these custom floating media shelves instead. And honestly, I couldn’t be happier with the outcome! They blend seamlessly with the space, offer ample storage, and provide that much-needed modern touch. Join me as I walk you through how to build your very own DIY media shelves!
Transform Your Space with DIY Floating Media Shelves
I confess, I’ve developed a bit of an obsession with shelves lately! I tend to get into phases with my DIY projects, and right now, shelving is my absolute favorite. There’s something so satisfying about creating functional and stylish storage solutions that truly elevate a room. These DIY floating media shelves are no exception. They offer a sleek, minimalist aesthetic that keeps your entertainment area tidy and organized, all while adding a touch of custom craftsmanship to your home.
This project is not only incredibly rewarding but also surprisingly straightforward and budget-friendly. You don’t need to be a seasoned woodworker to achieve professional-looking results. With a few basic tools and some determination, you can build these stunning shelves in a weekend. To make things even easier, we’ve provided comprehensive FREE printable plans for these beauties. You can download, save, or print them by clicking HERE or using the button below. A huge thank you goes out to Jay of Jay’s Custom Creations for expertly transforming all of Shanty 2 Chic’s original ideas into these easy-to-follow plans for our readers. Jay is an amazing craftsman with fantastic ideas, so be sure to check out his work!
Why Choose DIY Floating Media Shelves?
Opting for DIY floating media shelves offers numerous advantages over store-bought alternatives. Firstly, customization is key. You can tailor the dimensions, finish, and overall design to perfectly match your space and aesthetic preferences, ensuring a truly integrated look. Secondly, it’s often more cost-effective. Building it yourself saves on labor and allows you to select materials that fit your budget without compromising on quality. Lastly, there’s an immense sense of accomplishment that comes from creating something beautiful and functional with your own hands. These shelves are not just storage; they are a statement piece, meticulously crafted by you, to enhance your home’s decor and functionality, especially when paired with a wall-mounted television.
Essential Tools and Materials for Your Floating Shelves Project
Before we dive into the construction, let’s ensure you have all the necessary tools and materials at hand. A well-prepared workspace makes any DIY project smoother and more enjoyable. For this project, you’ll need:
- Wood: 2×4 boards (for the hidden support frame), 1×12 boards (for the shelf top), and 1×8 boards (for the shelf sides and front). Ensure your wood is straight and free of major defects.
- Measuring Tools: Tape measure, speed square, and a pencil for accurate marking.
- Cutting Tools: A miter saw or circular saw for precise wood cuts.
- Drilling & Joining Tools:
- Kreg Jig: An absolute must-have for creating strong, concealed pocket hole joints.
- Ryobi Drill: Or any reliable cordless drill for pre-drilling and driving screws.
- Ryobi Impact Driver: Highly recommended for driving long screws into studs with ease, preventing fatigue.
- Kreg Right Angle Clamp: Invaluable for holding pieces perfectly square while assembling.
- Fasteners & Adhesives:
- Gorilla Wood Glue: For extra strong, durable joints.
- Pocket Hole Screws: 1.5″ and 2.5″ lengths.
- Wood Screws: 1.25″ and 3″ lengths for assembly and wall mounting.
- Finishing Supplies:
- Varathane Stain (Early American): Or your preferred stain/paint.
- Ryobi Corner Cat Sander: For distressing and achieving a vintage look (optional).
- Sandpaper (various grits).
- Clean cloths for applying stain.
- Safety Gear: Safety glasses, hearing protection, and gloves.
- Installation Aids: Stud finder, level, and a pencil for marking wall studs.
- Optional for Cable Management: Ryobi Jigsaw for cutting cord access holes.
Step-by-Step Guide to Building Your Custom Floating Shelves
Step 1: Preparing the Hidden Support Frame
The foundation of any good floating shelf is a strong, concealed support frame. This is the part that will bear the weight and securely attach to your wall studs. For this section, we’ll be working with 2×4 boards. For each shelf you plan to build, you will need:
- One 2×4 board cut to 48 inches (this will be the main ledger board that attaches to the wall).
- Five 2×4 boards cut to 9 3/4 inches (these will be the internal support blocks that create the shelf’s depth).
Accuracy in your cuts is crucial here, so take your time and measure twice, cut once. Use a miter saw for clean, straight cuts. These dimensions ensure a sturdy frame that will support your shelf’s weight without sagging.
Step 2: Assembling the Support Frame with Your Kreg Jig
Now it’s time to assemble the support frames using the magic of pocket holes. If you don’t own a Kreg Jig yet, this project is a perfect reason to invest in one! It creates incredibly strong and virtually invisible joints, making your DIY furniture look professional. For each of the five smaller 2×4 pieces (9 3/4″), you’ll need to drill two 1.5-inch pocket holes into one end. Set your Kreg Jig to the appropriate depth for 2×4 lumber (which is typically 1.5 inches).
Once your pocket holes are drilled, it’s time to attach these smaller blocks to the longer 48-inch 2×4. Apply a generous amount of Gorilla Wood Glue to the end of each smaller piece before positioning it against the longer board. The wood glue adds significant strength to the joint, making it incredibly durable. Use your Kreg Right Angle Clamp to firmly hold the support blocks in place while you drive in the 2.5-inch pocket hole screws. This clamp is a lifesaver for ensuring your pieces stay perfectly aligned and square during assembly. Evenly space the five smaller boards along the length of the longer 2×4. This creates a robust frame ready for mounting, providing ample support for your media components.
Step 3: Crafting the Outer Shelf Box
With the internal support frames ready, let’s move on to creating the visible part of your floating shelves – the stylish outer box. For each shelf, you will need to make the following cuts:
- One 1×12 board cut to 48 inches (this will form the top surface of your shelf).
- One 1×8 board cut to 49.5 inches (this will be the front face of your shelf).
- Two 1×8 boards cut to 11.25 inches (these will be the side panels of your shelf).
Again, precision is key. Use a square to ensure all your cuts are perfectly straight, as this will impact the overall look and fit of your finished shelf.
Take the two 11.25-inch 1×8 pieces and drill two 3/4-inch pocket holes into one end of each piece. These holes will be used to attach the front 1×8 board later on, so make sure they are on the correct end (the end that will connect to the front piece).
Begin by attaching the shorter 1×8 side pieces to your 1×12 top board. Apply a bead of wood glue along the edge of the 11.25-inch 1×8 piece where it will meet the 1×12. The glue is vital for a strong, long-lasting bond. Then, using your Ryobi drill (or similar), drive 1.25-inch pocket hole screws through the pocket holes you just drilled on the 11.25-inch pieces, securing them to the 1×12 top. Ensure the pieces are flush and square as you screw them together.
Step 4: Completing the Shelf Box Assembly
Now that the side panels are securely attached to the 1×12 top, you’ll see the beginnings of your shelf box taking shape. This is what the assembly should look like before you attach the front 1×8 board. The exposed pocket holes on the side panels are where the front piece will connect, creating a seamless, sturdy box.
The final step in constructing the shelf box is attaching the 49.5-inch 1×8 front board. Apply wood glue to the edges of the side panels where the front board will connect. Then, align the front board and drive 1.25-inch pocket hole screws through the remaining pocket holes on the side pieces, securing the front board firmly in place. This completes the robust, hollow box that will slide over your internal support frame. Ensure all joints are tight and flush for the best appearance and structural integrity.
And just like that, you have a perfectly constructed shelf! Badabing badaboom!
Step 5: Finishing Touches – Staining and Distressing
Before hanging your beautifully crafted shelves, it’s time to add the finishing touches that will truly make them shine. I chose to give both of my shelves a single coat of my favorite stain: Varathane Stain in Early American. You can find this excellent product at The Home Depot. It offers a rich, warm tone and, best of all, dries in just about an hour – making the finishing process incredibly efficient. Apply the stain evenly with a cloth, following the wood grain, and wipe off any excess for a smooth, consistent finish.
Once the stain had thoroughly dried, I wanted to give my shelves a charming, vintage-inspired look. I achieved this by using my Ryobi Corner Cat sander to lightly distress the finish. This technique involves gently sanding certain areas, particularly edges and corners, to simulate natural wear and tear, creating an aged, rustic appeal. You can experiment with different levels of distressing to match your desired aesthetic. This step adds character and depth, transforming simple wood into a piece with a story.
Step 6: Securely Mounting Your Floating Shelves
Now for the exciting part – hanging your shelves! The first crucial step is to attach the internal support frames to the wall. Safety and stability are paramount here. Begin by using a reliable stud finder to locate the wall studs in your desired shelf locations. Mark these studs clearly with a pencil. Attaching directly to studs ensures maximum strength and prevents your shelves from pulling away from the wall over time.
Once you’ve identified your studs, position your support frame against the wall, ensuring it’s level. Mark a small line on the frame where each stud lines up. Now, using a drill, pre-drill pilot holes through the 2×4 frame at each stud mark. Pre-drilling is a critical step that prevents the wood from splitting when you drive in the screws, especially when working with hardwoods or near edges. Then, securely attach the frames to the wall using 3-inch wood screws, driving them through the pre-drilled holes and deep into the wall studs. For this task, I highly recommend using a Ryobi Impact Driver. If you already have a Ryobi drill, adding an impact driver to your toolkit is a smart move. Or, consider this fantastic combo kit that includes both tools – it’s an excellent value! An impact driver makes driving long screws incredibly easy; you can literally hold it to the screw, apply minimal pressure, and watch it effortlessly drive the fastener home. It’s truly a game-changer for wall-mounting tasks.
In this image, you can clearly see the bottom shelf fully installed and the support frame for the second shelf securely attached to the wall, ready for its outer box. Take a moment to ensure everything is perfectly level before proceeding.
Once the support frame is firmly in place, carefully slide your pre-built shelf box over it. It should fit snugly, creating the illusion of a solid piece of wood floating effortlessly on your wall. Take your time with this step, ensuring a smooth fit without forcing it.
Finally, to permanently secure the shelf box to its frame, you’ll drive screws through the top surface of the shelf and into the 2×4 frame below. I used six 1.5-inch wood screws for this part, ensuring they went deep into the 2x4s of the frame for maximum hold. Don’t forget to pre-drill pilot holes for these screws as well, to prevent any splitting of your beautiful finished wood. I wasn’t concerned about the visibility of these screws, as I knew my decorative items and media components would easily cover them up.
Step 7: Smart Cable Management and Final Adjustments
That’s essentially it for the construction and installation! One design choice I made was to leave the bottom of these shelves open. Given their proximity to the floor in my setup, I knew no one would ever see underneath them. More importantly, this open bottom provides incredibly easy access to the electrical outlet and simplifies cord management for all my media devices. For instance, my bottom shelf elegantly houses our cable box and Apple TV.
To maintain a clean and wire-free look, I used my Ryobi Jigsaw to cut a small, neat half-circle out of the back edge of the bottom shelf. This simple cut allows all the necessary cords to be neatly routed behind the shelf and down to the outlet, keeping them completely hidden from view. This thoughtful detail ensures your custom media center is not only beautiful but also highly functional and free of unsightly cable clutter.
Bringing It All Together: Styling Your New Media Hub
While I may still playfully grumble about the television being mounted a bit higher than I initially envisioned, I am genuinely thrilled with the creative solution these DIY floating media shelves provided. They not only fill the space perfectly but also offer a bespoke, stylish alternative to a traditional console. The finished look is exactly what I hoped for, seamlessly integrating into my bedroom/office space.
To complete the setup, I added a couple of comfortable poufs from Target beneath the shelves. These are fantastic for the kids, who can easily pull them out for extra seating when they want to relax and watch TV. Beyond functionality, the shelves provide a wonderful canvas for decor. You can style them with books, plants, decorative objects, or framed photos to add personality and warmth to your entertainment area. Remember, floating shelves maximize floor space, making your room feel larger and more open, while also offering versatile storage for all your media needs.
Here are a few more inspiring shots of the completed DIY floating media shelves, showcasing their elegance and functionality in a real-world setting. Notice how the simple, clean lines complement the room, providing both practical storage and a sophisticated visual element.
Thank you so much for joining me on this DIY journey! I hope this detailed tutorial empowers you to create your own custom floating media shelves. If you have any questions at all during your project, please don’t hesitate to ask in the comments below – I’m always happy to help!
I would absolutely LOVE for you to share and Pin these shelves with all your friends and fellow DIY enthusiasts! Your support helps us continue to create and share inspiring projects. You guys are truly awesome!
Happy crafting, and have a fantastic Tuesday!
Warmly,
Whitney