
Happy Wednesday, fellow DIY enthusiasts!
I am absolutely thrilled to share the details of my latest woodworking adventure with all of you today! The holiday season always means putting creative projects on hold, but with Christmas now gracefully behind us, I was more than ready to dust off my tools and dive back into building. The anticipation of creating something unique and functional had been bubbling, and I couldn’t wait to transform that energy into a tangible piece of furniture.
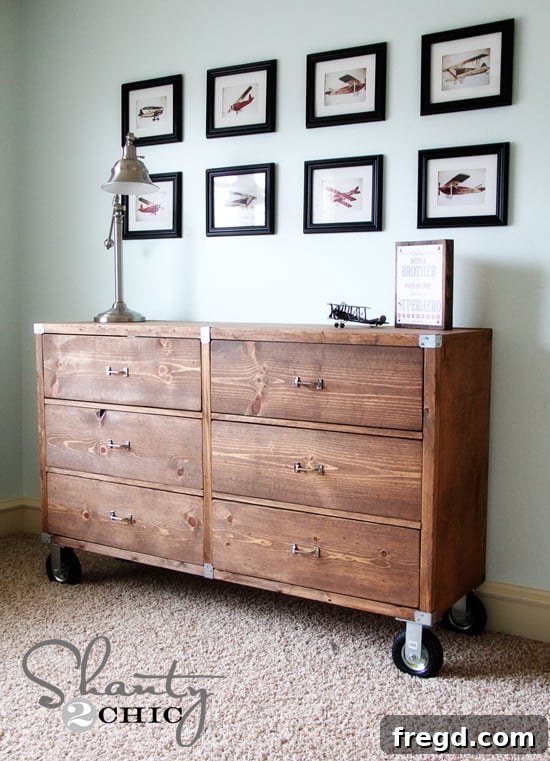
Unveiling My Latest Masterpiece: The Rolling Rustic Wood Dresser
This project might just be my proudest accomplishment yet. My youngest son had an almost entirely empty room – just a crib and endless possibilities. For months, his tiny pajamas and socks had been relegated to a simple basket, which, as any parent knows, isn’t the most efficient or organized solution. I knew a dresser was the perfect starting point to bring both order and style to his space.
My initial quest began by searching for inspiration, looking for ideas to adapt and personalize. While I found many beautiful designs, none quite captured the vision I had in my head. That’s the beauty of DIY, isn’t it? It empowers you to imagine, design, and create exactly what you need. So, I started sketching out concepts in my mind, visualizing every detail. And, of course, a huge shout-out goes to the incredibly talented Miss Ana White! Once I had a solid idea, I consulted her fantastic site for complementary plans, and she delivered beyond my expectations. I truly adore the final result. Take a look at how it turned out:
What are your thoughts? I’m absolutely smitten with it! If my son’s room wasn’t the intended home, I’d be strongly tempted to keep this stunning piece for myself. It’s a testament to how custom-built furniture can truly elevate a space.
I’m excited to share the intricate details of my build process right here. For those eager to replicate this exact design, you can find the full set of comprehensive plans over at Ana White’s website. Her detailed instructions are invaluable for anyone looking to undertake this rewarding project.
Choosing the Right Materials: The PureBond Plywood Advantage
Let’s talk about materials, because choosing the right wood is crucial for any successful furniture build. For this dresser, I opted for PureBond Plywood, and for good reason. Many of you who follow my work, and my partner Ash’s, know how much we champion this fantastic product. Initially, the idea of constructing beautiful, durable furniture from plywood might seem unconventional, even a bit strange. It certainly did to us at first! That was until we educated ourselves about the exceptional qualities of PureBond Plywood.
One of the greatest advantages of PureBond Plywood is its accessibility; you can conveniently find it at any Home Depot store, making it a reliable choice for DIYers across the country. But what truly solidified our decision to use and recommend PureBond?
Why We Love PureBond Plywood:
- Formaldehyde-Free Adhesive: This is a massive selling point. PureBond uses a soy-based, formaldehyde-free glue. It’s frankly scary to think about the harmful chemicals we might have been breathing in from traditional plywoods until now. Choosing PureBond means creating a healthier home environment for our families, free from these noxious fumes.
- Made in America: We are proud to support American manufacturing! PureBond plywood is produced right here in the USA, which is a big ‘whoop!!!’ for us. It speaks to quality and local job creation.
- Sustainable Sourcing: The wood used in PureBond products comes from sustainably managed forests. This commitment to environmental responsibility resonates deeply with our values, allowing us to build beautiful things without compromising the planet.
- Exceptional Workability: This plywood is incredibly easy to cut, drill, and finish. It holds screws well and provides a stable, consistent surface, making the building process smoother and more enjoyable, especially for intricate projects like dressers.
- Stunning Aesthetics & Value: For us, this is arguably the biggest selling point. PureBond plywood offers the luxurious look and feel of real hardwood, but at a mere fraction of the cost. Home Depot typically stocks birch and oak veneers, but you can also order other species like hickory, maple, or practically anything else, and have it delivered directly to your local store. This flexibility and beautiful finish are truly game-changers for budget-conscious DIYers who don’t want to sacrifice style.
After discovering the numerous benefits of PureBond Plywood, we simply can’t imagine going back to other options. It’s such an obvious, superior choice that fits perfectly within our “shanty” budgets while delivering professional-grade results. To complement the PureBond plywood, I also used pine boards for other parts of the dresser’s structure. For those interested in seeing PureBond in action, we recently shared a few videos on working with this material, which you can check out here!
Essential Tools for Any DIY Furniture Project: The Kreg Jig
For those of you still contemplating whether to invest in a Kreg Jig, let me assure you, it’s one of the best decisions you’ll make for your workshop. Stop hesitating and just go for it! This tool represents a small investment that yields a truly massive return in terms of project quality, efficiency, and sheer satisfaction. The Kreg Jig makes creating strong, precise pocket-hole joints incredibly straightforward, transforming complex joinery into a simple, repeatable process. It’s perfect for everything from sturdy frames to elegant drawer boxes, ensuring your furniture stands the test of time.
The Building Journey: From Raw Materials to a Functional Dresser
The journey from a stack of wood to a finished dresser is always incredibly rewarding. Here’s a glimpse into some of the key construction steps. First, I had the friendly staff at Home Depot make the initial cuts for the PureBond plywood, saving me time and ensuring perfectly straight edges.
Mastering Drawer Slides: A “Shanty” Approach to Perfect Functionality
I must admit, the prospect of installing six drawers initially felt a bit intimidating. Drawer slides have always been a challenge for me in the past, often leading me to simply avoid them to sidestep potential frustration and failure. However, for this dresser, especially with its six generous drawers – hear me, all you fellow moms out there who need maximum storage! – I knew I had to conquer this hurdle. The large capacity of these drawers is truly one of the dresser’s best features, and perfectly functioning slides were non-negotiable.
So, I devised my own “shanty” method for getting these babies installed seamlessly. While there’s likely a more professional, technical way to do it, my approach was incredibly easy, straightforward, and utterly foolproof for me. The result? Six perfectly functioning drawers that glide effortlessly. Allow me to share my simple, yet effective, method for installing drawer slides:
Your final step after the internal drawer boxes and slides are installed is to cut and attach the drawer faces to size. I simply measured each individual opening, then cut the face approximately 1/8″ shorter in both length and height than the opening dimensions. This slight allowance ensures a perfect, smooth fit with consistent gaps around each drawer, giving the dresser a polished and professional appearance.
Finishing Touches: Staining, Protecting, and Personalizing
The finishing stage is where the personality of your piece truly shines through. For this rustic dresser, I chose a beautiful stain that perfectly complements the wood’s natural grain.
After applying the stain, a crucial step for any furniture that will see regular use is protection. I applied a generous coat of Rust-Oleum polyurethane to everything. This clear topcoat seals the stain, enhances the wood’s beauty, and most importantly, provides a durable barrier against scratches, spills, and daily wear and tear, ensuring the dresser looks fantastic for years to come.
For the hardware, I sourced stylish pulls from Lowe’s, which added a touch of elegance to the rustic aesthetic. The functional casters, essential for the dresser’s rolling feature, were purchased from Northern Tool, ensuring smooth mobility. To add a bit more of that signature “shanty” charm and character, I found some inexpensive metal brackets in the framing section of the hardware store. While they serve no structural purpose on the dresser, they add a delightful decorative element, proving that small details can make a big difference in a custom build.
Reflections and Final Reveal
Whew! Writing about this build was almost harder than actually building the dresser itself, I promise! But it’s so worth it to share this journey with you. I hope I’ve covered every detail, but please don’t hesitate to reach out if you have any questions at all about the process, materials, or tools. I’m always happy to help fellow DIYers!
Here are a few more beautiful shots of my son’s new, custom-built dresser:
Thank you so much for stopping by and taking the time to read about this exciting project! I truly hope this detailed breakdown inspires you to pick up your tools and create something amazing for your own home.
Once again, you can find the full, step-by-step plans for building this beautiful rolling rustic wood dresser at Ana-White.com.
I would absolutely LOVE for you to pin and share this project using the buttons below! Your support helps inspire more creators and spreads the joy of DIY. Have an awesome day filled with creativity and success!
~Whitney