
Transform Your Old Rocker: A DIY Shanty Slipcover Tutorial
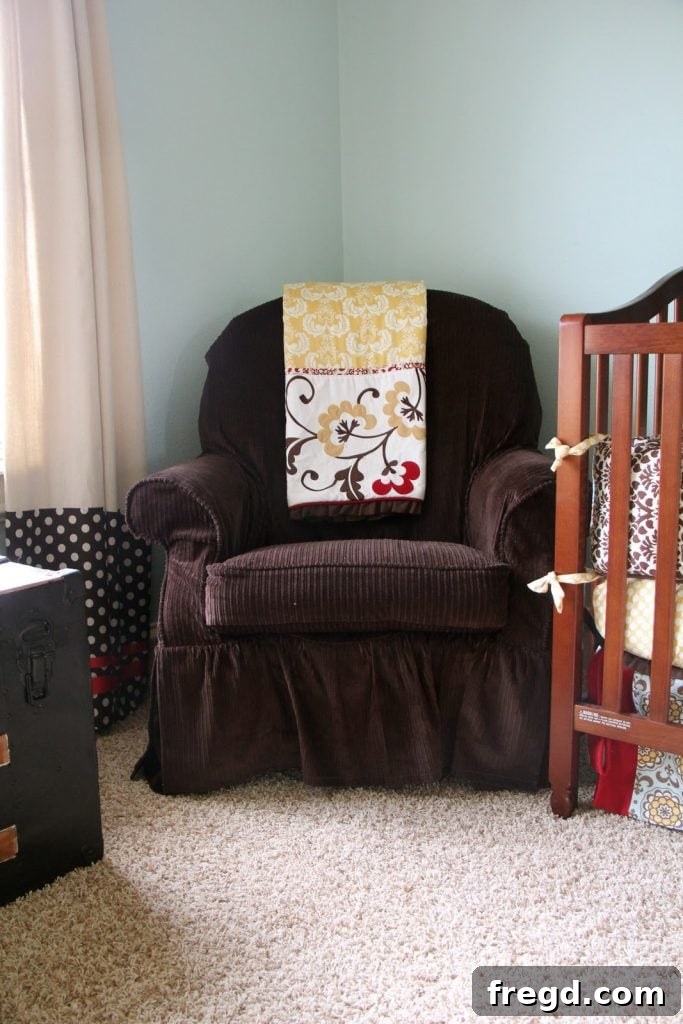
Welcome, fellow DIY enthusiasts! If you’re looking for a professional, by-the-book guide to slipcovering, you might find my approach a little unconventional. But if you appreciate practical, budget-friendly solutions that yield beautiful results, even with a dash of “shanty” charm, then you’re in the right place. Today, I’m sharing the journey of transforming an old green rocking chair into a cozy, stylish piece for Ellyot’s room with a handmade corduroy slipcover.
From Faded Green to Fabulous Brown: The Chair’s Journey
Every great furniture makeover starts with a story, and my beloved rocking chair is no exception. It began its life as a rather tired, but perfectly functional, green glider rocker. This fantastic piece was a generous gift from my in-laws, who no longer had a need for it. I was thrilled to give it a new home, knowing it had great potential, even in its original green hue.
For quite some time, the chair remained green. I envisioned having it professionally reupholstered one day when the budget allowed. However, as my pregnancy progressed and the powerful nesting instinct kicked in, I had an epiphany: why wait? Why not tackle this creative challenge myself? The idea of a DIY slipcover began to take shape, promising a personalized touch without the hefty price tag.
The Genius of the Old Sheet Pattern: A Budget-Friendly Approach
My grand plan was simple yet effective: create a test slipcover from an old sheet. If I could make a decent-fitting cover using a cheap, readily available material, I could then carefully take it apart, seam by seam, and use each piece as a precise pattern for my final fabric. This method is incredibly forgiving and perfect for anyone intimidated by drafting patterns from scratch.
Draping and Marking: Crafting Your Custom Slipcover Template
I began by draping an old sheet over the rocking chair, aiming for minimal sewing. The goal was to find a way to position the fabric that would require as few seams as possible, simplifying the construction process. This involved a lot of pinning, smoothing, and adjusting until the fabric lay just right. Once I achieved a good fit for a section, I would grab a pencil and carefully mark where I intended to cut and stitch. Often, to ensure the most accurate fit, I would even cut the fabric while it was still draped directly on the chair, making small adjustments as I went.
The arms were one of the first critical areas. I cut the fabric for the arms and then meticulously attached them to the back and bottom of the seat section. For all these initial seams, I used the longest straight stitch my sewing machine offered. This was a deliberate choice, as it allowed me to easily rip out the stitches if adjustments were needed later, making the pattern creation flexible and stress-free.
Next, I tackled the front part of the arms, ensuring they mirrored the clean lines of the original chair.
I pinned these sections securely and used my trusty pencil to mark the precise stitch lines. A crucial tip for this stage: use your pencil to label each pattern piece with its location on the chair. When you take everything apart, it’s incredibly easy to get lost in a pile of fabric scraps. Clear labels are your best friend in keeping everything organized and ensuring a smooth reassembly.
Iterative Stitching and Fitting: The Key to a Perfect DIY Slipcover
The process was iterative: each time I needed to create a new seam, I would carefully remove the partially assembled slipcover, sew the seam on my machine, and then put it back on the chair to check the fit. If anything felt a bit “janky” or didn’t sit quite right, I wouldn’t hesitate to pull it off, rip out the stitches, and adjust. This meticulous (though informal) approach with the old sheet was vital. I knew that refining the sheet pattern to perfection would lead to a much better outcome when I finally cut into my beautiful, new corduroy fabric for the final slipcover.
Once both arms were perfectly patterned and temporarily stitched, I moved on to the back of the chair. I pinned a large section of the sheet to the back, ensuring it covered the entire area smoothly, and then continued marking all my stitch lines with a pencil. This step-by-step process ensures that every contour and curve of the chair is accurately captured in your DIY pattern.
Bringing the Vision to Life: Cutting and Sewing the Corduroy
With the sheet pattern finalized, carefully marked, and all temporary stitches in place, I was ready for the exciting part: transferring the pattern to my chosen corduroy fabric. Before cutting, I meticulously unpicked all the stitches on the sheet pattern, separating it into individual pieces. This is where those pencil labels truly shine, guiding me on which piece was for the arm, back, seat, etc. I laid out each piece on the corduroy, paying close attention to the fabric’s nap and grain direction to ensure a consistent and professional finish. I then cut the corduroy in the same methodical order I created the pattern, starting with the arms.
Elevating the Design: Crafting Custom Piping
To add a touch of professional finish and visual interest to the arms, I decided to incorporate thick piping into the seams. Many sewing machines come with a specialized piping foot, making this detail surprisingly easy to achieve. If you can sew a straight stitch, you absolutely can make your own custom piping! It’s a fantastic way to define the edges of your DIY slipcover and give it a polished, custom look.
Making piping involves simply cutting strips of fabric—ideally on the bias for flexibility around curves—and wrapping them around a filler cord. You then sew close to the cord, creating a raised edge. I crafted all the necessary piping for my slipcover, ensuring it perfectly matched the rich brown corduroy.
Then came the careful process of sewing the piping into the seams of the arm pieces. This step, while not inherently difficult, certainly demands precision and patience. It requires you to be exact with your stitching to ensure the piping sits neatly along the seam, which, I’ll admit, isn’t always my strongest suit! However, the effort is well worth it for the beautiful result it adds to the finished chair slipcover.
Assembling Your Custom Slipcover and Adding Final Touches
With all the pieces cut and piping prepared, the assembly truly began. I systematically stitched all the corduroy sections together, following the order established by my sheet pattern. After piecing together the main body of the slipcover, I moved on to adding a small, elegant skirt around the base of the chair. This involved carefully measuring the desired length and width, cutting the fabric, and attaching it with a clean seam. Finally, I created a separate cover for the seat cushion, ensuring a cohesive and complete look for the entire rocking chair makeover.
The “Shanty” Secret Weapon: Hot Glue for a Flawless Finish
Now, for my ultimate “shanty” secret weapon: the hot glue gun. This might sound unorthodox for a sewing project, but hear me out! Knowing that I would never use the original green fabric of the chair again, I wasn’t afraid to get a little creative. Hot glue is an amazing tool for hiding minor imperfections, ensuring a super snug fit in tricky spots, and generally covering a multitude of small mistakes that might otherwise bother a perfectionist. Anywhere I found a seam that wasn’t quite perfect, or a spot that needed a little extra tautness, received a discreet dab of hot glue. The beauty is, you can’t even tell it’s there!
And let me tell you, this isn’t just a temporary fix. My three children love to use this rocking chair as their personal trampoline, and that hot glue has held up perfectly, defying all expectations. So, don’t knock it until you’ve tried this fantastic shortcut for achieving a polished, custom slipcover look with minimal fuss. It truly shows that a DIY approach doesn’t have to be perfect to be practical and durable.
I hope this detailed, yet decidedly “shanty,” guide to creating your own DIY slipcover offers you some helpful insights and inspiration. While it may not be a totally descriptive, step-by-step professional manual, it showcases how a little ingenuity, an old sheet, and a hot glue gun can transform an old piece of furniture into a cherished, personalized item for your home. Happy crafting!