
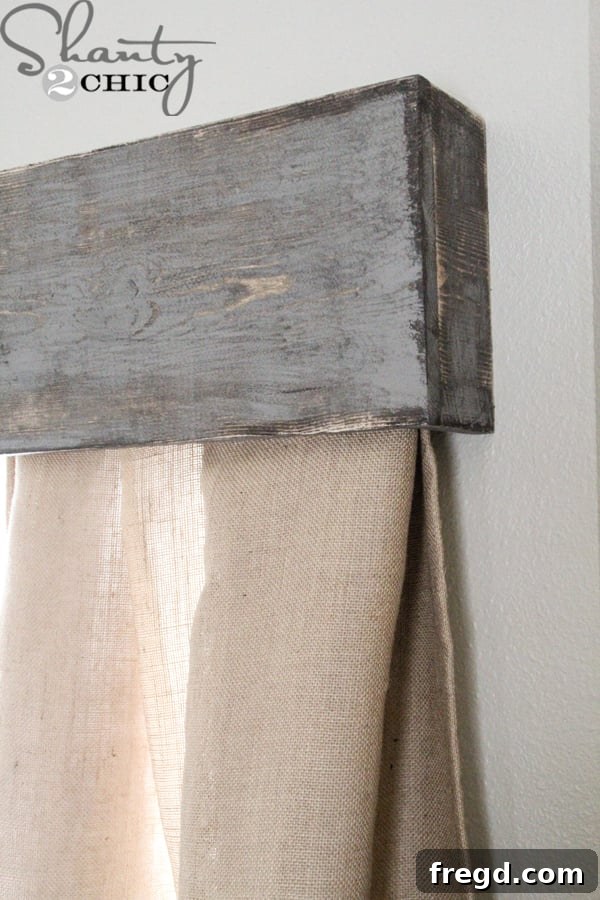
Welcome, fellow DIY enthusiasts! Are you looking to elevate your home decor with a touch of custom craftsmanship without breaking the bank? If so, you’ve landed in the right place. Just like many of you, I’ve spent countless hours transforming our new home, from building custom furniture to tackling various renovation projects. Yet, despite all the effort, I often found myself neglecting one crucial element: the windows.
While I’ve successfully created stunning lined window panels for our dining and living rooms, the rest of our windows remained a blank canvas. The truth is, high-quality window hardware can be surprisingly expensive, often forcing me to rely on handmade curtains and the sewing skills of a friend. But with my friend busy with her own home, I decided it was time to revisit an old idea that promised both beauty and affordability: DIY wooden window cornices. And let me tell you, the results were more impressive than I could have imagined!
In this comprehensive guide, I’m thrilled to share how you can craft your own beautiful wooden window cornices in about 30 minutes, for approximately $15 each. This project is not only budget-friendly but also incredibly satisfying, allowing you to splurge on other decor elements like exquisite curtains. Let’s dive into the world of custom window treatments and transform your living space!
Why Choose DIY Wooden Window Cornices?
Wooden window cornices, also known as valances, are much more than just decorative elements. They offer a myriad of benefits that enhance both the aesthetics and functionality of your windows. Here’s why this DIY project is a fantastic choice for any homeowner:
- Budget-Friendly: As you’ll see, these cornices cost a fraction of what store-bought or custom-designed options would. This allows you to allocate your budget to other areas of your home decor.
- Customization at Its Best: When you DIY, you have complete control over the design. Choose your preferred wood, stain, paint color, and distressing technique to perfectly match your existing decor or create a new focal point.
- Hides Unsightly Hardware: One of the primary advantages of a cornice is its ability to conceal curtain rods, brackets, and other hardware, creating a clean, streamlined look above your windows.
- Adds Architectural Interest: A well-placed cornice can add depth, dimension, and architectural detail to an otherwise plain window, making it feel more substantial and intentionally designed.
- Enhanced Privacy and Light Control: By covering the top portion of your window, cornices can help minimize light leakage from above, contributing to better room darkening and increased privacy, especially when paired with blackout curtains.
- Relatively Quick to Build: This project is perfect for a weekend warrior. With the right tools and a clear plan, you can have a beautiful cornice built and ready for finishing in under an hour per window.
Materials and Tools You’ll Need
Before you begin, gather all your materials and tools. Having everything at hand will make the process much smoother and more efficient.
Materials:
- 1×10 lumber (pine is a common and affordable choice)
- 1×4 lumber
- 1×2 lumber (for the wall cleat)
- 1 1/4″ pocket hole screws
- 2 1/2″ wood screws
- Wood glue
- Wood stain (e.g., Rust-Oleum Kona)
- Petroleum jelly (Vaseline)
- Gray paint (or your preferred color)
- Rag or foam brush for stain application
- Paintbrush for paint application
- Curtain rod(s) and curtains (optional, but recommended for a complete look)
Tools:
- Tape measure
- Pencil
- Miter saw or handsaw with miter box
- Kreg Jig (R3 or K5 recommended)
- Drill/driver
- 3/4″ pocket hole bit
- Level
- Stud finder (essential for mounting cleat)
- Ryobi Corner Cat Sander (or other orbital/detail sander)
- 80-grit sanding pads
- Clean cloths for wiping wood
Step-by-Step Guide: Building Your DIY Wooden Window Cornice
Step 1: Accurate Measurements and Wood Cuts
Precision is key in woodworking, especially when dealing with custom fits. Every window is unique, so avoid relying on generic measurements. Instead, take careful readings of your specific window. Start by measuring the width of your window, from one end of the trim to the other. If your window lacks trim, simply measure the width of the window opening itself.
Once you have this measurement, add 6 inches to it. This additional length ensures that the cornice extends gracefully beyond the window trim, providing a more substantial and finished appearance, and effectively concealing the curtain rod hardware. This sum will be the length for your main, front 1×10 board.
Next, you’ll cut two more 1×10 boards, each measuring 3.5 inches in length. These will serve as the side pieces of your cornice, giving it depth and structure. So, your cut list will look like this:
- One 1×10 board: (Your Window Width) + 6 inches
- Two 1×10 boards: 3.5 inches each
If you don’t own a power saw, don’t worry! A good quality handsaw can be used for these simple straight cuts. Always measure twice and cut once, and remember to wear appropriate safety gear when operating any tools.
Step 2: Drilling Pocket Holes for Strong Joints
Pocket hole joinery is a fantastic technique for creating strong, concealed joints, perfect for projects like this where you want a clean aesthetic. Using your Kreg Jig, drill three 3/4-inch pocket holes into one end of each of your two short 1×10 boards. These holes will allow you to securely attach the side pieces to the long front piece without visible screws from the exterior.
If you’re new to woodworking, a Kreg Jig is an invaluable tool. The Kreg R3 is an excellent choice for beginners and smaller projects, offering portability and ease of use. Even if you eventually upgrade to a larger model like the K5, the R3 will always be useful for specific applications, so it’s a worthwhile investment that won’t go to waste.
Step 3: Assembling the Main Cornice Box
With your pocket holes drilled, it’s time to assemble the basic structure of your cornice. Apply a small amount of wood glue to the edges of the short 1×10 pieces that will meet the long 1×10. Then, align each short piece flush with the ends of the long 1×10, forming a U-shape. Using 1 1/4-inch pocket hole screws, secure the side pieces to the long front piece. Ensure your joints are square and tight for a professional finish. Wood glue, combined with the screws, will create an incredibly strong and durable bond.
At this point, you’ll have the front and two side panels securely attached, forming the open box structure of your cornice. Take a moment to admire your progress!
Step 4: Preparing and Attaching the Top Board
Now, let’s add the top piece of the cornice, which will ultimately rest on the wall cleat and support the entire structure. Measure the precise length between the two short 1×10 side pieces you just assembled. This measurement should be approximately 1.5 inches shorter than your initial long 1×10 front piece. Cut a 1×4 board to this exact length.
Once cut, use your Kreg Jig to drill 3/4-inch pocket holes on both ends of the 1×4 and along one side. These holes will be used to attach the top piece securely to the main cornice box. The 1×4 will sit slightly recessed, allowing the front and side panels of the 1×10 to create a clean, finished edge.
Step 5: Final Assembly of the Cornice Box
Apply a thin bead of wood glue along the top edges of your assembled 1×10 cornice box where the 1×4 top piece will sit. Position the 1×4 top piece onto the box, aligning it so the pocket holes are facing upwards and inwards. Using 1 1/4-inch pocket hole screws, securely attach the 1×4 to the cornice box. This 1×4 piece is crucial as it forms the top of the cornice and will later rest on the mounting cleat attached to your wall, providing robust support.
Finishing Touches: Staining, Painting, and Distressing
Now for the fun part – bringing your wooden cornice to life with a beautiful finish!
Step 6: Apply a Base Stain
Begin by applying one coat of your chosen wood stain, such as Rust-Oleum Kona, over the entire cornice. Use a rag or foam brush for an even application, wiping away any excess. This initial stain layer provides a rich base color that will peek through the distressed paint later, adding depth and character. Allow the stain to dry completely according to the manufacturer’s instructions. Proper drying time is essential for the next step to work effectively.
Step 7: Prepare for Distressing with Petroleum Jelly
Once the stain is dry, take a small amount of petroleum jelly (like Vaseline) and rub a very thin layer over the edges and in various spots across the boards of the cornice. Focus on areas that would naturally show wear and tear, such as corners, raised edges, and flat surfaces where light would typically catch. This petroleum jelly acts as a resist, preventing the paint from adhering firmly in these areas, which will make distressing much easier later on.
Step 8: Apply Your Top Coat of Paint
Now, apply one coat of gray paint (or your chosen color) over the entire cornice, covering both the stained areas and the spots where you applied petroleum jelly. Ensure even coverage. Let the paint dry completely. Depending on your paint type and environmental conditions, this might take a few hours. This drying time is a perfect opportunity to get a head start on hanging your curtain rods and curtains!
Installation: Hanging Your Curtains and Cornice
Step 9: Install Curtain Rods and Curtains
While your paint is drying, you can proceed with hanging your curtains. I opted for inexpensive curtain rods, which are widely available at stores like Home Depot, Walmart, or Target, often costing under $2 each. Install your chosen curtain rods above your window, extending slightly beyond the window frame. Then, hang your curtains. This step can technically be done after the cornice is fully installed, but getting it done now saves you time and allows the paint to cure without interruption.
Step 10: Attach the Wall Cleat
This is a critical step for securely mounting your cornice. Cut a 1×2 piece of lumber to the same length as the 1×4 top piece of your cornice. This 1×2 will serve as your wall cleat. Using a stud finder, locate the studs above your window. Mark their positions. Then, using 2 1/2-inch wood screws, attach the 1×2 cleat to the wall, driving the screws directly into the studs for maximum stability. Use a level to ensure the cleat is perfectly straight. While I installed my curtain rod first, it’s generally easier to attach the cleat before installing the curtain rod, so learn from my experience and plan ahead!
Take a break! Your paint might still be drying, and you’ve already completed a significant portion of the project. You’re doing great!
Step 11: The Distressing Magic
Once the paint is completely dry, it’s time to reveal the underlying stain and create that charming distressed look. Grab your Ryobi Corner Cat Sander (or any orbital or detail sander) with an 80-grit sanding pad. Gently sand the entire cornice. You’ll notice that where you applied the Vaseline, large chunks of paint will easily lift off, exposing the beautiful stain underneath. Continue to sand other areas, allowing the bare wood to show through in various spots. This technique creates an authentic, worn-in feel that we absolutely adore for a rustic or farmhouse aesthetic.
Step 12: Mount the Cornice
After distressing, wipe down your cornice to remove any sanding dust. Now, carefully lift the cornice and set it on top of the 1×2 cleat that you previously installed on the wall. Ensure it’s centered and level. To secure it, drive 2 1/2-inch wood screws at an angle through the top 1×4 of the cornice and into the 1×2 wall cleat. Angle the screws slightly towards the wall for added grip and a concealed fastening method. Take care not to overtighten and damage the wood.
The Final Reveal and Customization Tips
And just like that, you’ve created a stunning DIY wooden window cornice! Each cornice costs roughly $15 in materials, and when paired with affordable curtain rods (which were under $2 each), this project offers incredible value. I found my fringed burlap panels at Ballard Designs, and despite their stylish look, they were quite reasonable compared to other options, plus they came lined – a delightful bonus!
One of my favorite aspects of these cornices is their versatility. If your curtains happen to be a little too long, simply fold them up to the desired length and clip them onto your curtain rings. The cornice will neatly conceal the adjustment, and no one will ever be the wiser!
This project was so surprisingly easy and inexpensive that I truly regret not tackling it sooner. My mind is already buzzing with ideas for modifications and how to incorporate these beautiful wooden cornices into other rooms of our home. Imagine different stains, paint colors, or even adding decorative trim or molding for a more ornate look!
Frequently Asked Questions About DIY Wooden Window Cornices
Q1: Can I use different types of wood for this project?
Absolutely! While pine is a popular and cost-effective choice, you can use other types of wood like poplar for a smoother finish or even reclaimed barn wood for a truly rustic appeal. Just be aware that different woods may take stain and paint differently, and their cost will vary.
Q2: How do I clean my wooden cornice?
For everyday cleaning, a soft, dry cloth is usually sufficient to wipe away dust. For more stubborn marks, a slightly damp cloth can be used, but avoid excessive moisture. If your cornice has a distressed finish, be gentle to preserve its character.
Q3: What if my window is very wide or unusually shaped?
For very wide windows, you might consider building the cornice in multiple sections and joining them together, or adding an intermediate support bracket for the wall cleat to prevent sagging. For unusual shapes, you may need to adjust the cutting plan, but the basic principle of a front and side panels remains the same. Always measure carefully!
Q4: Can I build this without a Kreg Jig?
While a Kreg Jig makes the joinery incredibly strong and hidden, it is possible to build the cornice using alternative methods like butt joints reinforced with wood glue and nails/screws driven from the outside, then filled and painted over. However, pocket holes are highly recommended for durability and a cleaner finish.
Q5: How can I make my cornice look more modern?
For a modern look, opt for crisp, clean lines and a smooth finish. Skip the distressing and choose a bold, solid color paint (like black, white, or a deep navy) or a sleek, natural wood stain. You might also consider adding minimalist metal accents.
Thanks so much for stopping by and taking the time to explore this project! I hope this detailed guide inspires you to create your own custom window cornices and adds a touch of personalized charm to your home.
~Ashley
Shop the Look & Related Projects:
Here are details on other items featured in the images, in case you’re curious about completing the look:
- Paint Colors: Discover My Home’s Paint Palette Here
- Stools: Sam’s Club (a steal at $35 each!)
- Rug: Hobby Lobby
- Metal Chairs: Target
- Dining Table: Learn How to Build This Round Wooden Table for $110
- Chalkboard Calendar: Create Your Own Chalkboard Calendar
- Kitchen Tile: See My Kitchen Tile Selections
- Chandelier: Find My Super Cute Chandeliers