
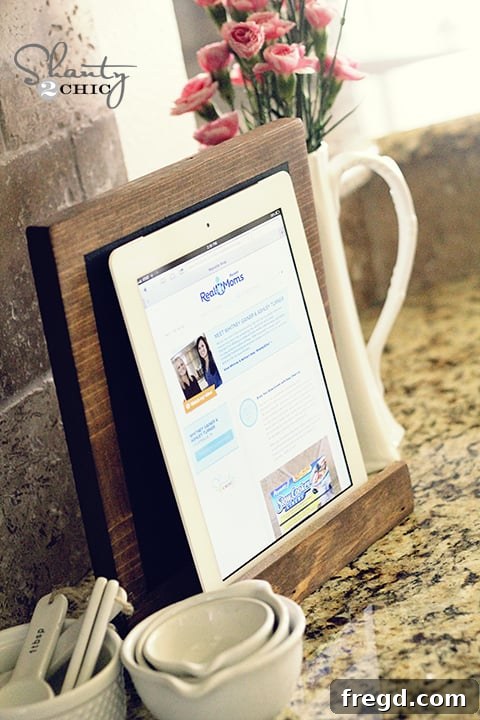
DIY iPad Stand & Chalkboard Display: Your Perfect Kitchen Companion
Hello, creative friends! Are you tired of your iPad flopping around on the counter while you’re trying to follow a recipe? For many of us who love to cook with digital instructions, keeping our tablets upright and visible is a constant challenge. I often found myself propping my iPad against a precarious stack of cookbooks or a coffee maker, always risking a tumble. This common kitchen dilemma sparked an idea, leading me to create a simple, yet incredibly functional, solution: a DIY iPad stand that doubles as a charming chalkboard display!
More Than Just an iPad Holder: A Versatile Kitchen Essential
This isn’t just any iPad holder; it’s a versatile display designed with both practicality and charm in mind. When it’s not holding your tablet, it seamlessly transforms into a decorative chalkboard. Imagine jotting down your grocery list, a sweet note for your family, or the evening’s dinner menu right on your kitchen counter. This dual functionality makes it an indispensable tool for any home, especially for those who appreciate handmade touches and smart organization. It’s also incredibly sturdy, ensuring your iPad stays safe and secure, no matter how intense your cooking adventures get.
Why This DIY iPad Stand is Perfect for Beginners
For anyone new to woodworking, or even just DIY in general, this project is an absolute dream. It requires minimal tools, basic cuts, and straightforward assembly, making it a perfect introduction to crafting with wood. I completed mine from start to finish during a single naptime – yes, it’s that quick and easy! This project proves that you don’t need a professional workshop or years of experience to create something beautiful and functional for your home. It’s designed to build your confidence and leave you with a fantastic finished product you’ll be proud to show off.
Gathering Your Affordable Materials
One of the best aspects of this DIY iPad display is its incredible affordability. You’ll be pleasantly surprised at how little it costs to make something so useful. The primary material you’ll need is wood, and I highly recommend using whitewood or pine boards. These are readily available at most hardware stores and are typically the most budget-friendly options, without compromising on quality for a project like this.
You can purchase these boards in standard lengths, such as 4-foot pieces. A single 4-foot piece provides enough wood to craft approximately four of these iPad displays. This means the cost per display drops to under $3 – an unbeatable price for a custom-made item! This affordability opens up opportunities to make extra stands as thoughtful gifts for friends, family, or even teachers. Imagine a personalized, handmade gift that’s both practical and stylish! You could even host a DIY crafting session with friends, making it a fun group activity.
Recommended Materials List:
- Whitewood or Pine Boards (e.g., 1×4 or 1×6, depending on desired depth)
- Wood Glue
- Small Brad Nails or Wood Screws (optional, for extra strength)
- Wood Stain (e.g., Rust-Oleum Ultimate Wood Stain in Dark Walnut)
- Chalkboard Spray Paint (e.g., Rust-Oleum Chalkboard Spray Paint)
- Painter’s Tape
- Sandpaper or Sander
Essential Tools for Your DIY Project
While this project is incredibly simple, having the right tools makes the process even smoother and more enjoyable. You don’t need a huge collection of power tools, but a few basics will go a long way.
Cutting Your Wood to Size
The first step involves cutting your boards. For this project, you will want all of your wood pieces cut to a uniform 10-inch length. If you’re new to woodworking and don’t own a saw, many Home Depot locations offer a handsaw for customers to use in-store, allowing you to get your pieces cut right after purchase. Alternatively, a simple hand saw will work perfectly for these straightforward cuts.
For those who are ready to dive deeper into DIY projects and plan on tackling many more creations, investing in a quality miter saw is a fantastic idea. Ryobi offers excellent compound miter saws that are both reliable and budget-friendly, making them a smart choice for any aspiring woodworker. A miter saw provides precise, clean cuts, which can significantly speed up your projects and improve the overall finish. It’s a tool that pays for itself quickly with the satisfaction of professional-looking results.
Achieving Smooth Edges with a Sander
Once your wood pieces are cut, preparing them for assembly and finishing is crucial. Before moving on to the final stages, I highly recommend sanding the corners and edges of all your pieces. This step isn’t just about aesthetics; it also makes the stand safer to handle by eliminating splinters and sharp points, and it helps the stain adhere more evenly for a professional look. A smooth finish truly elevates the appearance of any woodworking project.
When it comes to sanding, I can’t recommend the Ryobi Corner Cat enough. This compact and lightweight orbital sander is incredibly easy to maneuver, especially around corners and tighter spots, making it ideal for this project. It has become my go-to sanding tool because of its efficiency and ease of use, all without breaking the bank. Even if you’re a beginner, you’ll find it simple to operate, helping you achieve beautifully smooth results effortlessly.
Step-by-Step Guide to Crafting Your iPad Display
Now that you have all your materials and tools ready, let’s dive into the fun part: assembly and finishing! Follow these simple steps to bring your DIY iPad stand to life.
Step 1: Assemble Your Wood Pieces
With your wood pieces cut to 10 inches and lightly sanded, it’s time to assemble the basic structure. The design is incredibly simple, relying on a few strategically placed pieces to create the sturdy base and backrest for your iPad. Apply a generous amount of wood glue to the joining surfaces and press the pieces together firmly. For added durability and strength, especially since this stand will be frequently handled in the kitchen, you can use small brad nails or screws. Ensure all joints are flush and square before allowing the glue to set. Clamps can be helpful here to hold everything in place while the glue dries, ensuring a strong, lasting bond.
Step 2: Sanding for a Flawless Finish
Even if you did a light sanding before assembly, now is the time for a more thorough job. Focus on all edges, corners, and surfaces to ensure everything is perfectly smooth to the touch. This step is crucial for achieving a professional-looking finish and will greatly enhance the feel and durability of your stand. Start with a medium-grit sandpaper (around 120-150 grit) to smooth out any imperfections, then follow up with a finer grit (200-220 grit) for a silky-smooth surface. Remember to wipe off any sanding dust with a clean cloth before moving to the next step.
Step 3: Staining for Rich Color
Once your display is perfectly smooth and dust-free, it’s time to apply your chosen wood stain. I highly recommend Rust-Oleum Ultimate Wood Stain in Dark Walnut. This particular stain provides a beautiful, rich, deep color that truly brings out the natural grain of the wood, giving your project a sophisticated and timeless look. You can find this excellent stain at Lowe’s, making it easily accessible.
Rust-Oleum Ultimate Wood Stain in Dark Walnut
Apply the stain evenly with a brush or cloth, following the wood grain. Allow it to penetrate for a few minutes, then wipe off any excess with a clean rag. The beauty of this stain is its quick drying time – often under an hour, meaning you can move on to the next step sooner! Ensure you work in a well-ventilated area.
Step 4: Creating Your Chalkboard Surface
After the stain has completely dried, it’s time to add the chalkboard functionality. Carefully tape off the area where you want your chalkboard to be. Use high-quality painter’s tape to create crisp, clean lines. Measure twice and press the tape down firmly to prevent any bleed-through. You’ll want a clearly defined square or rectangle that will be functional for writing notes and lists.
Once your area is taped, grab your Rust-Oleum Chalkboard Spray Paint. Apply 1-2 light, even coats over the taped-off section. It’s better to apply multiple thin coats rather than one heavy coat to avoid drips and ensure a smooth, durable finish. Allow adequate drying time between coats as per the product instructions. This specialized paint will transform that section of your iPad stand into a fully functional chalkboard ready for all your notes and doodles.
Step 5: Final Touches and Curing
Once the chalkboard paint is dry to the touch, carefully peel off the painter’s tape to reveal your clean lines and perfectly finished chalkboard area. Allow the chalkboard paint to cure for the recommended time (usually a few days) before writing on it, as this ensures maximum durability and prevents ghosting. After curing, lightly rub the side of a piece of chalk over the entire chalkboard surface and then wipe it clean. This “seasons” the chalkboard, making it ready for use.
Your New Kitchen Companion: Ready for Use!
And just like that, your custom DIY iPad display and chalkboard stand is complete! It’s ready to find its home in your kitchen, becoming an invaluable aid for cooking, a central spot for family messages, or simply a charming piece of handmade decor. Its portability means you can place it exactly where you need it, whether you’re following a complex recipe, watching a cooking tutorial, or simply having your favorite show on in the background while you prep dinner.
Imagine the convenience of having your recipes at eye level, without fear of splashes or losing your place. And when the cooking is done, a quick flip transforms it into a communication hub for your household. Write down reminders, inspirational quotes, or simply leave a sweet “Good Morning” message for your loved ones. The possibilities are endless!
Customization & Care Tips
While the dark walnut stain gives a classic, elegant look, feel free to customize your stand to match your home decor. You could paint it a vibrant color, distress it for a farmhouse look, or even apply a clear coat to highlight the natural wood grain without stain. The beauty of DIY is making it uniquely yours! For care, simply wipe the wood with a damp cloth, and for the chalkboard, use a soft eraser or damp cloth to clean the surface.
I genuinely hope you love this project as much as I do. It’s truly amazing to create something so practical and beautiful for so little money – remember, it’s just about $3 a piece! That makes loving it even easier!
Thank you so much for stopping by and exploring this DIY guide. If you enjoyed this project, please consider sharing it with your friends and pinning it to your favorite DIY boards on Pinterest. Your support means the world! Happy crafting, and have an absolutely awesome day!
~Whitney