
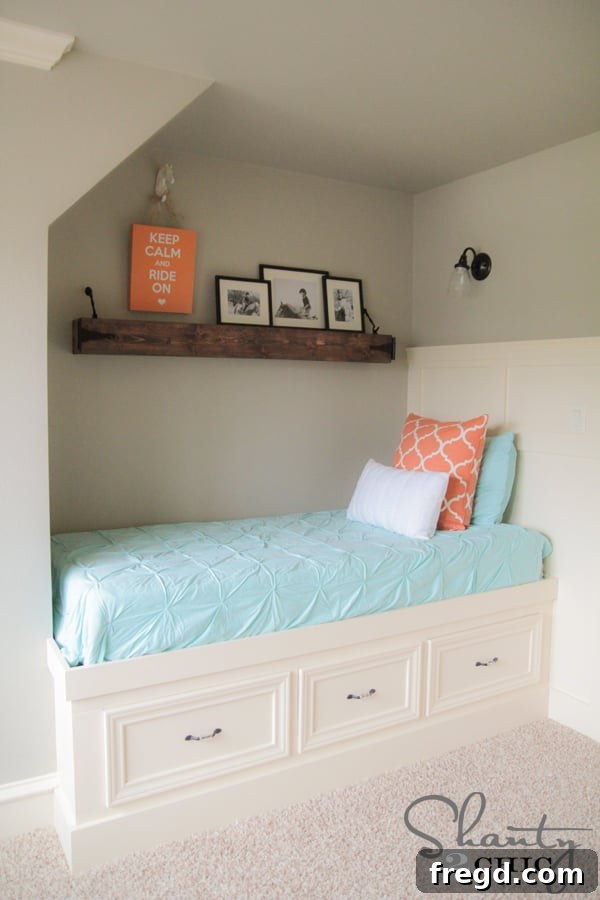
Welcome, DIY enthusiasts and home improvement seekers! We are absolutely thrilled to share a project that promises to transform any child’s room into a haven of functionality and style: a custom-built twin storage bed. If you’ve been following our journey on Instagram, you’ve witnessed the exciting progress of a special new room within our home. This adventure began with a recent decision to enclose a loft space, creating a dedicated bedroom for my daughter. The moment I saw one particular wall in this new room, I knew it was destined for something extraordinary – a built-in bed with integrated storage. And that’s precisely what we’ve accomplished! Prepare to be inspired by her stunning new built-in twin storage bed.
Honestly, I am completely captivated by this bed. Its design is so charming and practical, I might just consider trading rooms with her!
So, what makes this built-in bed truly exceptional? Beyond its custom appeal and space-saving design, we are providing comprehensive, FREE plans to empower you to construct your very own version! While my specific space was perfect for a built-in twin bed along a full wall, the beauty of this design lies in its adaptability. For those with corner spaces, a few simple modifications to the left side of the bed will allow it to seamlessly integrate into any corner, creating a cozy and functional nook. But the innovation doesn’t stop there. This bed boasts incredibly spacious drawers, ingeniously designed without any complex mechanical drawer pulls. Yes, you heard that right! The secret lies in a remarkably cool and robust wood drawer slide system that is surprisingly easy to build and offers incredible sturdiness. It’s a game-changer for durability and simplicity. To get started on your own custom project, you can download our complete set of FREE, step-by-step plans by clicking HERE or using the button below. In the following sections, I will personally guide you through every stage of this rewarding build, sharing tips and insights along the way.
With the plans in hand, let’s dive into the construction process!
For the vast majority of this project, I relied on my absolutely indispensable Kreg Jig. This tool is a true workhorse for any serious DIYer. Both Ashley and I have upgraded to the K5 model, which you can explore in detail HERE! We utilized the K4 model for many years, and the upgrade to the K5 brought a host of thoughtful enhancements that genuinely save a significant amount of time and make the tool even more intuitive to use. If you’re new to woodworking or curious about the magic of a Kreg Jig, we highly recommend checking out our detailed video HERE. In it, we meticulously break down its functionality, helping even beginners grasp its incredible utility and ease of operation.
The first major component to construct was the front frame of the bed. This initial frame sets the foundational structure for the entire unit. Given that the boards I was connecting were 3/4″ thick, it was crucial to set my Kreg Jig to create 3/4″ pocket holes specifically for this section. This ensures optimal strength and a flush fit for all joints.
Following the creation of the pocket holes, I proceeded to attach the frame pieces. This was done using 1.25″ pocket hole screws, combined with a generous application of wood glue between each joint. The combination of glue and screws creates an incredibly strong and durable bond, essential for a piece of furniture that will see daily use and support a mattress.
The same precise technique was applied to the middle sections of the front frame. Consistency in pocket hole depth and screw length is key to maintaining structural integrity throughout the project.
With efficiency that will surprise you, the entire front frame was completed in just a matter of minutes. This rapid assembly is one of the many reasons why pocket hole joinery is so beloved in DIY projects.
Next, my attention shifted to constructing the back frame, an equally vital component for stability and structure. This section was built using more substantial 2×3 and 2×4 lumber. Given the increased thickness of these materials (1.5″), I adjusted my Kreg Jig accordingly to create 1.5″ pocket holes. Accurate pocket hole settings are crucial for optimal joint strength and to prevent screws from protruding or lacking sufficient grip.
Once the pocket holes were prepared, I secured the components of the back frame. This involved applying wood glue to the joints and then fastening them with sturdy 2.5″ pocket hole screws. For this task, my reliable Ryobi 18V drill proved invaluable, effortlessly driving the screws to create a solid connection.
Here is the fully constructed back frame, ready for installation. Its robust build is evident, promising lasting support for the entire bed structure.
With both the front and back frames assembled, I strategically moved these larger components into my daughter’s room. This decision made the subsequent steps much easier, as it avoided the challenge of maneuvering a fully assembled bed through doorways. Now, it was time to focus on the ingenious wooden drawer slide system. This unique design eliminates the need for expensive and sometimes finicky mechanical drawer slides, relying instead on simple, sturdy “T” and “L” shaped wooden runners. You basically craft these shapes using wood glue and 2.5″ wood screws. To ensure a tight and secure bond, I clamped my pieces together before driving the screws. A critical step here is to pre-drill pilot holes for your screws. This prevents the wood from splitting, especially when working close to edges or with harder wood. Before assembling these, remember to create your pocket holes on each piece as per the plans. You can clearly visualize the “T” shape here, ready for assembly.
(Side note: It wasn’t until I was editing photos that I noticed the amusing expression in the wood grain of this piece! It certainly looks like it’s not too thrilled about those pocket holes, making me chuckle every time I see it.)
Moving on to the “L” shaped components of the drawer slide system. For these pieces, I opted for a slightly different placement for my pocket holes. As you can observe on the 2×3 piece, the pocket holes are positioned on the broader side. I found this orientation made it simpler to fit the piece into the Kreg Jig, streamlining the process. Rest assured, both pocket hole placements function equally well, providing the necessary strength and stability for the drawer slides.
With the “T” and “L” shaped drawer slides prepared, the next step involves attaching them securely to the bed frames. Precision is key here to ensure smooth drawer operation. As illustrated, the drawer slides were fastened to the back frame using robust 2.5″ pocket hole screws, while the front attachments utilized shorter 1.25″ pocket hole screws. This differentiation in screw length accommodates the varying thicknesses of the front and back frame materials, ensuring a strong and flush connection without compromising the wood.
Once all four of the main drawer slide components were securely attached, it was time to install the top runners. These crucial pieces serve a dual purpose: they provide robust support for the mattress, ensuring a comfortable and stable sleeping surface, and they also act as guides that prevent the drawers from tipping out when fully extended. I attached these top runners using the same reliable method of wood glue and pocket hole screws, maintaining the structural integrity of the entire built-in unit.
At this stage, the entire bed frame, complete with its integrated drawer slide system and mattress supports, was carefully positioned into its final resting place in the room. To ensure maximum stability and safety, I used robust 3 1/2″ wood screws to firmly attach the bed frame directly into the wall studs. This critical step anchors the built-in bed, making it an integral and secure part of the room’s structure.
With the main bed structure secured, I meticulously measured the precise dimensions for each drawer opening. This individualized measurement ensures a perfect, custom fit for every drawer, allowing them to glide smoothly within their dedicated channels. Immediately after, I began the exciting process of constructing the drawers themselves.
For all of my drawer construction, I chose 3/4″ PureBond plywood. This material is not only incredibly durable and stable but also an environmentally friendly choice. To make transportation and handling easier, I had the friendly associates at Home Depot cut the large sheets down into more manageable sizes for me. You can clearly see where I strategically added my 3/4″ pocket holes to the drawer sides, preparing them for assembly.
To assemble the drawer boxes, I combined the strength of wood glue with 1.25″ pocket hole screws. This method creates incredibly robust and lasting drawer boxes, perfectly suited for holding everything from toys to clothes without sagging or coming apart.
The bases of the drawers were then attached using wood screws driven from the bottom side. It is absolutely essential to pre-drill pilot holes for these screws as well. This small but crucial step will prevent the plywood from splitting, ensuring a clean and professional finish and extending the life of your drawers.
Here, you can see the newly constructed drawer boxes test-fitted into their respective openings within the bed frame, prior to the final decorative trimming. This dry fit is important to confirm all measurements and ensure smooth operation.
To give the drawers a polished, built-in appearance, I opted for a budget-friendly casing trim. I was delighted to discover a pro-pack containing six sticks of door casing for only $13 at Home Depot – an unbeatable deal that proves you don’t need to break the bank for high-quality results.
For efficient and precise trim attachment, my Ryobi AirStrike nailer was the tool of choice. This cordless nailer makes quick work of securing trim pieces, leaving behind minimal nail holes for an almost flawless finish.
My penultimate step in the construction phase involved adding the side boards to the wall and completing the side panel of the bed. This step brings all the structural elements together, giving the built-in bed a truly finished and integrated look.
During this process, I encountered a minor hurdle with the existing baseboards in the room. Rather than undertaking the arduous task of removing the entire length of the original baseboard, I turned to my trusty Ryobi reciprocating saw. This powerful tool allowed me to precisely cut and even out the baseboard section where the bed would meet it, creating a seamless and custom fit. I absolutely adore this saw, not just for its performance, but also because it conveniently uses the same 18V battery as my drill, making it incredibly easy to switch between tools without needing multiple battery systems!
Before moving on to the exciting painting phase, my final crucial step was to apply caulk and wood putty. These finishing touches are absolutely vital for achieving a professional, seamless look. Caulk fills any gaps or seams between the wood and the wall, while wood putty effectively conceals all nail holes and minor imperfections. This preparation ensures a perfectly smooth surface, ready for paint and allowing the final color to shine without distraction.
I chose to paint the built-in bed the same crisp color as the existing trim in my house. It’s actually a custom match to my original trim color. I am a devoted fan of Sherwin-Williams paints, so a while back, I brought a sample of my trim to their store, and they perfectly matched the shade. While I don’t have the exact color name readily available, the label with the color information is pictured below for reference. I cannot overstate how much I adore this particular paint. It offers exceptional coverage, going on very thick and effectively hiding a multitude of surface irregularities with ease.
The walls in the room are painted an absolutely amazing shade of gray that I cherish deeply! It’s called “Jogging Path” by Sherwin-Williams. One of my favorite aspects of their paint service is the convenience: I can simply call in my order, and then swing by to pick it up. This completely bypasses the dreaded experience of waiting in long lines at the hardware store, especially with potentially restless little ones in tow… not that I’ve ever had *that* particular issue, of course. 😉
This is the color swatch for Jogging Path. Please note that it appears significantly more gray in person and on the wall than it might in this digital representation. I truly, truly love this sophisticated shade.
To complete the cozy aesthetic of the room, I sourced all the beautiful bedding from Target, which perfectly complements the new built-in bed and wall colors. That about wraps up the detailed journey of constructing this fantastic piece! Over the next few weeks, I’ll be eagerly sharing all the other delightful DIY projects you might have spotted in the accompanying pictures, so stay tuned for more inspiration and tutorials.
Here are a few more captivating shots of the finished built-in twin storage bed!
And now, for the star of the show: the drawers! WOOHOO! These drawers exemplify both ease of use and incredible strength. They effortlessly slide in and out, a testament to the robust wooden slide system. In fact, they are so remarkably sturdy that I can actually stand inside them – a true testament to their durable construction and solid design! This level of strength ensures they can handle all the storage needs a busy child’s room demands.
As a final reminder, don’t forget that you can download the comprehensive set of FREE plans for this amazing built-in storage bed right HERE! A massive thank you goes out to Jay of Jay’s Custom Creations. He is truly phenomenal for meticulously translating all of Shanty2Chic’s original designs into these user-friendly, printable plans for our wonderful readers. He’s simply the best! Make sure to visit his site to discover more of his incredible work and detailed projects.
Thank you all so incredibly much for taking the time to stop by and explore this project with us! We would absolutely LOVE for you to PIN this built-in bed and share it widely with all your friends and fellow DIY enthusiasts. Spreading the word helps us continue to create and share more exciting content like this!
Please do not hesitate to reach out if you have any questions at all about the build, the plans, or any aspect of this project. We’re here to help!
~Whitney