
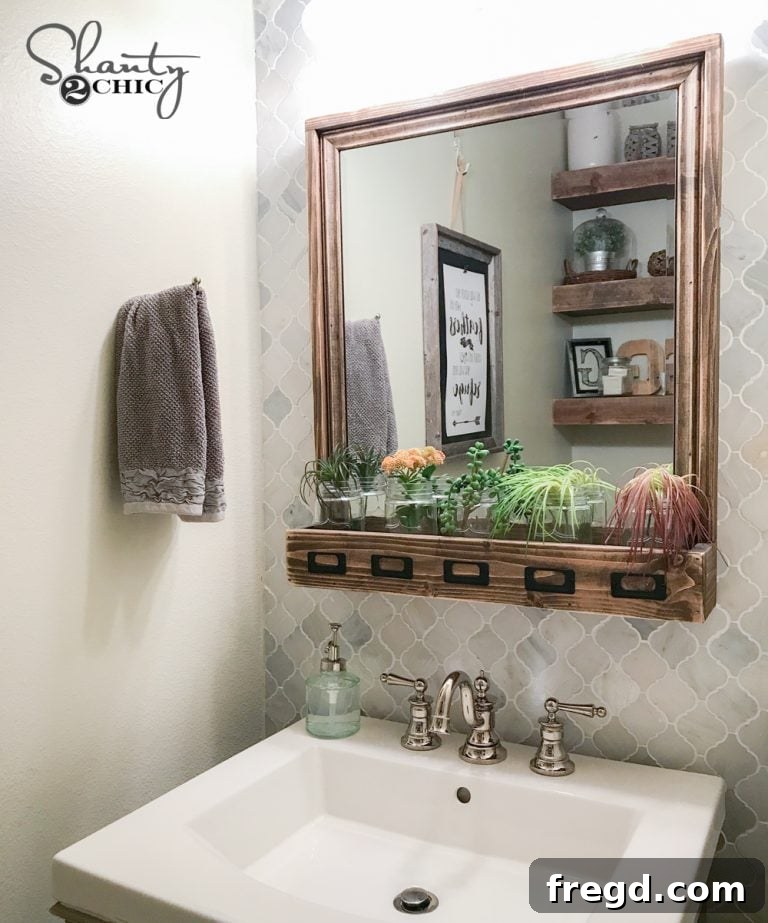
DIY Farmhouse Storage Mirror: Craft Your Own Stylish & Functional Organizer
Welcome, fellow DIY enthusiasts! Are you ready to transform your living space with a project that combines rustic charm, practical storage, and the immense satisfaction of building something beautiful with your own hands? Today, we’re absolutely thrilled to share the detailed plans and tutorial for our beloved DIY Farmhouse Storage Mirror. This project, which Ash and I crafted some time ago, remains one of our absolute favorites for its simplicity, enduring style, and incredible impact. Get ready to add a touch of timeless farmhouse elegance and smart organization to your home with this versatile piece!
Why Build a Farmhouse Storage Mirror for Your Home?
In today’s modern homes, functionality and aesthetics are no longer mutually exclusive; they beautifully intertwine. This DIY Farmhouse Storage Mirror isn’t just a reflective surface for checking your appearance; it’s a clever and elegant solution for decluttering and organizing your space in style. Whether you envision it gracing your entryway, providing essential storage in your bathroom, adding charm to your bedroom, or even serving as a creative hub in a craft room, this mirror offers discreet storage for everyday essentials while enhancing your decor with its timeless farmhouse appeal. Imagine having a designated, out-of-sight spot for keys, mail, cosmetics, toiletries, or small decor items, all neatly tucked away behind a stylish mirror frame. It’s the perfect blend of form and function, meticulously designed to make your daily life a little more organized and a lot more beautiful.
Your Comprehensive Guide: Video Tutorial & Free Plans
Before we dive into the intricate step-by-step instructions for crafting this stunning piece, we want to make sure you have every resource you could possibly need right at your fingertips. We understand that some learn best by seeing, and others by reading, which is why we’ve put together a truly comprehensive package to guide you. Our in-depth video tutorial visually walks you through every single phase of the construction, from making your very first cut to attaching the final mirror. Watching the video can provide invaluable visual guidance, clarify techniques, and make the written instructions even easier to follow, giving you the confidence to tackle each step.
Be sure to check out our detailed YouTube video HERE, where we demonstrate exactly how we built this entire farmhouse storage mirror project!
In addition to the visual guidance, we’re offering absolutely FREE downloadable plans HERE. These plans are an essential companion to this guide, providing all the precise measurements, cut lists, and detailed diagrams you’ll need to ensure accuracy and success. Print them out, gather your tools, and let’s confidently begin crafting your very own DIY Farmhouse Storage Mirror!
Essential Materials & Tools for Your Farmhouse Mirror Project
Every truly successful DIY project begins with selecting the right materials and having the appropriate tools on hand. For this stunning farmhouse storage mirror, you’ll primarily be working with wood and a few key fasteners and adhesives. Choosing quality materials will not only ensure the longevity and structural integrity of your finished piece but also significantly enhance its overall beauty. We’ll also highlight some indispensable tools that will make the construction process smoother, more efficient, and ultimately, more enjoyable.
Selecting Your Plywood Base: The Foundation
The very foundation of your DIY Farmhouse Storage Mirror is the sturdy back panel, a crucial component to which all other elements will securely attach. For this, you’ll need a good quality plywood or hardwood plywood board. Plywood is an excellent choice due to its inherent stability, resistance to warping, and its cost-effectiveness compared to solid wood panels. When selecting your board, take a moment to consider the final appearance, especially if you intend to stain it; hardwood plywood varieties often take stain more evenly and beautifully, resulting in a more polished finish.
If you’re new to woodworking or simply not comfortable cutting large sheets of plywood yourself, don’t fret! Most major hardware stores offer a convenient cutting service. Simply bring your precise measurements, and they can cut the board to the exact size you need, saving you significant time, effort, and potential frustration. For those who prefer the hands-on approach, cutting plywood can be a straightforward process with the right technique and tools. To assist you, we even have a dedicated video to guide you through accurate plywood cutting:
Master the technique: Learn How To Rip Plywood HERE with our helpful tutorial!
The Power of Pocket Holes: Your Kreg Jig Advantage
Pocket holes are a woodworking marvel, offering a fantastic and incredibly strong method to create concealed joints. For this particular project, they are absolutely essential for securely attaching the various components of the storage box to the plywood back panel. Our go-to tool for making these precise, angled holes is the ever-reliable Kreg Jig K5. A Kreg Jig allows you to drill angled holes into one piece of wood, which then connects seamlessly to another piece using special self-tapping screws. This ingenious method creates incredibly sturdy and durable joints without any visible fasteners, resulting in a cleaner, more professional, and aesthetically pleasing finish that truly elevates your DIY creation.
If you’re looking to invest in a reliable and versatile pocket hole jig that will serve you well for countless projects, you can find our favorite model, the Kreg Jig K5, readily available HERE on Amazon!
Step-by-Step Construction Guide for Your Storage Mirror
Step 1: Building the Base of the Storage Box
The journey to your beautiful DIY Farmhouse Storage Mirror begins with the very first structural component: the bottom board of your integrated storage box. This crucial piece will meticulously define both the depth and the overall width of your mirror’s practical storage area. Start by carefully measuring and precisely cutting this board according to the exact dimensions thoughtfully provided in our free downloadable plans. Utilizing your trusted Kreg Jig, drill 3/4″ pocket holes along one long side of this board and two additional pocket holes on each short end. These strategically placed holes are vital; they will allow you to securely and discreetly attach this piece to both the plywood back panel and the forthcoming side pieces of the storage box.
Next, apply a generous, even bead of high-quality wood glue to the edge of the board where it will meet the plywood back. Remember, wood glue doesn’t just hold pieces together while screws are driven; it provides significant extra strength and creates a more durable, long-lasting bond once cured. Carefully align the bottom board with the bottom edge of your plywood back panel. Secure it firmly in place using 1.25″ pocket hole screws, driven expertly through the pre-drilled holes on the long end and directly into the plywood. Before fully tightening the screws, take a moment to ensure the board is perfectly square and flush with the bottom edge of the back panel for a professional finish.
Step 2: Forming the Sides of the Storage Box
With the bottom board securely positioned and fastened, it’s now time to establish the vertical boundaries of your integrated storage box. These two small end pieces are integral to the overall structure; they will attach firmly to both the bottom board you just installed and the plywood back, thereby completing the basic, sturdy outline of your convenient built-in shelf. Ensure that these side pieces are meticulously cut to the exact specifications detailed within your project plans to maintain symmetry and accuracy.
Following the successful method from the previous step, these side pieces will also be attached using a combination of strong wood glue and 1.25″ pocket hole screws. Begin by applying wood glue to all the edges of the side pieces that will make contact with the bottom board and the plywood back panel. Carefully position each side piece so it is perfectly flush with the ends of the bottom board and rests snugly against the back panel. Drive your pocket hole screws through the pre-drilled holes in the side pieces, securely fastening them into the adjacent pieces. This technique creates robust, hidden joints that contribute significantly to the mirror’s overall strength and clean appearance. Before the glue sets, double-check that all pieces are aligned precisely, forming a neat, rectangular box structure.
Step 3: Adding the Front Panel of the Storage Box
To fully complete the structural integrity of your storage box and achieve that coveted finished, seamless look, you’ll now attach the front panel. This crucial piece will gracefully span the entire width of the box, connecting the two side pieces and the bottom board at their front-facing edges. This step is paramount for both enhancing the inherent strength of the storage compartment and providing a solid, attractive face for your organizational unit.
Begin by applying a continuous, even line of wood glue along the front edges of the three boards you’ve just expertly assembled: the bottom board and the two side pieces. This glue joint will provide a critical bond. Next, carefully align the front panel board with these freshly glued edges. For secure attachment, we highly recommend using 1.25″ brad or finish nails. These types of nails are ideal because they are less conspicuous than screws, making them perfect for securing face frames or decorative panels where a clean look is desired. For maximum efficiency and precision, use a nail gun, spacing your nails evenly along the top, bottom, and side edges of the front panel to create a truly secure and clean connection that will last for years to come.
Step 4: Installing the Outer 1×2 Trim
Now that the core structure of the storage box is fully assembled, it’s time to begin building out the frame that will elegantly surround your mirror and seamlessly integrate with the storage unit below. The 1×2 trim pieces are essential for creating a clean, defined border around the entire structure, adding definition and contributing significantly to that sought-after polished “farmhouse” aesthetic. This trim serves not only a decorative purpose but also adds to the overall robustness of the mirror frame.
Start by meticulously attaching the side trim pieces. Prior to fastening, apply a generous amount of wood glue to all mating surfaces – specifically where the trim meets the plywood back and the vertical sides of the storage box. Position the side trim pieces with utmost care, ensuring they are perfectly flush with the outer edges of the entire assembled structure. Once aligned, secure them firmly using 1.25″ brad or finish nails, spacing them approximately every 6-8 inches for optimal hold. Remember, the wood glue provides long-term adhesion and prevents movement, while the nails hold the pieces firmly in place while the glue dries and cures. Precise alignment during this step is absolutely critical for achieving a professional, high-quality finish that you’ll be proud of.
Step 5: Completing the Top Outer Trim
With the side trim pieces now securely in place, the next logical step is to add the corresponding top piece of the 1×2 trim. This final piece will elegantly complete the outer frame surrounding the mirror opening and provide a continuous, sturdy, and visually cohesive structure. It’s important to ensure your measurements for this top piece are incredibly accurate, precisely accounting for the exact width of the side trim pieces you’ve just installed to guarantee a perfect fit.
Mimicking the successful approach from the previous step, apply wood glue generously to the edges of the top trim piece where it will join the plywood back and, critically, the tops of the side trim pieces. Carefully align the top trim, making sure it creates a perfectly flush and seamless joint with the vertical side pieces. Once positioned correctly, use 1.25″ brad or finish nails to secure it firmly in position, ensuring tight connections that prevent any gaps. This step effectively completes the robust outer frame of your DIY Farmhouse Storage Mirror, meticulously setting the stage for the more intricate and decorative elements that will truly bring its character to life.
Step 6: Adding Decorative Inner Trim for Enhanced Style
Now, we arrive at the detailing that truly elevates the farmhouse aesthetic of your mirror: the decorative inner trim. This carefully selected trim will frame the mirror opening itself, adding a refined touch of elegance, depth, and significant visual interest. For our project, we chose a trim that is 1.25″ wide and 1/4″ thick, a commonly available size that offers a subtle yet impactful detail. Hardware stores typically boast a wide variety of decorative molding profiles in this size, providing you with ample options to choose a design that perfectly complements your personal farmhouse style – whether you envision something beautifully simple and classically understated, or perhaps something a little more ornate and intricate.
When installing this decorative trim, meticulous attention to detail regarding the angles is paramount for achieving a professional, flawlessly mitered finish. Begin by attaching the side pieces first. The top ends of these side pieces should be precisely mitered at a 45° angle; this is specifically designed to perfectly meet the corresponding mitered ends of the top trim piece, creating seamless corners. The bottom ends of the side pieces, however, will be cut straight, as they typically rest cleanly on the top edge of your storage box, integrating perfectly. Once the side pieces are securely glued and carefully nailed into place (using small brad nails or even pin nails for minimal visibility), you can then proceed to the top piece. Both ends of this top trim piece will be mitered at a 45° angle to create a perfectly snug and seamless corner joint with the side pieces. Take your time with these critical cuts to ensure tight, gap-free corners – this is truly where the craftsmanship and attention to detail will shine through in your finished project!
Finishing Touches: Staining, Mirror Installation, and Hardware
Applying Your Preferred Finish
With all the wooden components of your DIY Farmhouse Storage Mirror meticulously assembled and structurally sound, your creation is now complete and ready for its exciting aesthetic transformation. This is the moment where your personal style truly comes into play, allowing you to imbue the piece with your unique taste! For our project, we chose to enhance the inherent natural beauty of the wood with a lovely application of Varathane stain in a sophisticated “Ash” shade. This particular stain provides a beautiful, subtle grey-brown tone that perfectly complements the rustic farmhouse aesthetic, allowing the wood grain to elegantly shine through while adding depth, character, and a touch of modern charm.
However, the finishing options are virtually limitless, inviting your creativity! You could opt for a classic dark walnut stain for a more traditional farmhouse feel, a crisp white or elegantly distressed chalk paint for a shabby chic and vintage-inspired look, or even a bold, vibrant color to make a striking statement in your space. Whatever finish you ultimately choose, ensure you apply it evenly and allow it to dry completely according to the manufacturer’s specific instructions. Proper drying and curing time is absolutely crucial before proceeding to the next step, especially when working with specialized adhesives for the mirror.
Attaching the Mirror: The Reflective Heart of Your Project
Once your chosen finish is completely dry and thoroughly cured, it’s time for the exciting moment of installing the true star of the show: the mirror itself. For this project, we opted for a basic yet elegant beveled 20″x24″ wall mirror, a size that is readily and affordably available at most hardware stores. The subtle bevel along the edge adds a touch of understated sophistication without in any way detracting from the rustic charm and character of the overall piece, ensuring it integrates harmoniously. You can easily find the exact mirror we used HERE at Lowe’s!
For a secure, safe, and truly lasting installation, we emphatically recommend using a specialized mirror adhesive, which can also be conveniently found at your local hardware store or purchased online. This particular type of adhesive is meticulously formulated to bond mirrors safely and effectively to various surfaces without causing any damage to the delicate reflective backing, which is crucial for the mirror’s longevity. Apply the adhesive precisely in a pattern recommended by the product manufacturer – typically in vertical beads or strategically placed dollops, ensuring excellent coverage without any excessive over-application. Carefully place the mirror onto the prepared opening, pressing firmly and evenly to ensure maximum contact and adhesion. Allow the adhesive to cure fully, which can take several hours, or even a full day, depending on the specific product and environmental conditions. Patience here is absolutely key to a secure and trouble-free installation.
For reliable adhesion, you can find quality mirror adhesive HERE on Amazon to ensure everything stays perfectly and safely in place!
Adding Decorative Hardware: Personalizing Your Farmhouse Style
After the mirror adhesive has completely dried and your mirror is securely in place, it’s finally time to add those delightful final touches that truly personalize your farmhouse mirror and infuse it with unique character. We were fortunate to discover some incredibly charming and surprisingly affordable metal label holders on Amazon, which we felt added the perfect “shanty chic” touch and authentic rustic vibe to our project. These seemingly small details can make an enormous difference in the overall character and perceived age of your piece, giving it an authentic, lived-in feel that is so characteristic of farmhouse style.
You can find similar charming metal labels HERE! We thoughtfully attached five of these to the bottom of the storage mirror, strategically placed to enhance its farmhouse aesthetic and provide a subtle yet effective decorative element that draws the eye.
Feel absolutely free to get creative and experiment with your hardware choices! Antique-style hooks, decorative pulls, or even unique vintage-inspired knobs could also wonderfully complement the farmhouse style, depending on your vision. Consider what small items you might plan to store in the open cubbies of your mirror and how the addition of specific hardware could add both significant visual interest and enhanced functionality. This final step is a truly wonderful opportunity to infuse your unique personality and flair into the finished piece, making it truly one-of-a-kind.
Mounting Your DIY Farmhouse Storage Mirror Safely and Securely
The final and perhaps most crucial step in bringing your beautiful creation to life is safely and securely hanging it in its desired location. Given that every wall, every home, and every specific space is undeniably unique, it’s absolutely paramount to choose a mounting method that is not only appropriate for your specific situation but also guarantees the mirror is securely anchored. The safety of your beautiful new mirror, and more importantly, the safety of everyone in your home, depends entirely on a proper and robust installation. Never compromise on safety when hanging heavy items.
For my own mirror, I opted to use a sturdy picture frame wire system attached to reliable wall anchors. This method provides a very reliable hold, especially for heavier items like this mirror, by effectively distributing the weight across multiple secure points. However, depending on the combined weight of your finished mirror (including any items you plan to store in its shelves) and the specific type of wall you have (be it drywall, plaster, or solid studs), you might need to consider other equally effective options. Heavy-duty D-rings, robust French cleat hanging systems, or directly screwing into wall studs (if they are conveniently located and align with your mirror’s frame) are all viable and excellent alternatives. Always, without exception, use a stud finder to accurately locate structural supports within your wall if you plan to screw directly into the wall for maximum security. If you are using wall anchors, rigorously ensure they are rated for the anticipated combined weight of your mirror and any items you plan to store within its integrated shelves. This critical step prevents potential damage or hazards.
No matter which mounting method you ultimately choose, take your time, meticulously measure everything twice, and never hesitate to seek professional advice if you have even the slightest doubt about the safest approach. Once securely mounted, step back and proudly admire your handiwork! Here are a few final glimpses of the completed DIY Farmhouse Storage Mirror, now ready to beautifully enhance and organize your home:
Your Journey to a More Organized & Stylish Home Starts Here!
Thank you so very much for joining us on this incredibly rewarding creative journey! We absolutely loved sharing the comprehensive process of building this DIY Farmhouse Storage Mirror, a project that truly embodies the perfect blend of functional storage, rustic elegance, and personal craftsmanship. We sincerely hope that this detailed guide, along with our accompanying video tutorial and invaluable free plans, inspires you to pick up your tools with confidence and create your own unique and functional piece for your home.
Crafting your own home decor not only presents a fantastic opportunity to save money, but it also adds an incomparable personal touch and a sense of accomplishment that mass-produced, store-bought items simply cannot replicate. This storage mirror is more than just a piece of furniture; it’s a testament to your creativity, your dedication, and your growing skill as a DIY enthusiast. It’s a functional work of art that will serve your home beautifully for many years to come, sparking conversations and admiration from all who see it.
We would be absolutely delighted and so grateful if you would share these plans and our video with your friends, family, and fellow DIY enthusiasts! Spreading the joy and empowering others through DIY is truly what we’re all about. If you have any questions at all about the build process, selecting materials, specific tools, or even finishing techniques, please do not hesitate to reach out to us. We are always here to help you succeed and thrive in all your DIY adventures. Happy crafting, and we genuinely can’t wait to see your amazing creations!
Ready to transform your space? Download the FREE PLANS HERE and watch the step-by-step VIDEO TUTORIAL HERE today!