
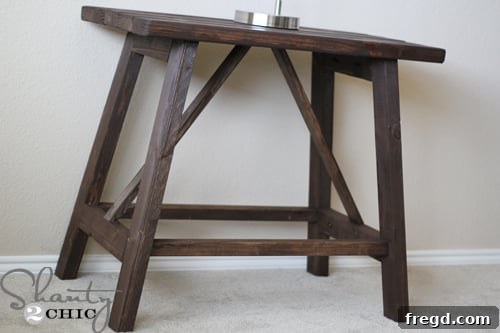
Welcome, DIY enthusiasts and budget-savvy decorators! Today, I’m thrilled to share an incredible journey that transformed a mere aspiration for high-end decor into a tangible, affordable reality for my upstairs game room. After successfully completing my Pottery Barn Inspired Benchwright Coffee Table, my creative compass pointed directly to finding the perfect accompanying end tables. I envisioned pieces that would echo the rustic elegance of the coffee table, tying the room together beautifully without breaking the bank. That’s when I turned to the brilliant mind behind countless successful DIY projects, our esteemed friend, Ana White, and once again, she delivered beyond expectation!
The inspiration struck when I stumbled upon a stunning end table design. This particular piece, boasting the distinct aesthetic I coveted, retailed for an astonishing $399. While undeniably beautiful, the price tag was a significant deterrent, especially for furnishing an entire room. This challenge, however, only fueled my passion for DIY. I knew there had to be a way to achieve that sophisticated look for less, and with Ana White’s innovative and accessible woodworking plans, that vision quickly materialized into a concrete plan of action.
Thanks to Ana’s expertly crafted plans, I embarked on building my own inspired versions of these high-end end tables. The result? Two magnificent tables, each costing a mere $16.50 in materials – totaling an unbelievable $33 for the pair! Let that sink in: $33 for two tables that retail for nearly $400 each. This colossal saving isn’t just a testament to the power of DIY; it’s an invitation for anyone to step into the world of woodworking and transform their living spaces with handcrafted elegance. The satisfaction of knowing I built these pieces with my own hands, for a fraction of the cost, is truly immeasurable.
Building Elegance on a Budget: My DIY Truss End Tables
Upon reviewing the plans, I admit a slight apprehension regarding the numerous angle cuts required for the truss design. My woodworking experience, while growing, had largely been limited to standard 90-degree corner miters. The idea of tackling complex angles felt a bit daunting at first. However, I firmly believe that true learning comes through hands-on experience and stepping outside one’s comfort zone. So, I dove in, trusting Ana’s clear instructions, and to my pleasant surprise, the process was far simpler than I had imagined. The intimidation quickly melted away as I made my first successful cuts. What seemed complex on paper became an intuitive assembly, taking me approximately 30 minutes to construct each table frame. This project truly reinforces the idea that many DIY ventures, even those with intricate-looking designs, are entirely achievable for beginners with the right guidance and a willingness to learn.
The journey from raw lumber to a finished, beautiful piece of furniture is one of the most rewarding aspects of DIY. It’s remarkable to think that simple, unadorned boards, often overlooked, can be transformed into something so functional and aesthetically pleasing. Each cut, each joint, brings the vision closer to reality, demonstrating the incredible potential hidden within everyday materials.
It’s truly crazy to witness something so fun and stylish emerge from what began as ordinary boards!
The Assembly Process: From Humble Boards to Sturdy Structures
The construction process itself was an engaging experience, and I’ve captured a few snapshots to illustrate the key stages. The precision of Ana White’s plans is outstanding, guiding you through each step with clarity. What might seem like a complex series of cuts and assemblies, particularly for the distinctive “truss” elements, is broken down into manageable tasks. The legs, for instance, are more than just simple supports; they form the foundational aesthetic of the table, requiring careful attention to those initial angle cuts that once seemed so daunting.
The sturdy legs, forming the backbone of the table’s design.
As the pieces came together, the transformation was evident. The flat boards began to take on a three-dimensional form, revealing the elegant structure of the truss design. Each connection brought me closer to the finished product, fostering a sense of accomplishment with every screw driven. It truly wasn’t long before the main framework was largely complete, transitioning from a pile of wood to a recognizable furniture piece.
Yes, almost done with the core structure!
A critical component for the unparalleled stability and ease of construction of these tables was my indispensable Kreg Jig. If you’re serious about woodworking, especially building sturdy furniture, a Kreg Jig is an absolute game-changer. It creates strong, hidden pocket-hole joints that are incredibly robust and give your projects a professional, seamless finish. I honestly couldn’t have achieved this level of sturdiness and clean aesthetic without it. The jig allowed me to quickly and accurately join the tabletop pieces, ensuring a solid surface that will withstand years of use.
The tabletop securely attached, providing a robust surface.
The Kreg Jig truly made these tables incredibly sturdy!
With the main construction complete, the tables were nearly ready for their finishing touches. It’s at this stage that the raw wood truly begins to hint at its final beauty, even before any stain or paint is applied. The structural integrity, thanks to the Kreg Jig and precise cuts, was apparent, promising years of functional use.
And we’re done with the assembly… well, almost!
The Finishing Touches: Sanding and Staining for a High-End Look
One detail I particularly admired in the original Pottery Barn version was the slightly rounded, softened edges of the tabletop boards. To replicate this refined look, I dedicated time to thoroughly sanding all edges with my Ryobi battery-powered sander. This tool is a personal favorite; its cordless convenience and effective performance make sanding a much less tedious task. Taking the time to round these edges not only enhances the aesthetic but also improves tactile comfort and safety, preventing sharp corners. This attention to detail is what truly elevates a DIY project from homemade to high-quality.
Achieving those desired rounded edges with careful sanding.
For the final aesthetic, I chose Rust-Oleum Dark Walnut Stain. This rich, deep hue perfectly complements the style of the tables and integrates seamlessly with the existing decor in our game room, particularly echoing the tones of the Benchwright Coffee Table. A single coat was sufficient to achieve the desired depth and warmth, highlighting the natural wood grain beautifully. The staining process is where the true character of the wood comes to life, turning functional pieces into decorative statements. After the stain dried, these stunning end tables were ready to take their rightful place, adding both utility and sophisticated style to the space.
One coat of Rust-Oleum Dark Walnut Stain brought out the rich character of the wood.
Seamless Integration and Versatility in Design
I am absolutely thrilled with how these DIY Truss End Tables complement the previously built Benchwright Coffee Table. Their shared aesthetic, from the robust design to the warm walnut finish, creates a cohesive and inviting atmosphere in our game room. This visual harmony wasn’t accidental; it was the direct result of carefully selecting a design that would integrate perfectly with existing pieces, demonstrating the power of thoughtful DIY planning. Beyond their intended role in the game room, these tables are incredibly versatile. Their elegant design and practical size would make them excellent bedside tables in a bedroom, offering a touch of rustic charm and ample surface space for lamps, books, and personal items. They could also serve as chic accent tables in a living room, entryway, or even a home office, proving that high-style furniture doesn’t have to come with a high price tag.
I just LOVE how well they play off of the Benchwright Coffee Table! They would also make fantastic bedside tables!
The Smart Investment: Tools That Pay for Themselves
Building two tables for just $33, as opposed to purchasing a single one for $399, is an undeniable victory for the DIY spirit! But here’s an even more compelling argument for diving into woodworking: the tools. While a good compound miter saw might seem like a significant initial investment, often retailing around the same price as one of these Pottery Barn tables (approximately $399), it’s an investment that pays for itself almost immediately. For this project alone, it saved me hundreds of dollars. But its value extends far beyond a single project.
If you don’t yet own a compound miter saw, you absolutely *can* build these tables using a simple hand saw and a miter box. This approach is more budget-friendly upfront, but it will certainly be more time-consuming and require more physical effort, especially for the numerous precise angle cuts. However, if you’ve been contemplating taking your woodworking skills to the next level, now is the perfect time to invest in a quality compound miter saw. It streamlines the process, ensures accuracy, and opens up a world of future projects. We absolutely love ours; it’s incredibly easy to work with and has become an indispensable tool in our workshop.
Essential Woodworking Wisdom: Tips for Success with a Miter Saw
For those new to working with miter saws, especially when tackling projects involving angles, understanding a few key terms and techniques can make all the difference. Here are some tips I picked up along the way:
- A bevel cut is achieved by adjusting the *top* part of your compound miter saw. This allows the blade to tilt relative to the fence, creating an angled cut across the thickness of the board. Think of it as cutting a slope on the board’s edge.
- An angle cut (or miter cut) is made by adjusting the *bottom* base of the compound saw, where the entire saw head pivots left or right. This creates an angle across the width of the board, often used for corners in frames or trim.
- “Not parallel”, when referring to angle cuts on the ends of a board, means that the two angles cut on opposite ends of the board are oriented such that they would not align if brought together. For instance, if you cut one end at a 45-degree angle to the left, and the other end at a 45-degree angle to the left again, they are “not parallel” and will diverge. This is essential for creating trapezoidal shapes or specific joint types.
- “Parallel”, in the context of angle cuts on board ends, signifies that the two angles cut on opposite ends of the board are oriented in the same direction relative to each other. For example, cutting one end at a 45-degree angle to the left, and the other end at a 45-degree angle to the right, creates parallel angles that will meet perfectly to form a corner or a longer, continuous angled piece.
A huge thank you once again to Ana White for providing such AWESOME plans that empower everyday people to create beautiful, high-quality furniture. Her designs are a treasure trove for anyone looking to add personalized touches to their home without the exorbitant price tag. Now, with these magnificent end tables proudly in place, I’m off to tackle my next project: finally finding some beautiful panels for my windows to complete the game room makeover!
If you’re as enamored with these tables as I am, I would absolutely LOVE for you to share them! Please consider pinning them to your Pinterest boards or sharing this post with fellow DIY enthusiasts. Your support means the world! Thank you so much for stopping by and joining me on this creative journey.
Happy building!
~Ashley