
Transform Your Dining Room: A Step-by-Step DIY Dining Table Makeover
Welcome, home decorators and DIY enthusiasts! It’s exciting to share the latest progress in my ongoing dining room transformation project. The dining room is often the heart of the home, a place for family meals, lively conversations, and cherished memories. Giving this space a fresh look can dramatically uplift the entire home’s ambiance. After tackling the walls and windows, my attention turned to the furniture, specifically the centerpiece: our dining room table. This makeover was a journey of careful preparation, strategic material selection, and a touch of creative distressing, resulting in a stunning focal point for our revitalized dining area. Join me as I walk you through how I refinished my dining table, turning it from dated to dazzling with a fresh coat of paint and a durable finish.
The “Before” Story: A Table Awaiting a New Chapter
Every great transformation begins with a clear understanding of what needs changing. For years, our dining table served its purpose admirably, bearing witness to countless family meals and creative projects. However, its original finish had started to show its age, and its aesthetic no longer aligned with the brighter, more contemporary vision I had for our dining room. The table’s top was stained wood, but it possessed a distinct reddish undertone that, over time, I had grown tired of. This red cast felt heavy and somewhat outdated, clashing with the lighter, airier feel I was striving for. Furthermore, the table legs, while sturdy, could also benefit from a significant brightening to truly open up the space.
Do you remember what it looked like before? Here’s a glimpse of the table in its original state, highlighting the reddish hue on the tabletop and the darker legs that were ready for a refresh.
The goal was clear: neutralize that red tone on the tabletop and introduce a lighter, more vibrant color to the legs, creating a cohesive and inviting look. This initial assessment is crucial for any furniture makeover, as it guides your choice of materials and techniques. I envisioned a lighter, more modern farmhouse aesthetic that would truly brighten the entire dining space.
Crucial First Steps: Preparation and Sanding
No painting project, especially one involving furniture that sees daily use, is complete without thorough preparation. This stage is paramount for ensuring paint adhesion and achieving a smooth, professional-looking finish. For my dining table makeover, I began by lightly sanding the top surface. This wasn’t about stripping away all the old stain, but rather creating a “key” for the primer and paint to grip onto, and addressing any minor imperfections.
I opted for a 120-grit sandpaper, which is excellent for light scuffing and smoothing without being too aggressive. Using a sanding block or an orbital sander, I gently went over the entire tabletop, working in the direction of the wood grain. This prevents unsightly cross-grain scratches. I focused a bit more pressure on specific areas where there were a few noticeable scratches, ensuring they were sufficiently smoothed down. The adage “better safe than sorry” definitely applies here; a few extra minutes spent sanding can save hours of frustration later if the paint doesn’t adhere properly or scratches show through.
During this diligent sanding process, I also had a delightful encounter with some “lovelies” left behind by my sweet children. Scratches, crayon marks, or sticky residue are common battle scars on family dining tables. Sanding helps to minimize these imperfections, providing a clean slate for the new finish. After sanding, it’s vital to thoroughly clean the surface to remove all dust and debris. A vacuum followed by a tack cloth works wonders, ensuring no stray particles interfere with the primer’s adhesion.
The Power of Primer: Ensuring Lasting Adhesion
With the sanding complete and the surface meticulously cleaned, the next critical step was applying a high-quality primer. Primer serves several essential functions: it creates a uniform surface for the paint, blocks stains from bleeding through, and most importantly, ensures excellent adhesion, especially on tricky surfaces. For this project, I turned to a primer I’ve fallen in love with: PPG Pittsburgh Paints Seal Grip Acrylic Universal Primer Sealer. I first discovered its magic when I was repainting my laundry room cabinets, and it has never disappointed.
This particular primer is fantastic because it genuinely seems to stick to just about anything, providing a reliable base coat that prevents chipping and peeling down the line. I applied a single, even coat of this primer to the tabletop. Its strong sealing properties were crucial for covering the old reddish stain and preparing the wood for a fresh, lighter color. I decided against priming the legs of the table because they were already painted and in good condition; a light scuff sanding was sufficient to prepare them for the new paint color. This strategic decision saved time and materials, focusing the primer where it was most needed.
Once the primer was applied and given ample time to dry according to the manufacturer’s instructions, the tabletop was perfectly prepped. It was primed, uniform, and ready for the next exciting stage: applying the chosen paint color that would truly bring this dining table makeover to life.
The Right Tools: Achieving a Flawless Finish
The secret to a smooth, professional-looking paint finish often lies in the tools you use. For both my primer and paint application on the tabletop, I relied heavily on my trusty Whizz Roller Systems. I cannot stress enough how much I swear by these things – once you use them, you’ll understand why they’re indispensable for small to medium-sized painting projects. These rollers, particularly the smaller 4-inch size, are perfect for furniture. They allow for incredibly smooth, even coats without the brush marks that can sometimes detract from the final look.
I typically pick mine up at Lowe’s, where they come with a small, manageable 4-inch roller designed for precision and ease of use. Their compact size makes them ideal for navigating the contours of furniture and achieving a streak-free finish on flat surfaces like a tabletop. While the roller was perfect for the broad, flat surface of the table, the intricate details and curves of the table legs required a different approach. For these areas, a high-quality angled paintbrush was essential to ensure thorough coverage and crisp lines, especially when working around decorative elements.
Using the right tools not only makes the job easier but also contributes significantly to the overall quality of the finish. A good roller minimizes texture, while a precise brush allows for attention to detail, ensuring every part of your dining table makeover looks professionally done. Don’t underestimate the power of quality painting tools; they are an investment that pays off in beautiful results.
Choosing and Applying the Perfect Paint Color
With the table thoroughly primed and my favorite Whizz rollers at the ready, it was time for the exciting part: applying the paint. The color I ultimately chose was a Dutch Boy shade called “Clam Island.” While the name might not sound particularly appealing, the color itself was absolutely perfect for the aesthetic I was aiming for. It’s a beautiful, soft neutral that perfectly complements the overall vision for my dining room and surprisingly, it matched my chosen spray paint for the chairs beautifully – more on that in my next post!
I applied two thin, even coats of “Clam Island” paint to both the tabletop and the legs. When painting, thin coats are always preferable to thick ones. They dry faster, adhere better, and are less prone to drips and brush marks. Allowing adequate drying time between coats is also crucial for durability and a smooth finish. For the broad, flat surface of the tabletop, the Whizz roller made quick work of achieving an impeccable, even coat. However, as anticipated, the more intricate details and turned elements of the table legs required the precision of a quality paintbrush. This ensured that every nook and cranny was thoroughly coated without excess paint buildup.
The transformation at this stage was already incredible. The table had shed its old, reddish cast and embraced a fresh, inviting hue. This step is where your vision truly begins to materialize, and the once-dated furniture piece starts to show its new personality. The carefully chosen paint color now provided the perfect base for the next step, which would add character and charm to the piece.
Adding Character: The Art of Light Distressing
After the paint had fully cured, I faced a delightful dilemma: to distress or not to distress? I went back and forth on this decision for a while. While I love a clean, crisp finish, I also appreciate the charm and forgiving nature of distressed furniture, especially in a busy household. With five energetic kids running around, I knew our dining table would likely accumulate its fair share of bumps and scratches over time. Distressing, I reasoned, would not only add a lovely aged aesthetic but also help any future wear and tear blend seamlessly into the table’s character, rather than standing out as unsightly flaws. It’s a practical and stylish choice for high-traffic pieces.
Ultimately, I decided to go for a light, subtle distressing. The goal wasn’t to make the table look ancient, but rather gently worn and lived-in. I used a 120-grit sanding block, the same grit used for initial prep, to carefully sand the edges of the tabletop and the detailed areas on the legs. I focused on areas that would naturally show wear over time: corners, edges, and raised decorative elements. The trick is to distress sparingly and thoughtfully, allowing just a hint of the underlying wood or previous finish to peek through, creating a soft, authentic look. This process adds depth and texture, enhancing the overall appeal of the painted furniture.
This step is highly personal and depends entirely on your desired aesthetic. For my family’s lifestyle and the overall vibe of the dining room, a lightly distressed finish felt like the perfect touch, adding warmth and making the table feel approachable and inviting. It harmonized beautifully with the newly painted walls and the natural elements I planned to incorporate into the decor.
The Ultimate Protection: Polycrylic Topcoat
With the paint and distressing complete, the final and arguably most crucial step for a dining table is applying a protective topcoat. A dining table endures daily use – spills, hot plates, sliding objects – so it needs a durable finish that can withstand the rigors of family life. My go-to product for painted furniture, especially high-traffic pieces, is Polycrylic. I absolutely love the durability this stuff offers! It provides a hard, protective shell that safeguards the paint finish from scratches, moisture, and general wear and tear.
I applied two coats of Polycrylic to the tabletop, allowing proper drying time between each coat. One of the major advantages of Polycrylic is that it’s water-based. This means it has a very low odor compared to oil-based alternatives like polyurethane, making it much more pleasant to work with indoors. You don’t have to worry about strong, lingering chemical smells permeating your home. Furthermore, Polycrylic is known for its non-yellowing properties, which is incredibly important when you’ve put so much effort into achieving a specific paint color. Unlike some polyurethanes that can impart a yellowish tint over time, Polycrylic maintains the true color of your paint, ensuring your beautiful finish stays true to its original shade for years to come.
Applying Polycrylic is straightforward: use a quality synthetic brush or a foam applicator, applying thin, even coats. Avoid overworking the product to prevent bubbles. This protective layer is the final touch that not only enhances the beauty of your refinished dining table but also ensures its longevity, making it a functional and beautiful piece for your home for many years to come.
The Grand Reveal: A Transformed Dining Table
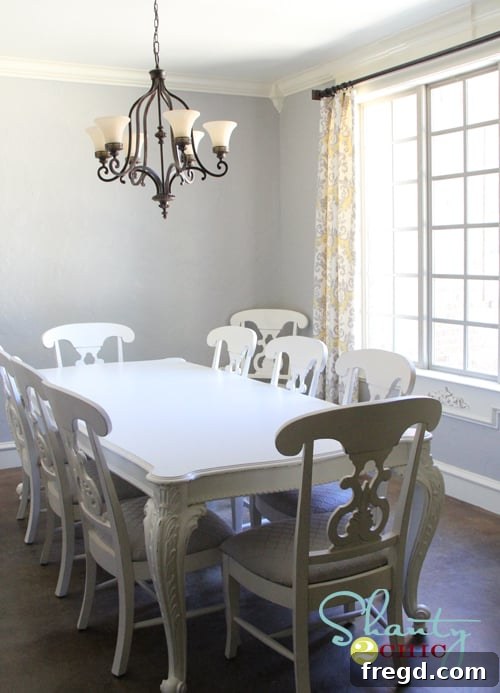
And just like that, the main event was complete! The dining table makeover was done. It was an incredibly rewarding project, transforming a dated piece into a fresh, inviting focal point for our dining room. The journey from the reddish, worn original to this bright, refreshed version was truly satisfying. The “Clam Island” paint color brings a subtle elegance, while the light distressing adds character, ensuring the table feels lived-in and loved, rather than pristine and unapproachable. The Polycrylic topcoat gives me peace of mind, knowing that this beautiful finish is well-protected against the daily activities of a busy family.
Of course, a dining room isn’t just a table. The chairs are a whole different story, a project I’ll be diving into and sharing details about in an upcoming post. For now, here are the stunning results of the dining table makeover. While there are still a few elements to add – artwork for the walls, perhaps some new lighting, and other decorative touches – the dining room is definitely getting there. Each step brings it closer to the vision I have for a harmonious and stylish space.
Thank you for following along on this DIY journey! I hope this detailed guide inspires you to tackle your own furniture makeovers. Refinishing a dining table can seem daunting, but with the right preparation, materials, and a bit of patience, the results are incredibly rewarding. Don’t hesitate to leave any questions in the comments below; I’m always happy to share more insights and tips!
Continue the Dining Room Transformation with These Related Posts!
The dining table is just one piece of the puzzle. If you’re looking to continue your dining room refresh, check out these other posts detailing earlier stages of my dining room revamp:
Painting my Walls Gray!
Discover how a simple change in wall color can dramatically alter the mood and brightness of your space. A fresh coat of gray paint laid the perfect neutral foundation for this entire dining room transformation.
DIY Window Panels
Learn how to create custom window panels that add elegance and privacy to your dining area. This project shows you how to achieve a high-end look without the custom price tag, completing the cohesive design of the room.