
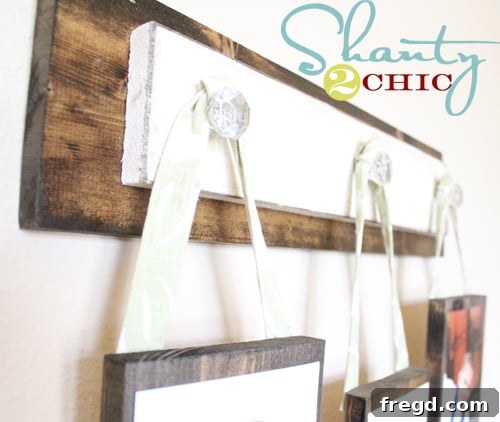
DIY Rustic Photo Wall Hanging: An Easy & Affordable Way to Display Cherished Memories
Welcome, fellow DIY enthusiasts and home decorators! The journey of transforming a house into a home often involves weaving personal stories into its very fabric. What better way to do this than by showcasing your most treasured memories? Like many of you, I’m always on the lookout for unique, stylish, and budget-friendly ways to display photographs. While it feels like a never-ending quest to get all those precious moments up on the walls, each new project brings a fresh wave of creative satisfaction. Today, I’m thrilled to share my latest endeavor: a charming and incredibly simple DIY Photo Wall Hanging that adds a rustic touch to any space.
Forget expensive custom frames or complicated gallery wall layouts. This project is all about embracing simplicity, maximizing impact, and doing it all without breaking the bank. If you’re searching for an inexpensive, quick, and highly personal way to bring your photos to life, you’ve found it! This particular photo display project became a focal point in my home, beautifully presenting cherished images.
What truly makes this project shine is its accessibility. You don’t need a workshop full of tools or years of woodworking experience. In fact, it took me only about an hour from start to finish, and the total cost was surprisingly under $10! This project is a testament to the power of upcycling and making the most of readily available materials, often ones you might already have tucked away in your garage or craft bin. The result is a bespoke piece of wall art that feels both timeless and personal.
Why Choose a DIY Photo Display?
In an age dominated by digital screens, there’s something incredibly heartwarming about physical photographs. They serve as tangible reminders of joyful moments, beloved faces, and significant milestones. A DIY photo display offers several compelling advantages:
- Personalization: Unlike mass-produced decor, a DIY project allows you to infuse your unique style and personality into every detail, from the choice of wood finish to the fabric patterns.
- Cost-Effectiveness: By utilizing scrap materials and affordable supplies, you can create stunning pieces that look far more expensive than they actually are. This project is a prime example, costing less than a single store-bought frame.
- Creative Expression: It’s an opportunity to unleash your creativity, experiment with colors, textures, and arrangements, and craft something truly one-of-a-kind.
- Sense of Accomplishment: There’s immense satisfaction in looking at something beautiful on your wall and knowing you created it with your own hands.
This rustic photo wall hanging is designed to be a conversation starter, drawing eyes to your most cherished memories in an artful and engaging way.
Gathering Your Materials: The Foundation of Your Project
One of the most appealing aspects of this photo wall hanging is that I was able to craft nearly every component from scrap wood. This not only kept costs down but also gave the piece an authentic, reclaimed feel. Don’t worry if you don’t have scrap wood; these pieces are easily found at any hardware store, and often they can cut them to size for you.
Here’s a detailed list of the materials I used, along with their specific dimensions and purposes:
Wood Components:
- 1 – 1×6 @ 21.5″: This will serve as the main backer board, providing the structural integrity for the entire display. Its length allows for a decent span to hang multiple photos.
- 3 – 1×6 @ 5.5″ x 8″: These three smaller pieces will be your photo plaques. Their dimensions are ideal for mounting standard 5×7 inch photographs, leaving a small border for the wood to show through.
- 1 – 1×4 @ 18″: This narrower, shorter piece will be the decorative front accent board, to which the glass knobs will be attached. It adds visual interest and a layered look to the top of the hanging.
Finishing Supplies:
- Minwax Dark Walnut Stain: Chosen for its rich, deep tone that gives the wood a classic, rustic appearance. You’ll only need one coat for effective coverage.
- Rust-Oleum Heirloom White Spray Paint: A beautiful, soft white that provides a lovely contrast to the dark stain and perfectly complements the distressed finish. Two coats are recommended for even coverage.
- 3M Sanding Block: Essential for distressing the painted wood edges, revealing the darker wood beneath and creating that coveted worn, vintage look.
- Gorilla Glue Epoxy: A strong, reliable adhesive for permanently joining the main wood components. Its two-part formula creates a durable bond.
- Elmer’s Spray Adhesive: Ideal for attaching photographs to the wood plaques smoothly and securely, without wrinkles or bubbles.
- Waverly Fabric (a few strips): Select a pattern and color that complements your home decor. The amount needed will depend on the desired hanging length for your photos.
- Hot Glue Gun and Glue Sticks: For quickly securing the fabric edges and other small details.
- Staple Gun and Staples: For firmly attaching the fabric strips to the back of your photo plaques.
- Glass Knobs (3): These serve both a functional and decorative purpose. Look for ones where the screws are not permanently attached, making them easier to glue onto the front board. I found mine at Walmart for $6 a set. This was my only purchase, making the project exceptionally cheap!
Tools You’ll Need:
- Measuring Tape
- Saw (if cutting your own wood)
- Gloves (for staining/painting)
- Rags or Brushes (for stain application)
- Scissors (for fabric)
Now that we have all our materials gathered, let’s dive into the fun part: bringing this beautiful photo display to life!
Step-by-Step Guide: Crafting Your Rustic Photo Wall Hanging
The construction process for this photo wall hanging is straightforward and incredibly rewarding. Each step builds upon the last, culminating in a unique piece of home decor.
Step 1: Preparing Your Wood Pieces
Begin by ensuring all your wood pieces are cut to the specified dimensions and are smooth. A light sanding can help prepare the surface for finishes.
First, take the three 1×6 photo plaques and the larger 21.5-inch 1×6 backer board. Apply one coat of Minwax Dark Walnut stain evenly across all surfaces. This rich, warm stain will give these pieces a beautiful, classic rustic base. Allow ample time for the stain to dry completely according to the manufacturer’s instructions, ensuring proper ventilation during this process.
Next, turn your attention to the 18-inch 1×4 accent board. Spray two even coats of Rust-Oleum Heirloom White spray paint, ensuring full coverage. This soft white creates a lovely contrast. Once the paint is dry to the touch but fully cured, it’s time to add character through distressing. Using your 3M sanding block, gently rub along the edges and corners of the white board. The goal is to lightly wear away some of the white paint, revealing the natural wood beneath and simulating age and wear. After distressing, apply a light coat of the Minwax Dark Walnut stain over the distressed edges. This step helps to “seal” the distressed areas and blend them seamlessly with the natural wood tones, enhancing the rustic appeal.
Step 2: Assembling the Main Structure
Now that your wood pieces are prepped and finished, it’s time to assemble the core of your wall hanging.
Take your distressed 1×4 accent board and apply a generous amount of Gorilla Glue Epoxy to its backside. Ensure even coverage for a strong bond.
Carefully place the epoxy-coated 1×4 board onto the top edge of your 21.5-inch 1×6 backer board. Center it both horizontally and vertically along the top, making sure it sits flush. Apply firm pressure and allow the epoxy to cure fully. This creates the main header piece from which your photos will hang.
Step 3: Personalizing Your Photo Plaques
This step brings your personal memories into the project.
Using Elmer’s Spray Adhesive, attach one 5×7 inch photograph to each of your three stained 1×6 plaques. Ensure the photos are centered on the plaques, leaving an even border of wood visible around the edges. Spray adhesive provides a smooth, wrinkle-free application. Work quickly and carefully to position the photo before the adhesive sets. Set these aside to dry completely.
Step 4: Crafting the Fabric Hangers
The fabric strips add a touch of softness and visual interest, besides being functional hangers.
While the glue on your main structure and photo plaques dries, cut three strips of your chosen Waverly fabric. The length of these strips is entirely up to you and will determine how low your pictures hang. I recommend holding them up to get a visual idea before committing to a final length. Once cut, fold down each long edge of the fabric strip by about ¼ inch and secure it with hot glue. This creates a clean, finished look and prevents fraying.
For an added decorative touch, tie a simple knot in the middle of each fabric strip. This not only looks charming but also adds a bit of texture and dimension.
Now, take one end of each fabric strip and staple it securely to the back of each small 1×6 photo plaque. Make sure the staples are firmly embedded and the fabric is taut. You’ll attach the other end of the fabric strips to the top header later.
Step 5: Adding the Decorative Knobs
The glass knobs are a key design element, providing both visual appeal and a functional hanging point.
I specifically chose these pretty glass knobs because the screws on the back were not permanently attached. This feature made them incredibly easy to integrate into this project without the need for drilling holes. While they cost $6 a set, they were my only significant expense, making the overall project still very budget-friendly!
Apply a dab of Gorilla Glue Epoxy to the flat back of each of the three glass knobs.
Carefully space them out evenly along the front of the white 1×4 accent board. Press firmly and allow the epoxy to dry completely, ensuring a secure attachment. These knobs will serve as the anchor points for your photo plaques.
Step 6: Bringing it All Together
Once all components are dry and secure, it’s time for the final assembly. Hang the fabric strips from the decorative knobs, allowing the photo plaques to dangle charmingly. Ensure the lengths are adjusted to your preference, creating a balanced and visually appealing display.
Simply drape the top, un-stapled end of each fabric strip over a knob, letting the photo plaques hang freely. Adjust the length of the fabric strips as needed to ensure your photos hang at the desired height and are evenly spaced. And just like that, your rustic photo wall hanging is complete!
Customization & Styling Tips
One of the greatest joys of DIY is the ability to customize. While I opted for a rustic farmhouse look, you can easily adapt this project to suit your personal aesthetic and existing home decor.
- Color Palette: Experiment with different paint and stain combinations. For a modern minimalist look, try a crisp white main board with black painted plaques. For a coastal vibe, use blues and greens with distressed white.
- Fabric Choices: The possibilities are endless! Choose a vibrant patterned fabric for a bohemian feel, a solid linen for understated elegance, or even burlap for an even more rustic touch. You could also use twine or thin leather strips instead of fabric.
- Knob Styles: Beyond glass, consider ceramic knobs with intricate patterns, distressed metal knobs for an industrial edge, or simple wooden pegs for a minimalist approach.
- Photo Presentation: Instead of gluing photos, you could use small clips to attach them, allowing for easy rotation of pictures. You could also print photos in black and white for a timeless look.
- Adding Embellishments: Small artificial flowers, tiny metal charms, or even hand-lettered quotes on mini wooden tags could be added for extra flair.
- Arrangement: While I opted for a symmetrical arrangement, you could vary the lengths of your fabric strips to create an asymmetrical, cascading effect. You could also add more photo plaques if your main board is longer.
This versatile piece can find a home in various rooms. Hang it in your entryway to greet guests with cherished family photos, in the living room as a focal point, in a nursery to display baby photos, or in a hallway to create a walk down memory lane.
Final Thoughts & Your Next DIY Adventure
There’s immense satisfaction in creating something beautiful and functional with your own hands, especially when it costs so little and comes together so quickly. This DIY Photo Wall Hanging truly embodies the spirit of creative homemaking – a one-hour project for under $10 that yields a stunning, personalized piece of decor. It’s perfect for adding a touch of rustic charm, a splash of personal history, and a whole lot of love to your living space.
I hope this tutorial inspires you to gather some scrap wood and embark on your own photo display journey. Don’t be afraid to experiment with different finishes, fabrics, and decorative elements to truly make it your own. The possibilities are as endless as your imagination!
Thanks so much for stopping by and joining me on this creative adventure. Happy crafting!
~Ashley