
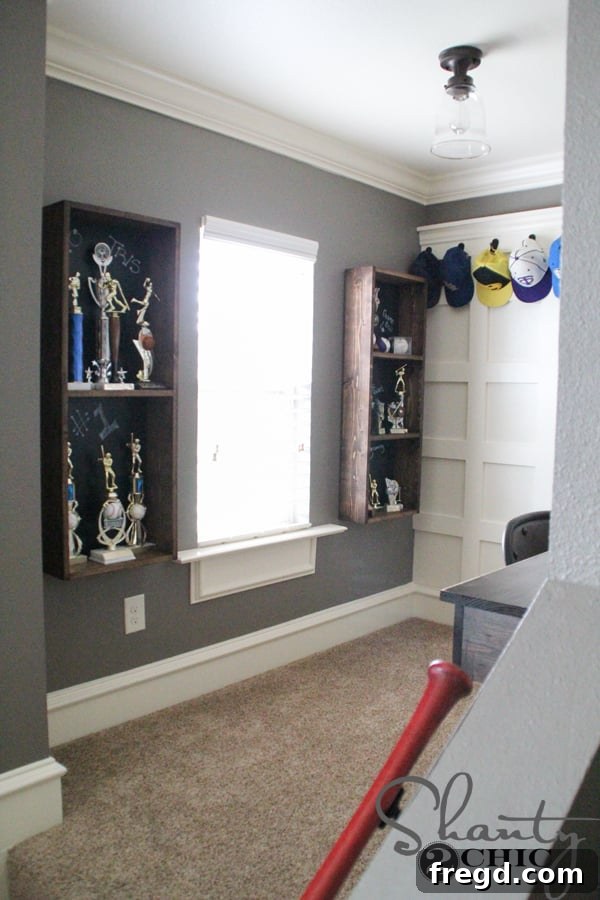
As a parent, few things bring more joy than creating personalized spaces for our children. Over the years, I’ve tackled countless DIY projects to furnish and decorate my kids’ rooms, each one bringing its own satisfaction. However, a recent addition for my 11-year-old son’s room truly stands out – a custom-built trophy display shelf that has captured his attention and admiration more than any other piece. It’s not just a storage solution; it’s a testament to his achievements and a focal point he’s incredibly proud to show off to his friends.
Just like many boys his age, my son has accumulated a impressive collection of trophies, medals, and awards from various sports, academic endeavors, and extracurricular activities. While these cherished mementos represent hard work and success, they can quickly lead to a cluttered and disorganized space. I wanted to design a dedicated area where he could proudly display his accomplishments in a way that was both functional and aesthetically pleasing. That’s when I conceived the idea for these unique trophy storage shelves, featuring an integrated chalkboard backing. This clever addition allows him to personalize his display by writing messages, noting the significance of each trophy, or simply doodling – a feature he absolutely loves! It’s safe to say, these shelves earned me some serious “mom points.”
What’s even better is how surprisingly simple and cost-effective these DIY trophy shelves are to build. Each sturdy shelf measures approximately 42 inches by 16 inches, and I was able to construct them for around $25 each in materials. This project offers fantastic flexibility for customization, allowing you to easily adjust dimensions or the number of interior shelves to perfectly suit your child’s collection and room space. Ready to create a personalized display that will make any young champion beam with pride? Let’s dive into the step-by-step guide!
Why DIY Your Kid’s Trophy Display?
Choosing to build a custom trophy shelf over purchasing a generic one offers a multitude of benefits, especially when it comes to creating a truly special space for your child:
- Personalization: A DIY project allows you to tailor every detail, from the dimensions and finish to unique features like the chalkboard backing. This ensures the shelf perfectly fits your child’s room decor and personality.
- Clutter Solution: Trophies, while wonderful, often end up scattered. A dedicated display provides an organized and attractive home for these precious items, reducing clutter and making cleanup easier.
- Boosts Confidence: Seeing their achievements proudly displayed can be a huge motivator and confidence booster for kids. It reminds them of their hard work and success, encouraging them to pursue future goals.
- Cost-Effective: Building it yourself is typically far more affordable than buying a pre-made, high-quality display unit of similar size and features.
- Durability: By selecting quality materials and assembling it yourself, you can ensure a robust and long-lasting piece of furniture that can withstand years of use.
- Custom Fit: You can design the shelves to fit perfectly into an awkward nook, along a specific wall, or accommodate trophies of varying sizes, which store-bought options rarely offer.
- A Shared Experience: Involving your child in the design or even parts of the building process can be a rewarding bonding experience, giving them an even greater sense of ownership and pride in the finished product.
Getting Started: Planning and Materials
Before you begin cutting and assembling, it’s wise to gather all your materials and tools. For each shelf unit, you’ll need the following:
- Two 1x6x8 boards (select good quality, straight wood for the best results)
- One 2’x4′ sheet of chalkboard (available at most home improvement stores)
- Gorilla Wood Glue (or similar strong wood adhesive)
- 1 1/4″ pocket hole screws
- Wood stain (I used Rust-Oleum Dark Walnut) or paint
- Clean cloths for staining
- French cleat hanging system (purchased separately, not included in shelf cost)
Tools you’ll want on hand:
- Miter saw or circular saw (for accurate cuts)
- Kreg Jig (essential for strong, hidden pocket hole joinery)
- Drill/driver (for pocket holes and screws)
- Measuring tape and pencil
- Clamps (to hold pieces securely during assembly)
- Safety glasses and hearing protection (always prioritize safety!)
- Ryobi 18V crown stapler or hammer with finish nails (for attaching chalkboard)
- Kreg Rip Cut (optional, but highly recommended for cutting the chalkboard sheet)
Ensure you have a clear, well-lit workspace and always follow safety guidelines when operating power tools.
Step-by-Step DIY Trophy Shelf Construction Guide
1. Making Your Cuts
For each individual trophy shelf unit, you will begin by cutting your 1x6x8 boards. From these, you’ll need to cut two pieces at 42 inches in length. These will form the vertical side panels of your trophy display. Next, cut four pieces at 14 1/2 inches. These shorter pieces will serve as your horizontal shelves – the top, bottom, and any interior shelves. Precise cuts are crucial for a clean, professional finish, so take your time and double-check your measurements.
2. Drilling Pocket Holes
Pocket hole joinery is a fantastic technique for creating strong, hidden connections, making your finished project look seamless. Using your Kreg Jig, drill two 3/4-inch pocket holes at both ends of each of the four 14 1/2-inch boards. Ensure your Kreg Jig is set correctly for your wood thickness (typically 3/4 inch for 1×6 boards) to achieve the best results. These holes will be used to attach the shelves to the vertical side panels.
3. Assembling the Outer Frame
Now it’s time to start assembling the main structure of your trophy case. Take one of your 42-inch vertical boards. Attach one 14 1/2-inch board to the very top and another 14 1/2-inch board to the very bottom, creating the initial “U” shape of your shelf. Apply a bead of Gorilla Wood Glue along the edges where the boards meet, then secure them with 1 1/4-inch pocket hole screws. Use clamps to hold the pieces firmly in place while you drive the screws, ensuring the edges are perfectly flush. This step creates a robust connection that will stand the test of time.
4. Customizing Shelf Spacing for Trophies
Before adding any middle shelves, a crucial step for a functional trophy display is to measure your child’s trophies. Different awards come in various heights, so planning your interior shelf placement now will ensure everything fits perfectly. Lay out your child’s existing trophies and determine the optimal spacing. For instance, I created one trophy case with a single middle shelf to accommodate taller items and another with two middle shelves for smaller awards. This foresight prevents disappointment later and makes the display truly custom-fit. Mark your desired shelf locations clearly on the vertical board.
5. Installing the Middle Shelves
Once you’ve determined your ideal spacing, attach the middle 14 1/2-inch board(s) at your marked locations. Again, apply wood glue along the edges and secure with 1 1/4-inch pocket hole screws. Use a level to ensure your shelves are perfectly horizontal before tightening the screws. This step requires precision to ensure the finished display looks neat and organized.
6. Completing the Trophy Case Structure
With the top, bottom, and all middle shelves securely attached to one vertical side, it’s time to bring the second 42-inch vertical board into play. Position this remaining long board and attach it to the open ends of all the 14 1/2-inch shelves using wood glue and 1 1/4-inch pocket hole screws. Ensure that your spacing remains consistent throughout – for this project, the internal distance between the two long boards ended up being 13 inches, providing a good depth for most trophies. Take care to align everything perfectly and check for squareness before the glue sets.
Finishing Touches: Stain and Chalkboard
7. Applying the Finish
Now for the exciting part – bringing out the wood’s natural beauty! I chose one coat of Rust-Oleum Dark Walnut stain for a rich, classic look that complements many room decors. Before staining, ensure your wood is clean and free of dust. Apply the stain evenly with a clean cloth, working in the direction of the wood grain. Allow it to penetrate for about 5 minutes, then use a separate clean cloth to wipe off any excess and blend the stain for a smooth, consistent finish. If you prefer, you could also paint your trophy cases to match specific room colors or apply a clear protective coat for a more natural wood look. Always allow adequate drying time according to the product instructions in a well-ventilated area.
8. Integrating the Chalkboard Backing
The chalkboard backing is what truly elevates these trophy shelves, adding a fantastic element of personalization and interactivity. Once the stain is completely dry, lay your assembled shelf unit onto a piece of 2’x4′ chalkboard material (I purchased mine from Home Depot). This material is usually a thin hardboard with a chalkboard finish, perfect for this application. Ensure the shelf is perfectly aligned with the edge of the chalkboard, preparing for the next step.
Carefully trace around the outer edge of the entire trophy case onto the chalkboard sheet using a pencil. This will give you the exact dimensions needed for your backing. For precision and ease, a carpenter’s square can help ensure your lines are straight and corners are true.
With your lines traced, it’s time to cut the chalkboard to fit. I used my Kreg Rip Cut, which attaches to a circular saw, to make long, straight, precise cuts. If you don’t have a Rip Cut, a straight edge and clamps can guide a circular saw, or you can use a jigsaw with a fine-tooth blade, being mindful to cut slowly to prevent chipping the chalkboard surface. Always wear eye protection when cutting.
9. Securing the Chalkboard and Final Touches
Position the cut chalkboard piece onto the back of your trophy case, ensuring it’s flush with all edges. I used my Ryobi 18V crown stapler to quickly and securely attach the chalkboard. If you don’t have a stapler, finish nails and a hammer will work just as well, spacing them every 4-6 inches along the perimeter. To achieve a seamless, professional look, I then took a clean cloth with a small amount of stain and gently wiped it around the very edges of the chalkboard. This subtle technique helps to blend the chalkboard into the stained wood frame, creating a cohesive and polished finish.
Installation: Hanging Your Custom Trophy Shelves
Your magnificent DIY trophy shelves are now complete! The final step is to securely hang them on the wall. While the shelves themselves aren’t excessively heavy, they will become considerably heavier once filled with trophies. For this reason, I highly recommend using a robust hanging method for peace of mind.
10. Using French Cleats for Secure Mounting
For heavy pieces or items I want to hang with absolute confidence, I consistently turn to French cleats. These ingenious hanging systems, readily available online or at hardware stores, consist of two interlocking pieces. One part attaches to the back of your furniture piece, and the other attaches to the wall. When assembled, they slide together, creating an incredibly strong and stable bond that sits flush against the wall. The cleats are not included in the initial material cost of the shelves, but they are a worthy investment for safety and stability.
Installation of French cleats is remarkably straightforward. First, attach one half of the cleat securely to the back of your trophy shelf. Ensure it’s centered and level. Use screws long enough to bite well into the wood without protruding through the front. Next, move to your wall. Most French cleat kits come with a small level and wall anchors. Use a stud finder to locate at least one wall stud, and ideally secure as many screws as possible into studs. For any screws that won’t hit a stud, use the provided wall anchors for maximum holding power. Make sure the wall-mounted cleat is perfectly level and oriented so that the shelf half will slide down and lock into it.
Once both parts of the cleat are installed, simply lift your trophy shelf and slide it down onto the wall-mounted cleat. It will lock into place, sitting flush and incredibly sturdy against the wall. This system provides a stable foundation for displaying your child’s valued possessions.
The Joy of Display: Proud Moments and Future Plans
I genuinely love having a designated, organized spot for my son’s trophies. But more importantly, he absolutely adores having a “really cool spot for his trophies” – his exact words! The moment they were hung, he immediately brought his friends up to his room to proudly show off his collection and the new display. His excitement and pride were palpable, and that’s truly the best reward for any DIY project. (Full disclosure: after I finished taking pictures, he wasted no time in erasing everything I had written on the chalkboard and rearranged all his trophies to his own liking, which is exactly what makes these custom pieces so special and loved!)
These trophy shelves have transformed a cluttered corner into a point of pride and inspiration. But this room makeover is far from over! I have a few more ideas for this space up my sleeve, and I’m particularly excited to share the tutorials for the student desk and the giant picture hanging above it in the coming weeks. Stay tuned for those!
In the meantime, if you admire the board and batten hat rack featured in these photos, you’ll be happy to know that’s another rewarding DIY project. You can find the full tutorial for it HERE!
For those curious about other elements in this space, here are some details:
- Chair: World Market
- Wall Color: Siene by Valspar
- Trim Color: Ivory Lace Valspar (matched to an oil-based paint)
Thanks so much for stopping by and checking out this exciting DIY trophy storage project. I hope this detailed guide inspires you to create a personalized, clutter-free, and confidence-boosting space for the champions in your life!
~Ashley