
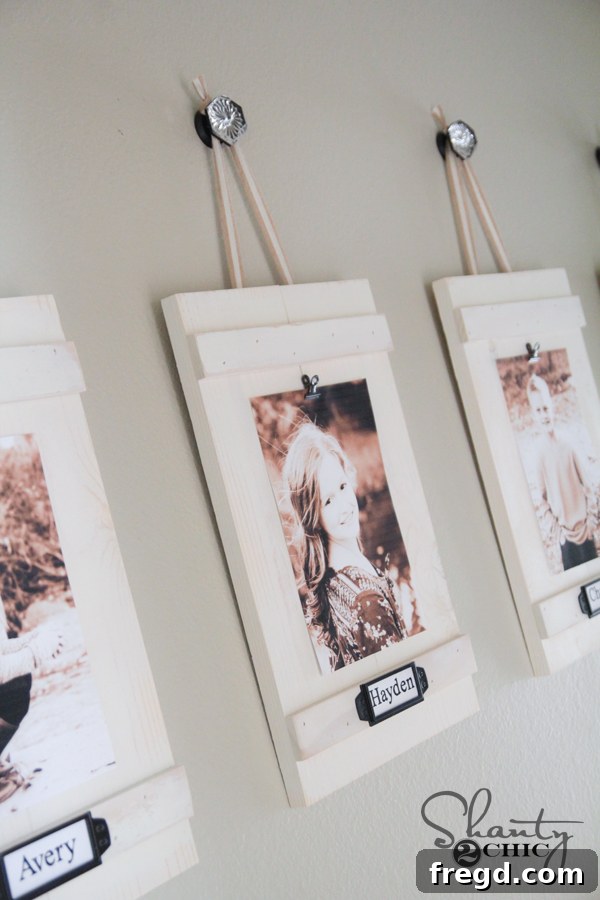
Transform Your Hallway with Elegant DIY Hanging Clip Frames
Is your hallway feeling a little tired? Ready for a refresh that brings character and a breath of fresh air to your home? I recently embarked on a rewarding project to update my hallway wall, replacing older frames with a brand new set of DIY hanging clip frames. The goal was to lighten up the space and introduce a more dynamic, customizable display for cherished memories. The transformation was remarkable, and I’m thrilled to share how these custom-built frames came to life.
These DIY Hanging Clip Frames are not only stunning but incredibly functional, allowing for effortless changes to your displayed photos. Whether you’re a seasoned DIY enthusiast or new to woodworking, this project is designed to be accessible and enjoyable. Let’s dive into the simple steps that will guide you in creating your own beautiful wall art, perfect for any home decor style, especially those leaning towards farmhouse, rustic, or casual chic. Get ready to add a personal touch that truly makes your house feel like a home!
Why Choose DIY Hanging Clip Frames?
There’s something incredibly satisfying about creating decor for your home with your own hands. Beyond the personal pride, these DIY hanging frames offer numerous advantages over traditional store-bought options. Firstly, they are incredibly **budget-friendly**, allowing you to achieve a high-end look without the hefty price tag. Secondly, the design is brilliantly simple, enabling you to construct multiple frames in a short amount of time. I managed to complete all five of mine, from cutting to hanging, in just a couple of hours – a testament to how straightforward this tutorial is!
The inherent beauty of a clip frame lies in its versatility. Imagine being able to swap out photos, artwork, or even children’s drawings in a matter of seconds. This means your wall decor can evolve with your family, changing seasons, or simply your mood. No more wrestling with tiny latches or cumbersome backings found in conventional frames. With these stylish DIY frames, your wall will always reflect your latest memories and favorite visuals, ensuring your home feels current and vibrant. This project is a fantastic entry point into woodworking, offering immediate gratification and a tangible improvement to your living space.
Gather Your Materials and Tools
Before diving into the construction, it’s essential to gather all your materials and tools. Preparation is key to a smooth and efficient DIY process. For these stunning clip frames, we’ll be focusing on readily available lumber and basic crafting supplies. The beauty of this project is its adaptability; you can often substitute materials based on what’s available or your preferred aesthetic.
Wood Components:
- 1×6 White Wood Boards: These will form the main backing of your frames. White wood is an excellent choice as it’s typically smooth, easy to cut, and takes paint beautifully. The “1×6” refers to the nominal dimensions, which are approximately 3/4 inch thick by 5 1/2 inches wide. You’ll need enough length to cut several pieces for each frame. For five frames, consider what size photos you want to display and plan your board lengths accordingly. A common photo size for these frames might be 8×10 or 5×7, so cutting your 1×6 boards to be slightly larger provides a nice border.
- 1/4″ Pine Boards (or 1×2 Boards): These thinner boards will serve as the decorative top and bottom accents of your clip frames, adding a touch of finished elegance. If you have trouble finding 1/4″ pine boards, standard 1×2 lumber is a perfectly suitable alternative. While 1x2s are thicker (approximately 3/4″ x 1 1/2″), they will still achieve a similar aesthetic and are widely available at any hardware store.
Adhesives and Fasteners:
- Gorilla Wood Glue: A strong, reliable wood glue is crucial for securing the decorative boards to the main frame. Its superior bonding strength ensures durability.
- Ryobi Airstrike Brad Nailer: This tool significantly speeds up assembly and provides a clean finish. If you don’t have a brad nailer, a hammer and small finish nails can work, but a nailer offers precision and efficiency.
- 5/8″ Brad Nails: These small nails are ideal for attaching the thinner decorative boards without splitting the wood.
- Gorilla Super Glue Gel: Perfect for attaching the mini bulldog clips securely to the frames. The gel formula prevents dripping and provides a fast, strong bond.
Finishing Supplies:
- Rust-Oleum Heirloom White Spray Paint: This particular shade offers a lovely, classic, slightly off-white finish that complements a distressed look beautifully. Feel free to choose any color that matches your home’s aesthetic.
- Ryobi Corner Cat Sander: An orbital or detail sander like the Corner Cat is excellent for quick distressing.
- 120-Grit Sandpaper: This grit is perfect for gently exposing the wood underneath the paint, creating that desirable distressed, farmhouse effect.
Hardware for Functionality and Flair:
- Liberty 3-3/4 in. Vintage Inspired Cocoa Bronze Metal Label (2 per Pack): These decorative metal labels from Home Depot’s vintage-inspired line add a charming, industrial-chic touch. They come in various finishes, so pick one that suits your style.
- Mini Bulldog Clips: These small, strong clips are the star of the show, holding your photos securely in place. They can be found at craft stores like Hobby Lobby or online.
- Ribbon: Used for hanging the frames from the wall hooks. Choose a color and texture that complements your frames and decor.
- Young House Love 1.9 in. Decorative Acrylic Hooks: Designed in collaboration with Liberty Hardware, these stylish hooks provide an attractive and easy-to-install hanging solution for your finished frames.
Essential Tools:
- Measuring Tape and Pencil: For accurate measurements and markings.
- Miter Saw (or Hand Saw and Miter Box): Essential for making clean, straight cuts in your wood boards.
- Drill: Needed to pre-drill holes for attaching the metal labels.
- Staple Gun: For quickly attaching the ribbon to the back of the frames.
- Safety Glasses: Always wear appropriate safety gear when working with power tools.
Having everything organized before you start will make the building process much more enjoyable and efficient. Now, let’s get to the exciting part – cutting your wood!
Step 1: Precise Wood Cuts for Your Frames
The foundation of any great woodworking project is accurate cuts. This step is crucial for ensuring your frames look professional and assemble without a hitch. For each frame, you’ll need three pieces of wood: one larger piece for the main backing and two smaller pieces for the decorative top and bottom accents. Carefully measure and mark your wood before making any cuts. Remember the adage, “measure twice, cut once.”
Determine the desired height of your finished frames. For instance, if you want your frames to accommodate an 8×10 photo with a nice border, you might cut your 1×6 pieces to around 12-14 inches in length. The smaller 1/4″ pine or 1×2 boards should be cut to the exact same length as your 1×6 main board. A miter saw will provide the cleanest and most precise cuts, but a hand saw with a miter box can also yield excellent results with a bit more effort. Take your time, ensure your cuts are straight, and prepare all the pieces for your desired number of frames.
Step 2: Assembling the Frame Structure with Glue and Nails
With all your wood pieces perfectly cut, it’s time to bring your frames to life. This step involves carefully attaching the decorative accent boards to the main frame backing using both wood glue and brad nails for a robust and lasting bond. The combination of adhesive and mechanical fasteners ensures that your frames will hold up beautifully over time.
Begin by laying your 1×6 main board flat on a clean, stable work surface. Next, take one of your smaller accent boards. Apply a continuous bead of Gorilla Wood Glue along one entire side of this smaller board. This doesn’t need to be overly thick, but ensure even coverage for maximum adhesion. Carefully position this glued accent board onto the 1×6 main board. For consistent spacing and a polished look, align it approximately 1.5 inches from the top edge of the 1×6. You can even use another smaller board as a temporary guide to ensure a perfectly straight line, especially if you’re making multiple frames.
Once properly aligned, use your Ryobi Airstrike brad nailer to secure the accent board. Load it with 5/8″ brad nails. Fire nails along the length of the accent board, spacing them evenly (e.g., every 4-6 inches) to ensure a strong hold. The brad nailer makes this process incredibly fast and leaves minimal evidence of fasteners. Repeat this process for the second accent board, attaching it 1.5 inches from the bottom edge of the 1×6 main board. The glue provides the long-term bond, while the nails hold the pieces securely in place while the glue dries, preventing any shifting. After this step, your frames will start to take shape, ready for the finishing touches.
At this point, your assembled boards should clearly resemble the basic structure of a frame, with the accent pieces securely attached at the top and bottom. This foundational step is complete, and you’re now ready to move onto the aesthetic treatments that will give your frames their unique character.
Step 3: Painting for a Fresh, Clean Look
With the frame structures fully assembled, the next step is to prepare them for their beautiful finish. A fresh coat of paint will not only protect the wood but also provide the clean, bright aesthetic that complements the farmhouse-inspired design. Before moving on to distressing, apply your chosen paint color. I opted for Rust-Oleum Heirloom White spray paint, readily available at Home Depot, for its soft, inviting hue and excellent coverage.
When spray painting, work in a well-ventilated area, preferably outdoors or in a garage with open doors. Lay down a drop cloth or old newspaper to protect your work surface. Apply the paint in thin, even coats, holding the can about 8-12 inches away from the surface and moving it steadily back and forth. Avoid spraying too heavily in one spot to prevent drips and uneven coverage. It’s always better to apply two or three thin coats than one thick, gloopy one. Allow adequate drying time between coats as recommended on the spray paint can. This careful application will ensure a smooth, professional-looking base for the next step: distressing.
Step 4: Adding Character with Distressing
Once your paint has thoroughly dried and cured, it’s time to add character to your frames through the art of distressing. This technique gives the frames a charming, aged, and rustic appeal, making them look as if they’ve been lovingly used for years. It’s a key element in achieving that popular farmhouse or shabby chic style.
Grab your Ryobi Corner Cat sander, fitted with 120-grit sandpaper. The 120-grit is perfect because it’s coarse enough to remove paint effectively without leaving deep gouges in the wood. Gently sand the edges and prominent surfaces of each frame. Focus on areas that would naturally show wear and tear over time, such as corners, raised edges of the accent boards, and any areas where the wood grain might be slightly more pronounced. The goal isn’t to remove all the paint but rather to subtly expose the natural wood beneath, creating a soft, weathered look. You can control the degree of distressing – a lighter touch for a subtly aged look, or more pressure for a more pronounced rustic effect. Stand back periodically to assess your work and ensure you achieve a balanced and aesthetically pleasing distressed finish across all your frames. Once you’re satisfied with the look, wipe down the frames with a clean cloth to remove any sanding dust.
Step 5: Elevating the Design with Vintage-Inspired Hardware
The frames are now painted and distressed, looking beautiful even on their own. But to truly elevate their style and functionality, we’ll add some exquisite hardware. This is where the magic of personal touches comes in, transforming simple wood into a captivating piece of home decor. I absolutely adore the vintage-inspired hardware line that Liberty Hardware has launched at Home Depot. Their collection offers charming pieces that add a unique, artisanal feel to any project.
For these frames, I decided to incorporate their metal label holders, which are incredibly cute and versatile. These “Liberty 3-3/4 in. Vintage Inspired Cocoa Bronze Metal Labels” come in packs of two and are available in three distinct finishes, allowing you to choose the perfect match for your frames and existing decor. You can easily find them online at Home Depot HERE. These labels not only enhance the aesthetic with their vintage charm but also offer a functional element, allowing you to label categories of photos or simply add a decorative touch. Position them towards the top or bottom of your frames, centered for a balanced look, and prepare for installation.
Step 6: Attaching the Metal Label Holders
Once you’ve chosen the perfect spot for your metal label holders, it’s time for installation. Precision is key here to ensure they are straight and securely fastened. Each label holder typically comes with small screws for attachment. While it might seem straightforward, pre-drilling pilot holes is an essential step, especially when working with wood, to prevent splitting and to ensure the screws go in smoothly and straight.
Using a drill bit slightly smaller than the diameter of your screw, carefully drill pilot holes where the screws will go through the label holder and into the frame. Once the pilot holes are made, simply place the label holder onto the frame, aligning it with the holes. Then, insert the screws from the back of the frame, passing them through the pilot holes and into the label holder. This method provides a clean, finished look on the front of the frame, with the screw heads hidden on the back. Ensure each screw is tightened snugly, but avoid over-tightening, which could strip the wood. With the labels attached, your frames are gaining significant character and functionality.
Step 7: Adding the Functional Photo Clips
The final, and perhaps most defining, piece of hardware for these DIY hanging frames is the photo clip itself. This is what transforms a decorative wooden board into a dynamic display for your cherished photographs. While any small clip will technically work, selecting the right kind can truly enhance the overall aesthetic and functionality of your frame. I prefer using cute mini bulldog clips, which strike the perfect balance between charm and robust gripping power. These can often be found at craft stores like Hobby Lobby or purchased conveniently online HERE on Amazon!
To attach the clips securely, a strong and fast-acting adhesive is ideal. Gorilla Super Glue Gel is my go-to for this task. Its gel consistency means it won’t run, allowing for precise application, and it dries incredibly fast – often within minutes – creating a strong bond. Simply apply a small drop of the Super Glue Gel to the back of each mini bulldog clip. Then, carefully position the clip onto the bottom accent board of your frame, ensuring it’s centered and straight. Apply gentle pressure for a few seconds to allow the glue to set. Repeat this for all your frames. Once dry, these clips will hold your photos firmly in place, making it incredibly easy to swap out pictures whenever you desire. This effortless interchangeability is one of the standout features of this DIY hanging frame project, ensuring your wall decor is always fresh and updated.
Step 8: Preparing for Hanging with Decorative Hooks
Your DIY frames are almost complete! The final step involves preparing them for display on your wall. The method of hanging can significantly impact the overall look and feel of your gallery. For this project, I opted for a charming and effortless hanging system that adds another layer of decorative appeal: stylish wall hooks. These aren’t just any hooks; they’re an awesome piece of hardware also available at Home Depot, designed by the talented folks from Young House Love in collaboration with Liberty Hardware.
These “Young House Love 1.9 in. Decorative Acrylic Hooks” are incredibly easy to attach to your wall and provide a stable, attractive point from which to hang your frames. You can find them HERE at Home Depot. Before installation, consider the layout of your frames on the wall. Measure carefully to ensure even spacing and desired height. Once you’ve marked the spots, simply follow the instructions provided with the hooks for secure wall attachment. Most decorative hooks can be installed with a single screw, often including a wall anchor for added stability, especially if you’re not drilling into a wall stud. These hooks are not only functional but also contribute to the overall aesthetic, blending seamlessly with the vintage-inspired hardware on your frames.
Step 9: The Grand Reveal: Hanging Your Beautiful Frames
With your decorative hooks securely mounted on the wall, the final step is to prepare your frames for hanging. This is where the ribbon comes in, providing a flexible and charming way to suspend your frames from the hooks, adding a lovely drape and an additional layer of visual interest to your hallway decor. Choose a ribbon that complements the overall color scheme and style of your frames and the room.
For each frame, cut a length of ribbon. The length will depend on how high or low you want your frames to hang from the hooks. A good starting point is to hold the ribbon up to the frame and envision its drape. Once cut, staple one end of the ribbon to the top center-back of each frame. Use a staple gun for quick and secure attachment. Ensure the staple is firmly embedded in the wood and the ribbon feels sturdy. Repeat this for all your frames. Now, simply loop the ribbon over your installed Young House Love hooks, adjusting as needed to achieve your desired alignment and aesthetic. Step back and admire your handiwork! Your hallway has been transformed into a personalized gallery, filled with unique, handcrafted pieces that reflect your style.
Admire Your Handiwork: The Finished Hallway Gallery
And just like that, the project is complete! The transformation of the hallway wall is truly striking. What began as simple pieces of wood has evolved into a stylish and functional display, bringing a fresh, light, and personalized feel to the space. The blend of the distressed heirloom white finish, the charming vintage-inspired metal labels, and the practical bulldog clips creates a cohesive and inviting aesthetic. These frames don’t just hold pictures; they tell a story, adding warmth and character to your home.
Take a moment to step back and appreciate the impact of your DIY efforts. The beauty of these **custom picture frames** lies not only in their appearance but also in their adaptability. You now have a dynamic wall display that can evolve with your life. No more complicated frame changes; simply unclip one photo and replace it with another. This means your kids’ faces won’t stay the same for the next three years (unless you want them to!), allowing your hallway gallery to always reflect the most current and cherished moments. This project is a testament to how a few simple materials and a little creativity can yield truly remarkable results.
Here are a few more shots of the finished frames, showcasing their charm and how they effortlessly enhance the hallway:
Tips for Customizing Your DIY Frames
While the distressed heirloom white look is timeless, these frames are incredibly versatile for customization:
- Color Palette: Experiment with different paint colors to match your existing decor. Bold colors can make a statement, while muted tones offer a subtle elegance.
- Stain vs. Paint: Instead of painting, consider staining the wood for a more natural, rustic look, bringing out the beauty of the wood grain.
- Hardware Alternatives: Explore different styles of clips (e.g., larger clips for bigger prints) or even unique decorative elements like small hooks for hanging trinkets.
- Photo Selection: Mix and match color and black-and-white photos for an eclectic feel. Print photos on different paper types (matte, glossy, textured) for added visual interest.
- Arrangement: Play with varying heights and spacing when hanging multiple frames to create a dynamic gallery wall. You can also mix these clip frames with other types of wall art for a truly unique display.
- Thematic Displays: Use the metal labels to designate themes for each frame, such as “Family Adventures,” “Sweet Memories,” or “Kids’ Art.”
Conclusion: A Simple Project, Lasting Impact
I sincerely hope you love these **DIY hanging frames** as much as I do! This project is a fantastic example of how a relatively simple woodworking endeavor can yield significant aesthetic rewards. It’s an accessible way to inject personality and charm into any room, transforming an ordinary wall into an engaging focal point. The ease with which you can swap out photos ensures that your display remains fresh, relevant, and continually reflective of your life’s beautiful moments. Embark on this fun and rewarding journey to create your own personalized wall decor, and prepare to receive compliments on your creative flair!
Thank you so much for stopping by and exploring this tutorial. Happy crafting!
Whitney