
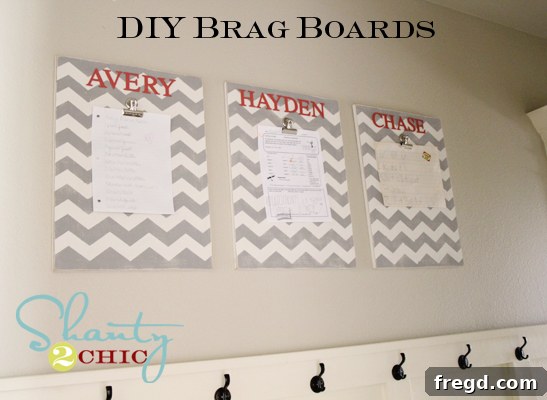
The Ultimate DIY Brag Board: Showcase Your Kids’ Masterpieces with Style!
As a parent, witnessing your children’s creativity flourish is one of life’s greatest joys. From vibrant finger paintings to meticulously crafted school projects and impressive report card grades, our kids constantly create treasures we want to celebrate. However, managing this delightful influx of artwork can quickly lead to an overflowing refrigerator door, a common struggle for many families, especially those with multiple enthusiastic young artists!
With five wonderful children, including three busy elementary schoolers, I found my fridge reaching its artistic capacity. It was time for a practical yet charming solution. I decided to embark on a fun and easy DIY project: creating personalized “Brag Boards” for each of my kids. These dedicated display boards offer a stylish and organized way for them to proudly exhibit their latest art projects, awards, or any accomplishment they’re particularly proud of. The best part? These boards are incredibly simple to make, budget-friendly, and add a wonderful touch of personalization to any child’s room or family space. Let me show you exactly how they turned out and how you can create your own!
Why Every Home Needs a DIY Brag Board
Beyond simply decluttering your refrigerator, Brag Boards offer numerous benefits. They empower children by giving them a dedicated space to showcase their achievements, fostering a sense of pride and accomplishment. It encourages their creativity when they know their hard work will be prominently displayed. For parents, it provides an organized system to keep track of important papers and art pieces, transforming potential clutter into cherished wall decor. Plus, creating these boards together can be a wonderful family activity, allowing for customization that perfectly matches your home’s aesthetic and your child’s personality. These boards are not just functional; they’re a testament to your child’s growth and your family’s commitment to celebrating their journey.
Gather Your Materials: What You’ll Need for Your Custom Brag Boards
One of the best aspects of this project is how accessible and affordable the materials are. You don’t need specialized tools or expensive supplies to create these beautiful display boards. Here’s a comprehensive list of what you’ll need to get started:
- 1/2″ MDF Board: Medium-density fiberboard is an excellent choice for this project due to its smooth surface, affordability, and ease of cutting. You can find large sheets at any home improvement store.
- Latex Paint (Base Coat): An off-white or light-colored latex paint works perfectly as a primer and base for your board. MDF tends to absorb spray paint, making latex a more efficient and cost-effective option for the initial coat.
- Chipboard Letters: These are lightweight and easy to paint, perfect for personalizing each board with a name or a fun phrase like “My Art.” Look for them at craft stores, often available in various fonts and sizes.
- Acrylic Paint (for Letters and Pattern): Choose colors that complement your home decor or your child’s favorite hues. I opted for a lovely coral mix and a classic grey for the chevron pattern.
- Paint Brushes/Rollers: For applying the base coat and detailing the letters and patterns.
- Stencil Material (Contact Paper or Vinyl): If you plan on adding a patterned design like chevron stripes. A cutting machine like a Silhouette Cameo makes intricate stencils easy, but you can also use painter’s tape for stripes or store-bought stencils.
- 80-Grit Sanding Block: Optional, but highly recommended if you want to achieve a slightly distressed, “shanty” or rustic look on your finished board.
- Hot Glue Gun and Glue Sticks: For quickly and securely attaching the painted letters to the board.
- Gorilla Glue Epoxy: My secret weapon for a super-strong, permanent hold for the clips. This two-part epoxy is incredibly durable.
- Metal Clips: These will hold your children’s artwork. Bulldog clips, binder clips, or specialty craft clips work well. Choose a size appropriate for the board.
- Sawtooth Hangers: For easy and secure hanging of your finished Brag Board on the wall.
- Hammer: To install the sawtooth hangers.
- Measuring Tape and Pencil: For marking cuts and letter placement.
- Safety Gear: Gloves and proper ventilation when working with epoxy.
Step-by-Step: Crafting Your Personalized Brag Board
Ready to transform a simple piece of MDF into a cherished display? Follow these easy steps to create your own beautiful and functional Brag Boards.
Step 1: Prepare Your MDF Boards
I began this project with a 1/2-inch thick sheet of MDF (Medium-Density Fiberboard) sourced from Home Depot. MDF is an excellent material for DIY projects like this because it’s cost-effective, has a smooth surface that’s easy to paint, and is quite durable. I cut my large sheet into individual pieces, each measuring 16 inches by 24 inches. This size is perfect for displaying multiple pieces of artwork without overwhelming a wall space. If you don’t have the tools to cut MDF at home, most home improvement stores like Home Depot offer a complimentary cutting service. Don’t hesitate to utilize it! For reference, the entire sheet cost me around $10, which was enough wood to create three of these boards. That’s an incredibly budget-friendly starting point for such a personalized project!
This is the specific MDF board I purchased from Home Depot.
Step 2: Apply the Base Coat
The next crucial step is to give your MDF pieces a solid base coat. For this, I highly recommend using latex paint. MDF has a tendency to really soak up spray paint, which can lead to needing many coats and a less even finish. Latex paint, on the other hand, adheres beautifully, provides excellent coverage, and creates a smooth foundation for subsequent layers. I laid my cut MDF boards out in a well-ventilated area and applied a generous coat of Behr Off-White latex paint. This neutral base allows the decorative elements and, eventually, the colorful artwork to truly pop. Ensure you allow ample drying time between coats, typically a few hours, to achieve a perfectly smooth and durable surface.
Step 3: Design and Paint Your Letters
While the base coats on my boards were drying, I shifted my focus to the personalized lettering. I discovered these fantastic chipboard letters at Hobby Lobby, which were a steal at half off, making each box only $1.50! What a deal! I purchased one box for each board, ensuring I had enough letters to spell out each child’s name or a fun word like “Art” or “Brag.” Chipboard letters are lightweight and easy to paint, making them ideal for this project. To create a unique coral color, I mixed two different acrylic paints together. Don’t be afraid to experiment with paint mixing to achieve your desired shade! Apply an even coat to your letters, and then set them aside to dry completely. If you prefer, you can also use vinyl letters or stencils for a different look.
Here’s a closer look at the paint mix that created that beautiful coral hue:
And here are the vibrant letters drying thoroughly before the next step:
Step 4: Create Your Custom Pattern (Chevron Fun!)
While the painted letters were drying, I moved on to adding a stylish pattern to the boards. I used my Silhouette Cameo cutting machine to create chevron stencils out of Contact Paper. The Cameo is fantastic for precise and intricate designs. I did run out of contact paper for the last two pieces and successfully used vinyl, which also worked perfectly as a stencil material. If you don’t have a cutting machine, don’t worry! You can easily achieve a similar look with painter’s tape to create crisp stripes, or purchase pre-made stencils from craft stores like Hobby Lobby, offering a variety of patterns beyond chevron. Carefully apply your stencil to the dry base-coated board, ensuring it adheres smoothly to prevent paint bleeding. I then used grey acrylic paint to fill in my chevron pattern. This part required two coats to achieve full, opaque coverage and vibrant color. Be sure to remove the stencil carefully while the paint is still slightly tacky to get clean lines, then let the paint dry completely.
Step 5: Add a Rustic Touch (Optional Distressing)
After the chevron pattern had thoroughly dried, I decided to give my boards a bit of a “shanty” feel, which means adding a touch of rustic charm and distress. I achieved this by using an 80-grit sanding block. Gently sanding the edges and some areas of the patterned surface creates a worn, aged look that beautifully contrasts with the modern chevron pattern. This step is entirely optional, but I absolutely love the character and depth it adds to the finished product. The combination of a chic pattern with a subtly roughed-up texture makes for a really fun and unique aesthetic. It’s amazing how a little bit of sanding can completely transform the vibe of a piece!
Step 6: Secure Your Letters
With the boards fully painted and dried, it was time to add the personalized touch: the letters! I carefully arranged the painted chipboard letters onto the top section of each board to spell out the desired name or phrase, ensuring they were perfectly centered and spaced. Once I was happy with the placement, I used a hot glue gun to permanently attach each letter. Hot glue provides a strong, instant bond, making this step quick and efficient. Be mindful not to use too much glue to avoid unsightly excess. A small dab on the back of each letter is usually sufficient. Press down firmly for a few seconds until the glue sets.
Step 7: Attach the Display Clips
To enable easy display of artwork, the next step involves attaching the metal clips to the board. For this crucial part, I swear by Gorilla Glue Epoxy. This product is a game-changer! It has a consistency similar to hot glue, which makes it easy to work with, but it provides an incredibly strong, permanent bond that hot glue simply can’t match for this application. You’ll want to work in a well-ventilated area as it can be a bit stinky upon application, but rest assured, once it dries and cures, the odor completely disappears. You’ll be amazed by its holding power! The epoxy typically comes in two separate tubes that you mix together in equal parts before applying. Apply a small amount to the back of each clip, then firmly press the clips onto the board in your desired arrangement. I spaced mine evenly down the length of the board. Allow the epoxy to cure fully, which can take several hours, for the strongest bond possible.
Here’s a glimpse of the epoxy mixing process:
And the clips drying securely in place:
Step 8: Install Hanging Hardware
The penultimate step is to prepare your Brag Boards for hanging. For simple and sturdy wall display, I opted for sawtooth hangers. These are readily available at any hardware or craft store and are incredibly easy to install. They are perfect for lighter frames and boards like these. Simply align the hanger centrally on the top edge of the back of your board, ensuring it’s level. Then, using a small hammer, gently tap the small nails or pins into the MDF until the hanger is securely flush with the board. Make sure the ‘teeth’ of the hanger are facing upwards so they can easily catch on a nail or screw in your wall. If you prefer, D-rings or Command Strips are also viable alternatives, depending on your wall type and desired hanging method.
A quick tap with the hammer is all it takes:
Step 9: Time to Hang and Display!
The final and most satisfying step is to hang your beautifully crafted Brag Boards on the wall! Choose a prominent spot in your child’s room, a hallway, or even a family common area where everyone can appreciate the rotating gallery of masterpieces. Use a level to ensure they hang perfectly straight. Once they’re up, the real fun begins: clipping on your kids’ first “masterpiece”! My children were absolutely thrilled and kept asking when the boards would be finished so they could proudly display their latest artwork. It’s incredibly rewarding to see their faces light up as they hang their creations, transforming simple crafts into cherished moments.
Final Thoughts and Personalization Tips
I truly hope you enjoyed this DIY Brag Board tutorial and feel inspired to create your own! My kids absolutely adore their personalized display boards, and it brings a smile to my face every time I see their latest “masterpiece” proudly clipped up. It’s a wonderful way to encourage their creativity and give their hard work the spotlight it deserves. The fact that each board cost me under $10 to make is just the icing on the cake – truly my kind of project!
Remember, the beauty of DIY is customization. Feel free to unleash your creativity and adapt these instructions to your personal style. Consider using different patterns like polka dots, stripes, or even freehand designs. Experiment with various paint colors that match your children’s rooms or your home decor. Instead of names, you could use inspiring words like “CREATE,” “DREAM,” or “EXPLORE.” You can also vary the types of clips or even add small hooks for displaying medals or ribbons. The possibilities are endless, making each Brag Board uniquely special.
Join the Conversation!
Thank you so much for stopping by and taking the time to read through this tutorial! I always love hearing from you and seeing your creative projects. If you decide to make your own Brag Boards, please share your creations! I would LOVE for you to pin this project below to inspire other DIY enthusiasts.
If you have any questions about the steps, materials, or need further tips, please don’t hesitate to ask in the comments section below. You can also connect with us and ask questions directly on our Facebook page, where we love to engage with our community. Happy crafting!
~Whitney