
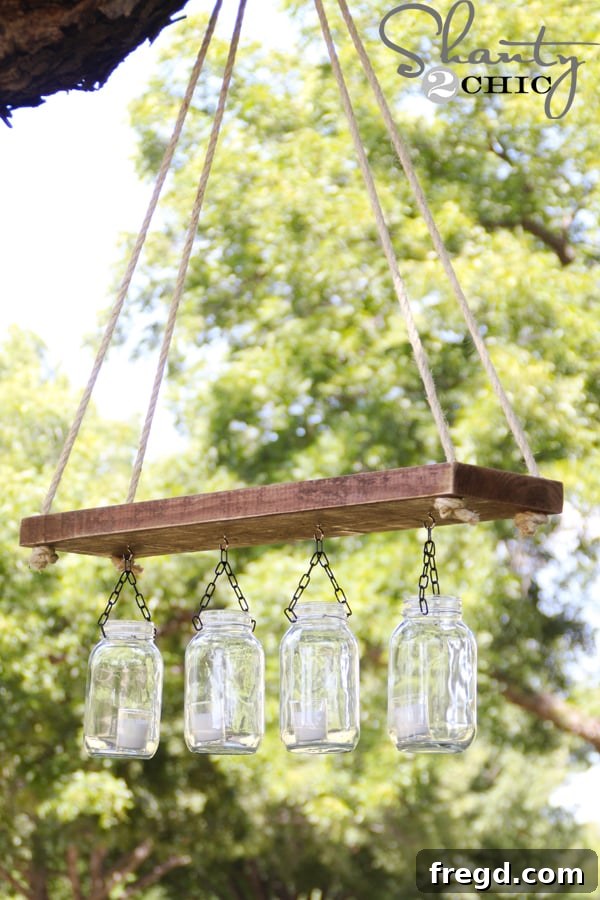
Welcome to an exhilarating DIY journey where creativity meets functionality! Today, we’re not just crafting; we’re transforming ordinary items into an extraordinary centerpiece for your outdoor living space. Get ready to be inspired as we unveil the secrets to creating your very own stunning outdoor chandelier, a project so simple, so budget-friendly, and so utterly charming, you’ll wonder why you hadn’t tried it sooner. I am beyond thrilled to share this project with you because it’s not just a decoration; it’s a statement piece that promises to infuse warmth, style, and a touch of rustic elegance into any setting. This DIY outdoor mason jar chandelier is the perfect way to personalize your patio, deck, or garden, creating an enchanting ambiance for countless evenings to come.
Just looking at this picture fills me with immense satisfaction and a spark of joy! This charming outdoor chandelier, made primarily from humble mason jars, is truly a testament to accessible DIY. What makes it even more remarkable? It was incredibly easy to assemble and cost me a mere $10! This isn’t just a project; it’s an experience perfect for a fun craft night with friends, a rewarding activity with your children, or a peaceful solo endeavor. Its simplicity means you can complete it quickly, leaving you with more time to enjoy your beautifully lit outdoor oasis. Imagine the admiring glances and compliments this unique piece will draw – all thanks to your creativity and a few basic supplies. This budget-friendly outdoor lighting solution is a game-changer for anyone looking to add character without breaking the bank.
Ready to illuminate your evenings with a touch of handmade brilliance? Let’s dive into the step-by-step process of creating this captivating mason jar chandelier, transforming your outdoor area into a magical retreat.
Our journey begins with crafting the individual components: the charming Mason Jar Lanterns. These versatile lanterns will serve as the glowing elements of our grander chandelier, each one a mini masterpiece ready to contribute to a larger, breathtaking design.
Gathering your supplies is the exciting first step in any DIY adventure. For this project, the core items are readily available and affordable, ensuring your DIY outdoor lighting remains budget-friendly. I picked up a box of 12 standard-sized mason jars from Wal-Mart for around $8. While we’ll only be using four jars for the main chandelier design discussed here, having extra on hand is always a good idea for future craft projects, storing pantry staples, or even gifting. The beauty of mason jars lies in their timeless appeal and versatility, making them a staple for crafters and perfect for creating unique garden decor. Beyond the jars, you’ll need 16-gauge wire and some small black chain, both of which I sourced from Lowe’s. The 16-gauge wire is ideal because it’s sturdy enough to hold the weight of the jar securely, yet pliable enough to bend and twist without excessive effort. The small black chain adds a rustic, industrial touch, perfectly complementing the mason jars and enhancing the overall aesthetic of your DIY chandelier. Don’t forget your basic tools: a good pair of pliers (preferably needle-nose or lineman’s pliers for cutting and bending) will be indispensable for this project, making each step smoother and more precise.
With your supplies ready, let’s tackle the chain. The first step involves precisely cutting segments of your small black chain. For each mason jar lantern, you’ll need a chain segment consisting of 13 links. To achieve this, simply use your pliers to bend one of the links open. Apply steady pressure and wiggle it gently until the link separates from its neighbors, allowing you to pull it off. This method ensures a clean break without needing specialized chain cutters. Take care to avoid pinching your fingers and always wear appropriate safety eyewear when working with tools. Repeat this process for all four of your mason jar lanterns, ensuring each chain segment is exactly 13 links long for uniformity in your final chandelier. Consistency in length is key for a balanced and aesthetically pleasing finished product, so take your time with this step, as it forms the foundation for how your lanterns will hang.
Now that your chain segments are prepared, it’s time to integrate them with the wire. Cut a piece of your 16-gauge wire to approximately 12 inches in length. This measurement provides ample wire for wrapping and securing, with enough excess to comfortably work with, ensuring you have enough material to create a strong attachment. Take one end of your 12-inch wire and thread it through the very first link of your 13-link chain segment. Then, take the other end of the wire and thread it through the very last link of the same chain segment. Essentially, you’re creating a loop of wire with the chain suspended in the middle. Ensure the chain is centered on the wire before proceeding, as this will affect how the lantern hangs later and contribute to the balanced look of your finished outdoor chandelier. This combination of wire and chain forms the elegant and sturdy hanging mechanism for each individual mason jar lantern.
With the wire and chain prepped, the next step is to attach this assembly securely to the mason jar. Carefully position the wire around the neck of the mason jar, just below the threaded rim where the lid would typically screw on. This natural indentation on the jar provides a perfect groove for the wire to sit, preventing it from slipping. Make sure the chain portion is positioned to hang gracefully from the side or front of the jar, depending on your preferred aesthetic for the overall outdoor chandelier design. The wire should sit snugly in this indentation, ensuring stability. This initial placement is crucial for the stability and appearance of your finished lantern, so take a moment to adjust it until you’re happy with its position and how the chain aligns.
Once the wire is positioned around the neck of the mason jar, it’s time to secure it tightly. Bring the two loose ends of the wire together and begin twisting them around each other. Use your pliers to grasp both ends firmly and twist clockwise until the wire tightens snugly around the mason jar’s neck. The goal here is to create a secure, stable hold that will prevent the jar from shifting or falling, even in windy conditions. Continue twisting until there is no slack and the wire feels firmly attached, creating a strong bond. This step is critical for the safety and longevity of your mason jar lantern and, by extension, your entire outdoor chandelier, so ensure it’s as tight as possible without damaging the glass. A properly twisted wire will look neat, professional, and hold the jar perfectly in place, ready for its role in your patio lighting scheme.
After you’ve twisted the wire securely around the jar’s neck, you’ll likely have some excess wire protruding. To achieve a clean, professional finish and prevent any sharp edges, it’s essential to trim this excess. Using your pliers or wire cutters, carefully snip off the surplus wire as close to the twisted section as possible. Take caution to avoid cutting too close to the main twisted loop, which could compromise its integrity. Once cut, use the pliers to gently bend down and tuck in any remaining sharp ends or stray pieces of wire. This ensures the wire doesn’t snag on anything, scratch anyone, or detract from the aesthetic appeal of your DIY outdoor chandelier. A neat finish elevates the overall appearance of your mason jar lantern, making it look polished, complete, and ready for its next stage in the assembly process.
And just like that, BAM! You’ve successfully created your first elegant Mason Jar Lantern. This seemingly simple component is brimming with potential and possibilities, serving as a versatile piece of rustic decor on its own. Repeat these steps three more times to create a total of four identical lanterns. Once completed, these individual lanterns can be used in numerous ways – perhaps hanging individually from tree branches for subtle garden lighting, lining a pathway, or as charming centerpieces for a rustic table setting. However, their ultimate purpose in this project is to become key elements of a magnificent outdoor chandelier. Each perfectly crafted lantern brings us one step closer to realizing our dream of an enchanting, custom-made lighting fixture that will be the envy of all your guests and a shining example of creative outdoor living.
Building the Chandelier Frame: The Heart of Your Outdoor Lighting
Now that you have your quartet of beautifully crafted mason jar lanterns, the next crucial phase of this DIY adventure is to construct the main frame of your outdoor chandelier. This frame will serve as the central hub from which your lanterns will gracefully hang, defining the shape and overall presence of your lighting fixture. There are numerous creative approaches to building this frame, depending on the look you’re aiming for and the materials you have readily available, ensuring your custom outdoor chandelier perfectly matches your aesthetic.
For a rustic and sturdy appeal, consider repurposing a wooden wagon wheel or using a large, robust embroidery hoop as your base. A simple, circular wooden disc (perhaps a cut-out from plywood or an old cutting board) or even a metal wreath frame can also work wonderfully, providing a solid foundation for your mason jar chandelier. The key is to choose a material that is robust enough to support the combined weight of the four mason jar lanterns and whatever lighting elements you choose to place inside them. If you opt for a wooden base, a coat of weather-resistant stain or outdoor-grade paint will protect it from the elements, ensuring your outdoor chandelier withstands varying weather conditions and maintains its charm season after season. Alternatively, a metal frame can be painted with outdoor-grade spray paint to match your desired aesthetic or to provide additional weather protection.
Once your base frame is ready, you’ll need to decide on its main hanging mechanism. Typically, three or four equally spaced chains or strong wires attached to the top of the frame and converging at a single point form the primary suspension system. These will then be securely fastened to an overhead hook on your patio ceiling, deck pergola, or gazebo. The length of these main suspension chains can be adjusted to achieve the perfect hanging height, allowing your outdoor chandelier to cast its magical glow exactly where it’s needed most – whether it’s above a dining table or a cozy seating area. This careful planning and execution of the frame construction are paramount to the success, stability, and visual impact of your stunning DIY outdoor chandelier, making it a focal point of your garden decor.
Illuminating Your Chandelier: Bringing Light to Life
The final and perhaps most exciting step in crafting your outdoor mason jar chandelier is the installation of the lighting elements and the assembly of the entire fixture. This is where your creation truly comes to life, casting a warm and inviting glow across your outdoor spaces, elevating your patio lighting ideas. For safety and ease of use in an outdoor environment, especially considering exposure to moisture, we highly recommend using battery-operated LED fairy lights, solar-powered lights, or LED tea lights. These options eliminate the need for electrical wiring, making the project safer, simpler, more energy-efficient, and far more versatile in terms of placement.
For each mason jar lantern, gently insert your chosen lighting element. Solar-powered lights often come with a small solar panel on top, which can be placed inside the jar’s lid (if you decide to keep the lids) or simply nestled among the fairy lights if you leave the jars open. Ensure the solar panel receives adequate sunlight during the day for optimal charging. LED fairy lights, with their delicate strands, can be artfully coiled inside each jar to create a whimsical, star-like effect, adding a magical touch to your garden decor. Battery-operated tea lights offer a classic flicker, beautifully mimicking candlelight without any flame or heat, making them a safe choice for prolonged use. Experiment with different types and colors of lights to achieve your desired ambiance, whether it’s a cozy warm white, a vibrant multi-color display for festivities, or a subtle, romantic glow for intimate evenings.
Once the lighting elements are in place, it’s time to connect your individual mason jar lanterns to the main chandelier frame you previously constructed. Use additional pieces of your black chain or wire to securely attach the top link of each mason jar lantern’s hanging chain to the frame. Ensure they are evenly spaced around the frame to maintain balance and visual harmony, which is crucial for the overall aesthetic of your DIY chandelier. Double-check all connections to ensure they are robust and can safely support the combined weight of the jars and their lighting contents. Consider adding a small swivel hook at the top of the main suspension point to allow your chandelier to gently turn with the breeze, adding dynamic movement.
Finally, hang your complete outdoor chandelier in your desired location. Whether it’s suspended above your patio dining table for charming dinners, illuminating a cozy lounge area, or adding sparkle to your garden pergola, this DIY masterpiece is sure to impress. Step back and admire your handiwork. The warm, inviting glow emanating from your custom-made mason jar chandelier will transform your outdoor space into an enchanting retreat, perfect for evening gatherings, quiet reflection, or simply enjoying the beauty of your surroundings. This unique piece of outdoor lighting will undoubtedly become a cherished part of your home.
Why Choose a DIY Mason Jar Chandelier? Unlocking Benefits and Customization
Embracing a DIY project like this outdoor mason jar chandelier offers a plethora of benefits beyond just saving money. It’s not just a craft; it’s an investment in personalized home decor and an enjoyable creative process.
- **Budget-Friendly Elegance:** First and foremost, it’s an incredibly **budget-friendly** solution for outdoor lighting and decor. With the primary components like mason jars, wire, and chain being inexpensive and readily available, you can achieve a high-end, designer look without the hefty price tag associated with store-bought chandeliers. This makes it an ideal project for anyone looking to enhance their outdoor aesthetic on a shoestring budget, proving that stunning garden decor doesn’t have to be costly.
- **Unparalleled Customization:** Secondly, the ability to **customize** is unparalleled. Unlike mass-produced items, your DIY chandelier can be tailored to perfectly match your personal style, existing outdoor decor, and the specific mood you wish to create. You can choose different sizes of mason jars (pint, quart, half-gallon), varying colors or finishes of chain, or even paint the jars themselves (e.g., frosted for a softer glow, mercury glass effect for vintage charm, or solid colors to match cushions). The lighting possibilities are vast: from warm white LED fairy lights for a classic glow, to colorful solar lights for a festive atmosphere, or even essential oil diffusers in some jars for an aromatic experience. This level of personalization ensures your outdoor chandelier is truly unique and a reflection of your taste.
- **Sustainable and Eco-Friendly:** Moreover, this project champions **sustainability and eco-friendliness**. By repurposing mason jars, you’re giving new life to materials that might otherwise be discarded, contributing to waste reduction. It’s a wonderful way to engage in conscious consumption and contribute to a greener planet while simultaneously creating something beautiful and functional for your home. This aspect adds an extra layer of satisfaction to your crafting efforts.
- **Sense of Accomplishment:** It also offers immense **satisfaction and a sense of accomplishment**. There’s a unique pride that comes from decorating your home with items you’ve crafted with your own hands. This personal touch adds warmth, character, and a story to your outdoor space that no store-bought item can replicate. It’s a tangible reminder of your creativity and effort.
- **Magical Ambiance:** Finally, the **ambiance** created by a mason jar chandelier is simply magical. The soft, diffused light filtering through the glass creates a cozy, inviting atmosphere perfect for evening entertainment, quiet dinners, or simply relaxing under the stars. It transforms an ordinary patio or deck into an enchanting outdoor living room, making it a focal point and conversation starter for all your guests, enhancing the overall experience of your outdoor oasis.
Tips for Enhancing Your Outdoor Chandelier
To make your DIY mason jar chandelier even more spectacular, durable, and truly your own, consider these additional tips:
- **Creative Embellishments:** Before placing your lights, consider adding small decorative elements inside the jars. Pebbles, polished river stones, sea shells, faux flowers, pinecones, or even small branches can create a unique visual texture during the day, enhancing the overall appeal and adding personal flair to your garden decor.
- **Superior Weatherproofing:** While mason jars are sturdy, ensuring your lighting elements are outdoor-rated is crucial. For battery-operated lights, consider using jars with lids that have a small hole drilled for the light string, or use lights specifically designed for outdoor use to protect battery compartments from rain and humidity. Applying a clear, UV-resistant sealant spray to any painted elements on the jars or the main frame can also extend their lifespan and prevent fading or chipping.
- **Optimal Placement Strategy:** Think carefully about where the chandelier will hang. High traffic areas might require a more robust hanging system to prevent accidental bumps. Consider the proximity to trees or walls for optimal light reflection and to ensure the chandelier is secure from strong winds. Also, observe how sunlight hits the area if you plan to use solar-powered lights.
- **Harnessing Solar Power:** If direct sunlight is available for several hours a day at your chosen location, solar-powered lights are an excellent, eco-friendly choice. They charge during the day and automatically illuminate at dusk, offering hassle-free operation and significant energy savings, contributing to sustainable outdoor lighting.
- **Seasonal Decor Changes:** Embrace the versatility of your chandelier by changing its internal decorations seasonally. Tiny ornaments or faux snow for winter, delicate faux blossoms or colorful eggs for spring, vibrant beads or small flags for summer, and miniature gourds or autumn leaves for fall can keep your outdoor space feeling fresh, festive, and responsive to the changing seasons year-round.
- **Adding Fragrance:** For an extra sensory experience, consider placing a few drops of outdoor-friendly essential oil (like citronella to repel bugs, or lavender for relaxation) onto a cotton ball inside one or two jars (away from any heat sources if using candle alternatives). This adds an aromatic layer to your enchanting outdoor ambiance.
Conclusion: Your Luminescent Masterpiece Awaits
You’ve now journeyed through the creation of a truly magnificent piece of outdoor decor – a DIY mason jar chandelier that combines rustic charm with practical, enchanting illumination. From the initial excitement of gathering supplies to the meticulous crafting of each individual lantern and the thoughtful assembly of the entire fixture, you’ve transformed simple, affordable materials into a dazzling focal point for your outdoor living space. This project is more than just about making a light fixture; it’s about infusing your personal space with creativity, warmth, and a unique handmade touch that store-bought items simply cannot replicate.
Whether it graces your patio, brightens your deck, or adds a magical glow to your garden, this budget-friendly and easy-to-make chandelier promises countless evenings of enchanting ambiance. It’s a testament to the idea that beauty doesn’t have to be expensive or complicated; often, the most cherished items are those crafted with love and care. So, gather your friends for a memorable craft night, involve your kids for a rewarding family activity, or simply enjoy the meditative process of crafting on your own. Your beautiful, custom-made outdoor chandelier is ready to cast its spell and elevate your outdoor living experience, making your home a beacon of charm and personal style. Enjoy the glow and the compliments that are sure to follow!