
Crafting Joy: An Effortlessly Charming DIY Spring Wreath Project
Welcome to a fresh and vibrant new season! As the days grow longer and nature awakens, there’s no better time to infuse our homes with the rejuvenating spirit of spring. For many of us, this season also brings a much-anticipated break from routine, often coinciding with school holidays like Spring Break. While these moments are precious for family time, they can sometimes mean our more ambitious DIY projects take a temporary backseat. But fear not, fellow creators! Sometimes, the most rewarding projects are the ones that are delightfully simple, incredibly quick, and won’t break the bank. Today, we’re diving into a charming craft that perfectly fits that description: a beautiful, custom Spring wreath designed to add a touch of handmade cheer to your home in no time at all. This project is so straightforward, you can even tackle it with little ones buzzing around, making it a perfect activity for a relaxed afternoon.
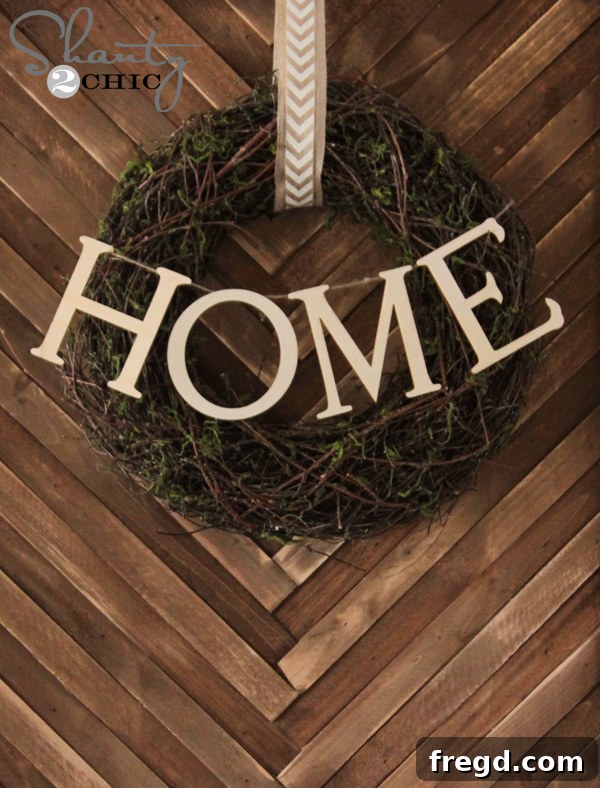
My recent creative endeavor resulted in a captivating Spring wreath that instantly brightened my entryway, and I can’t wait to share the process with you. It’s truly remarkable how a few carefully selected, inexpensive items can come together to create something so unique and personal. Prepare to be amazed by the simplicity and the stunning outcome!
Isn’t it just brimming with personality? This project exemplifies the beauty of a seriously simple and budget-friendly craft – the kind we often crave amidst our busy lives. Sometimes, all it takes is a spark of inspiration and a handful of accessible materials to transform a space and uplift your spirits.
Why Choose a DIY Wreath for Your Spring Decor?
While store-bought wreaths offer convenience, there’s an unparalleled satisfaction that comes from creating something with your own hands. A DIY Spring wreath allows for complete personalization, ensuring it perfectly complements your existing home decor and reflects your unique style. Beyond the aesthetic appeal, crafting provides a wonderful opportunity for creative expression and a calming break from digital distractions. It’s also an incredibly cost-effective way to refresh your seasonal decorations. Instead of spending a fortune on mass-produced items, you can achieve a custom, high-end look for a fraction of the price. This particular project, costing around just $15, is a testament to how far a small budget can go when paired with a little ingenuity.
Gathering Your Supplies: A Quick Trip to Michael’s
For this project, I sourced all my materials from Michael’s, a treasure trove for crafters. The key to keeping the cost low, besides selecting affordable items, is to always hunt for a coupon! Michael’s consistently offers online coupons, so a quick search before you head to the store can save you a significant percentage on your purchase. This little trick is a game-changer for budget-conscious DIY enthusiasts.
The Perfect Wreath Base
My first find was the wreath itself, located in the floral section. There are various types of wreath forms available – grapevine, foam, wire, even natural branches. I opted for a simple, rustic wreath base that provided a lovely natural texture. When selecting your wreath, consider the overall look you’re aiming for. A bare grapevine wreath, for instance, offers a fantastic canvas for various embellishments and allows the other elements to truly shine. This was the item I used my coupon on, instantly reducing the overall expense.
Charming Wooden Letters
Next, I ventured into the Spring craft section and stumbled upon these delightful wooden letters. I was instantly smitten! The edges had a beautifully distressed, almost burned look, and the font was absolutely perfect – modern yet with a touch of rustic charm. What made them even better was their price; they were incredibly cheap, making them an ideal choice for this budget-friendly project. Michael’s usually stocks a vast array of wooden shapes, letters, and designs, so you’re sure to find something that resonates with your personal style. Imagine spelling out “HELLO,” “BLOOM,” or even a family name! The possibilities for customization are endless.
Crafting Your Spring Wreath: Step-by-Step Guide
This is where the magic happens, and you’ll be amazed at how quickly this project comes together. You’ll need a hot glue gun, which is a staple for most quick crafts, and some twine.
Step 1: Preparing Your Letters
The first step involves attaching a piece of twine to the back of each wooden letter. The goal here is to create a small loop or hanger for each letter, allowing them to dangle charmingly from the wreath. Simply cut a small length of twine for each letter. Apply a dab of hot glue to the top back edge of a letter, then press the ends of a piece of twine into the glue, forming a loop. Hold it firmly for a few seconds until the glue sets. Repeat this for all your letters. Make sure the loops are roughly the same length so your letters hang evenly.
Step 2: Attaching Letters to the Wreath
Once the twine hangers are secure on your letters, it’s time to attach them to your wreath. Arrange your letters on the wreath to determine the best spacing and overall look. Once you’re happy with the placement, apply a small dot of hot glue to the back of the twine loop on each letter. Carefully press each letter’s twine loop onto the underside of the wreath, allowing the letters to hang naturally. Ensure they are centered and evenly spaced. This step requires a steady hand and a bit of patience to get the alignment just right, but don’t worry, hot glue allows for quick adjustments if needed before it fully sets.
Step 3: Adding the Hanging Ribbon
The final touch is to add a beautiful ribbon for hanging your wreath. I discovered this fantastic chevron ribbon in the ribbon section, and I absolutely loved its playful pattern and vibrant color, perfect for spring.
While the printed ribbon was lovely on its own, I wanted to give the hanging mechanism a bit more visual weight and presence. To achieve this, I layered two pieces of the same ribbon. This creates a thicker, more substantial hanger and adds a subtle dimension. Simply cut two lengths of ribbon, place them together, and then loop them around the top of your wreath. Tie a secure knot at the desired length for hanging. And just like that, the assembly is complete! See? I told you it was simple.
Displaying Your Masterpiece
Now for the exciting part: finding the perfect spot to display your newly crafted Spring wreath!
Hanging Your Wreath with Ease
For my own wreath, I chose to hang it from my DIY wood shim wall art, which provided a unique and rustic backdrop. The method for hanging is incredibly straightforward: I simply added a small finish nail to the top edge of the wooden art piece. Then, I tied a neat knot in the layered ribbon at the desired hanging height, and easily suspended the knot from the nail. It’s incredibly easy, yet the result is pretty darn polished and professional-looking. This method works perfectly for any wall, door, or even a mantelpiece where you can securely place a small nail or hook.
Creative Display Options
Don’t limit yourself to just a door! Wreaths can beautifully adorn:
- **Entryway doors:** A classic choice that welcomes guests with seasonal cheer.
- **Interior walls:** Above a console table, in a gallery wall, or as a standalone piece.
- **Mantels:** Propped up or hung above a fireplace for a focal point.
- **Windows:** Hang from a window frame to be enjoyed from both inside and out.
- **Mirrors:** Drape over the top of a large mirror for an elegant touch.
Personalize and Embellish: Making It Truly Yours
While my design kept things simple, the beauty of DIY lies in its adaptability. Here are a few ideas to personalize your Spring wreath even further:
Paint and Patina
Consider painting your wooden letters! You could use a soft pastel shade for a traditional spring look, a bright pop of color for a modern twist, or even distress them further with a little sandpaper and dark wax for a vintage feel. Gold or silver metallic paint could also add a touch of elegance.
Adding Floral Accents
Although I kept mine minimalist, small faux flowers, greenery, or even tiny bird embellishments can be hot-glued directly onto the wreath base for added texture and color. Look for cherry blossoms, tulips, or delicate leaves to capture the essence of spring.
Seasonal Versatility
This basic design can easily be adapted for other seasons. Swap out “SPRING” for “FALL,” “GATHER,” or “JOY,” change the ribbon to seasonal colors, and add appropriate embellishments like mini pumpkins, pinecones, or snowflakes. The core structure remains the same, offering endless possibilities!
The Joy of Simple Crafting
This Spring wreath project is a perfect example of how impactful simple DIYs can be. It’s an easy, inexpensive way to bring seasonal charm into your home, offering a personalized touch that store-bought items simply can’t replicate. The satisfaction of creating something beautiful with your own hands, especially a project that requires minimal time and effort, is truly unbeatable. So, whether you’re a seasoned crafter or just starting out, this wreath is a fantastic project to try.
Here are a few more glimpses of the finished wreath, showing how it beautifully complements its surroundings and embodies the fresh spirit of spring.
Conclusion & Share Your Creations!
We hope this DIY Spring wreath tutorial has inspired you to grab some supplies and create your own piece of seasonal cheer. It’s a testament to the fact that beautiful home decor doesn’t have to be complicated or expensive. Embrace the simple joys of crafting, and watch how a little creativity can transform your living space.
If you tackle this project or any of our other DIYs, we’d absolutely love to see your finished creations! Be sure to connect with us and share your masterpieces. You can stay up-to-date with all our latest projects, tips, and inspirations by following us on our social media channels.
To keep up with all of our DIY projects and discover more creative ideas, be sure to follow us on Instagram and Pinterest! Happy crafting!