
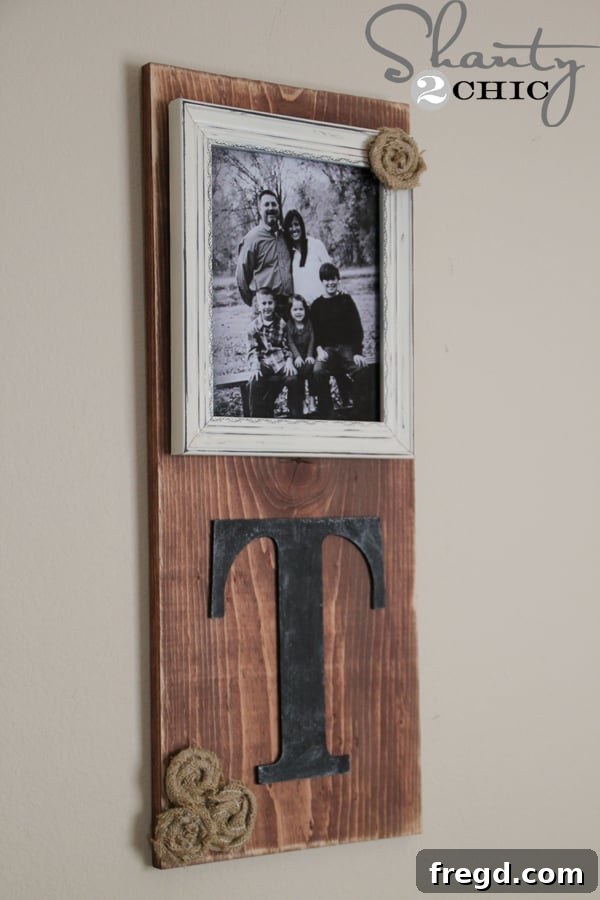
Welcome, fellow DIY enthusiasts! Are you searching for a weekend project that is both incredibly rewarding and exceptionally budget-friendly? Look no further! Today, we are absolutely thrilled to guide you through the creation of a stunning, personalized picture frame that will not only beautifully display your cherished memories but also add a touch of handcrafted charm to any room. This easy DIY picture frame project is perfect for beginners and seasoned crafters alike, promising a beautiful result without breaking the bank. Imagine transforming a simple piece of wood and an inexpensive frame into a unique decorative piece – all for under $10!
There’s immense satisfaction in creating something with your own hands, especially when it comes to home decor. This project offers that satisfaction in spades. It’s an opportunity to infuse your personal style into your living space or craft a heartfelt, customized gift for someone special. Let’s gather our tools and materials and embark on this creative journey together, turning everyday items into an extraordinary display for your most treasured photographs.
Essential Tools and Materials for Your Budget-Friendly Picture Frame
Before we dive into the step-by-step instructions, let’s ensure you have everything you need. One of the best aspects of this DIY project is its accessibility; most items can be found at your local hardware store or craft supply store, often at very affordable prices. Remember, creativity often blossoms best when working within a budget!
Materials:
- Wood Board: One 1×12 inch board, 4 feet in length. (This single board will yield two frames, making the project even more economical!)
- Wood Stain: A can of light walnut wood stain (or your preferred shade).
- Craft Letter: A wooden or MDF letter (e.g., “M”) representing an initial, available at craft stores like Hobby Lobby. Look for sales to save even more!
- Chalkboard Spray Paint: A can of Rust-Oleum Chalkboard Spray Paint (or similar brand).
- Inexpensive Picture Frame: One 8×10 inch picture frame, readily available at discount stores like Walmart for a few dollars.
- Spray Paint for Frame: A can of Rust-Oleum Heirloom White spray paint (or your favorite color for a distressed look).
- Super Glue Gel: Strong adhesive like Gorilla Glue Super Glue Gel.
- Decorative Embellishments: Burlap flat-rolled rosettes or similar decorative accents (optional, but highly recommended for added charm).
- Sandpaper/Sanding Block: Fine-grit sandpaper for smoothing wood and distressing.
- Sawtooth Hanger Kit: For hanging the finished frame securely.
- Wall Anchor: If hanging on drywall without a stud.
Tools:
- Measuring Tape: For accurate measurements.
- Saw: A miter saw, circular saw, or hand saw for cutting the wood board.
- Foam Brush: For applying wood stain.
- Clean Cloths/Rags: For wiping stain and cleaning surfaces.
- Corner Cat Sander (or Hand Sandpaper): For distressing the picture frame, especially in tight corners.
- Screwdriver or Drill: For attaching the sawtooth hanger and a screw for the picture frame.
- Pencil: For marking cutting lines and screw placement.
- Safety Gear: Eye protection and gloves are always recommended when working with saws, paints, and stains.
Step-by-Step Guide to Crafting Your DIY Picture Frame
Now that we have all our supplies ready, let’s roll up our sleeves and get started on this exciting transformation! Each step is designed to be straightforward, ensuring a smooth and enjoyable crafting experience.
Step 1: Preparing Your Wood Board
Our project begins with the foundation: the wood board. Purchase a 1×12 inch board that is 4 feet in length. This dimension is incredibly efficient, as you can cut it in half to create two separate frames, effectively doubling your crafting output or providing a backup! Using a miter saw or a circular saw, carefully cut the 4-foot board into two equal 2-foot sections. Always ensure safety precautions are followed when operating power tools. If you don’t have access to a saw, many hardware stores offer cutting services for a small fee, or you can use a hand saw and a miter box for precision. Once cut, give the edges and surfaces a light sanding with fine-grit sandpaper to remove any splinters or rough patches, creating a smooth surface for staining.
Step 2: Staining the Wood Board
With your wood board prepped, it’s time to add character with stain. For this project, a light walnut stain was chosen to achieve a warm, rustic appeal, but feel free to select a shade that complements your home decor. Using a foam brush, apply a single, even coat of stain across the entire surface of the board. Work in the direction of the wood grain for the best results. Don’t worry about perfect coverage at this stage. Allow the stain to sit for approximately 5 minutes, giving the wood ample time to absorb the pigment. After this brief absorption period, take a clean, lint-free cloth and gently wipe the stain, blending it into the wood rather than wiping it completely away. This technique creates a beautiful, subtly aged finish that highlights the natural grain. Let the board dry completely according to the stain manufacturer’s instructions, typically a few hours.
Step 3: Personalizing Your Craft Letter with Chalkboard Paint
While your stained wood board is drying, you can move on to preparing your personalized letter. For a unique touch, we’re transforming a simple craft letter into a mini chalkboard element. Select a wooden or MDF letter that represents an initial important to you – perhaps your last name, a child’s name, or a meaningful word. Lay the letter on a protected surface in a well-ventilated area. Apply two thin, even coats of chalkboard spray paint, allowing adequate drying time between coats as per the product instructions. Thin coats prevent drips and ensure a smooth, durable finish.
Step 4: Seasoning the Chalkboard Letter for an Authentic Look
To give your chalkboard letter that truly authentic, “used” look and ensure it functions properly, it’s essential to “season” it. Once the chalkboard paint is completely dry and cured (typically 24-48 hours after the final coat), take a piece of chalk and rub the side of it all over the entire surface of the letter. Ensure full coverage. Then, using a clean, dry cloth or an eraser, gently wipe off the chalk. This process fills the microscopic pores of the chalkboard paint, preventing future chalk marks from becoming permanently etched into the surface and giving it a beautifully muted, well-loved appearance. This technique truly elevates the rustic charm of the letter.
Step 5: Revamping Your Inexpensive Picture Frame
Next, we’ll transform a simple, inexpensive 8×10 inch picture frame into a stylish component of our DIY project. These frames are typically available for just a few dollars at discount retailers. Prepare the frame by removing any glass, backing, or hanging hardware. Lightly sand the frame to create a surface for the paint to adhere to. In a well-ventilated area, apply two thin coats of Rust-Oleum Heirloom White spray paint (or your chosen color), allowing proper drying time between each coat. This creamy off-white shade provides a fantastic base for a distressed finish, offering a classic, farmhouse-inspired look.
Step 6: Distressing the Picture Frame for a Vintage Feel
To achieve that coveted worn and weathered aesthetic, we’ll distress the freshly painted frame. A corner cat sander is ideal for this step, as its pointed design allows easy access into the intricate corners and edges of the frame, replicating natural wear and tear. If you don’t have a corner cat sander, fine-grit sandpaper wrapped around a block or even just your finger will work wonderfully. Focus on areas that would naturally show wear, such as the edges, raised details, and corners. Lightly sand until the underlying color or wood shows through in places, creating a beautifully aged effect. The key is to distress subtly and unevenly for a truly authentic look. Wipe away any dust with a clean cloth.
Step 7: Preparing the Frame for Hanging
Since this frame will be hung from the main wood board, we need to modify its existing stand. Many inexpensive frames come with a fold-out stand on the back. Gently bend this stand backward until the hinge pops off. This removal ensures the frame lies flat against the main board and makes it ready for our unique hanging method. We want to be able to easily swap out photos, so instead of gluing the frame directly to the board, we’ll create a simple hook system.
On the main stained wood board, measure and mark a spot for a screw approximately 2.5 inches down from the top edge, centered horizontally. Gently screw a small screw into this spot, leaving about 1/4 to 1/2 inch of the screw head protruding. This screw will act as the hook from which your picture frame will hang, allowing for easy photo changes without damaging the main display board.
Step 8: Assembling the Personalized Elements
Now, let’s bring all the elements together. Take your seasoned chalkboard letter and apply a generous amount of super glue gel to its back surface. The gel consistency helps prevent drips and provides a strong bond. Carefully center the letter on the bottom half of your stained wood board, below where your picture frame will hang. Press firmly for a few moments to ensure a secure attachment. Allow the glue to cure completely according to the manufacturer’s instructions. This usually takes a few minutes for initial bond, but full strength can take longer.
Step 9: Adding the Finishing Touches and Embellishments
To truly complete the rustic charm of your DIY picture frame, consider adding decorative embellishments. Burlap flat-rolled rosettes were chosen for this design, adding a soft, textural contrast to the wood and metal. You can easily find these at craft stores or even make your own with a simple tutorial. For this frame, three rosettes were strategically placed on the bottom left corner of the main board, just below the letter, and one was placed at the top right corner of the picture frame itself. This asymmetric placement adds visual interest and a handcrafted feel. You can experiment with different types of embellishments – perhaps some faux greenery, small metal accents, or even painted wooden buttons – to match your unique style. Use super glue to securely attach your chosen embellishments.
Step 10: Final Assembly and Hanging Your Masterpiece
With all your elements prepared and attached, the final step is to securely hang your new picture frame display. Insert your favorite 8×10 photo into the distressed frame. Then, carefully hang the frame onto the screw you previously installed on the main wood board. The frame should sit snugly against the board, yet be easily removable for future photo swaps. To hang the entire display on your wall, attach a sawtooth hanger to the back of the main wood board, centered at the top. Measure and mark the spot on your wall where you want to hang it. If you’re hanging on drywall without hitting a stud, use a wall anchor to ensure stability and prevent damage. This robust hanging method ensures your beautiful, personalized picture frame will be a long-lasting addition to your home decor.
There you have it! A truly unique, personalized, and budget-friendly DIY picture frame. This project is not just about crafting; it’s about creating memories, expressing your creativity, and adding a touch of soul to your living space. The ability to easily swap out pictures means this frame can evolve with your family and your cherished moments, making it a timeless piece of decor.
Creative Variations and Gifting Ideas
This versatile DIY picture frame isn’t just a perfect addition to your own home; it also makes an incredibly thoughtful and personal gift. Here are a few ideas to spark your imagination:
- Holiday Gifts: Imagine crafting several of these frames for Christmas, each personalized with a family initial or a special date. Fill them with a cherished photo of the recipient, and you have a truly meaningful present that won’t be forgotten.
- Themed Decor: Adapt the colors and embellishments to suit specific themes. For a nursery, use soft pastels and whimsical elements. For a coastal theme, try blues and whites with seashell accents.
- Collage Style: Instead of one large board, you could use a slightly wider board and attach two smaller frames side-by-side for a mini photo collage.
- Different Lettering: Instead of a single initial, consider gluing on small wooden words like “LOVE,” “HOME,” or “FAMILY” for a different personalization approach. Stenciling words or dates directly onto the wood board is another beautiful option.
- Alternative Finishes: Explore different wood stains, or even paint the main board a solid color and then distress it for a completely different look. Chalk paint, for example, offers a beautifully matte and easily distressed finish.
We hope you’ve enjoyed this detailed tutorial on crafting your own charming and affordable DIY picture frame. It’s a project that combines simple woodworking with creative finishing techniques to produce a beautiful piece that feels both new and wonderfully antique. The joy of creating something with your own hands, especially a piece that holds such sentimental value, is truly unparalleled.
Thank you for stopping by and embarking on this creative adventure with us! We always appreciate your shares and pins on social media – your support helps us continue to bring you inspiring and accessible DIY projects. Don’t forget to share your finished frames with us; we love seeing your unique interpretations!