
DIY Test Tube Bud Vase: Crafting Elegant & Affordable Home Decor
Hello, fellow DIY enthusiasts!
Last week, I had the pleasure of visiting my in-laws, and as always, their beautifully decorated home sparked a flurry of creative ideas in my mind. There’s something truly inspiring about seeing how thoughtful touches can transform a living space. This particular visit, a charming metal vase holding delicate glass test tubes caught my eye. It was an instant inspiration, and my creative wheels immediately started spinning! I knew I had to recreate something similar, but with my own unique twist. And today, I’m thrilled to share the fantastic results of that inspiration with all of you.
Introducing Your Next Favorite DIY Project: The Test Tube Bud Vase!
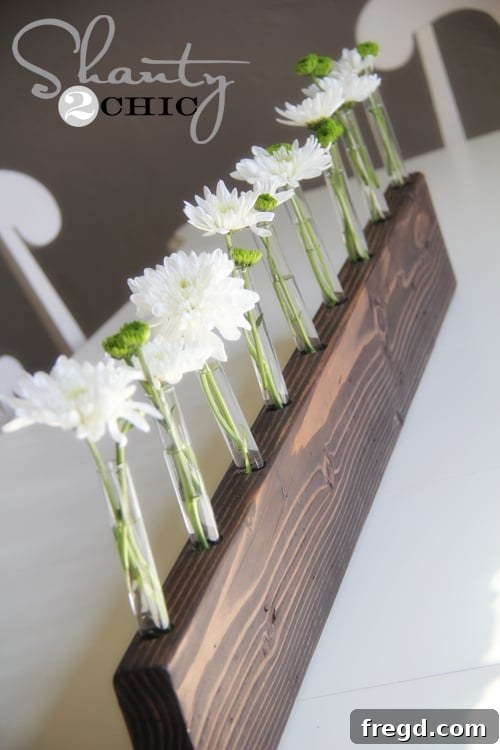
Behold, the rustic-chic Test Tube Bud Vase!
You might be surprised to hear this, but this entire project took me a mere 30 minutes to complete! Seriously, from start to finish, you can have this elegant piece ready for your home in less time than it takes to watch an episode of your favorite show. And here’s the best part: the only power tool you’ll absolutely need is a drill. That’s right, just one simple tool stands between you and this gorgeous handmade decor item.
The Inspiration: A Touch of Modern Rustic Charm
The initial spark for this project came directly from my mother-in-law’s home. She had this incredibly cute vase that combined the industrial feel of metal with the delicate simplicity of glass test tubes. It was a brilliant blend of textures and styles that immediately captivated me. I loved how the individual test tubes allowed for a minimalist display of single flower stems, creating a serene and sophisticated look without being overly elaborate. This design struck me as both modern and inherently rustic, a perfect fusion for almost any home decor style, from farmhouse chic to minimalist contemporary. I wanted to capture that essence, but in a way that was accessible and easy for anyone to create, especially using readily available materials.
Why a DIY Test Tube Bud Vase is a Must-Have
Beyond its undeniable charm, this DIY Test Tube Bud Vase offers a multitude of benefits:
- Incredibly Cost-Effective: You’ll be amazed at how little it costs to put this beautiful piece together. We’re talking less than $15 for the primary supplies!
- Quick and Easy Project: As mentioned, it’s a 30-minute endeavor. Perfect for beginners or anyone looking for a quick crafting fix.
- Highly Customizable: While I opted for a rustic stained look, the possibilities for customization are endless. You can paint the wood any color, use different types of wood, or even vary the number and size of your test tubes.
- Versatile Decor Piece: This vase makes a stunning centerpiece for a dining table, a charming accent for a mantelpiece, a unique addition to a bookshelf, or even a thoughtful handmade gift for friends and family.
- Showcases Single Blooms Beautifully: Test tube vases are perfect for highlighting the delicate beauty of individual flowers or small cuttings, giving each bloom its moment in the spotlight.
Gathering Your Essential Supplies
One of the biggest questions I had when planning this project was where to source the test tubes. Luckily, the answer was incredibly simple, and affordable!
Test Tubes: Your Tiny Glass Vessels
I found my perfect test tubes on Amazon here. I purchased a pack of 10 for under $10, and to sweeten the deal, it came with free shipping. Amazon truly is a lifesaver for DIY supplies; it’s always so convenient, and the shipping is reliably fast. I actually received mine the day after ordering – talk about instant gratification! When selecting test tubes, consider the diameter carefully, as this will determine the size of the drill bit you need. Standard sizes like 16mm or 18mm are common.
The Wood: Foundation of Your Floral Display
For the base of my vase, I used a standard 8-foot 2×6″ pine board from Lowe’s. This common dimension provides a sturdy and substantial feel for the finished product. I cut my board down to a length of 44 inches. Don’t own a saw? No problem! Most home improvement stores like Lowe’s or Home Depot offer free wood cutting services. Just bring your measurements, and they’ll do the work for you. The best part? This entire board cost under $4, and you can actually get two of these bud vases out of a single 8-foot board, making it even more economical!
Drill Bit: The Key to Perfect Holes
To create the perfectly sized holes for your test tubes, you’ll need a spade bit. These bits are designed to bore flat-bottomed holes, ideal for this project. I found mine at Lowe’s and specifically used this 13/16″ spade bit. It’s crucial to match your spade bit size to the diameter of your test tubes for a snug fit. If your test tubes are a different size, simply find a spade bit that matches their external diameter.
Wood Stain: Adding Depth and Character
For a rich, warm finish, I chose a wood stain. My personal favorite for this project was Rust-Oleum Kona Ultimate Wood Stain. This deep, dark brown shade instantly adds a rustic and sophisticated look to the pine board. It’s incredibly easy to apply and dries quickly, transforming ordinary wood into something truly beautiful.
Additional Supplies (Recommended):
- Pencil and tape measure/ruler for marking.
- Hammer (if you want to distress the wood).
- Sandpaper (fine-grit) for smoothing edges.
- Clean rags or foam brush for applying stain.
- Protective gloves for staining.
- Safety glasses for drilling.
- Wood clamps (optional, but recommended for stability during drilling).
Step-by-Step Guide: Crafting Your Test Tube Vase
Step 1: Prepare Your Wood Board
First things first, ensure your wood board is cut to the desired length. As mentioned, I used a 44-inch length for mine. Once cut, give the edges and surfaces a quick sand with fine-grit sandpaper. Even if you plan to distress the wood, a little sanding helps remove splinters and prepares the surface for marking and staining. Wipe off any sawdust with a damp cloth.
Step 2: Mark for Drilling
Accuracy is key here for an even and aesthetically pleasing look. I started by marking my board 2 inches in from one end. This provides a nice margin. From that initial mark, I then measured and placed a new mark every 5 inches along the length of the board. This resulted in a total of 9 marks on my 44-inch board where the holes for the test tubes would go. Use a pencil to make clear, visible marks.
Step 3: Add Character (Optional Distressing)
For those who love a rustic, ‘shanty’ chic aesthetic, this step is for you! I decided to give my board a bit of character by distressing it. My preferred method was simply hitting it multiple times with a hammer. This creates dents, dings, and imperfections that give the wood an aged, reclaimed look. You can also use other tools like a wire brush, chains, or even rough sandpaper to achieve various distressed effects. This step is entirely optional, but it definitely adds to the charm of the finished vase.
Step 4: Drill the Test Tube Holes
Now it’s time for the main event! Secure your spade bit into your drill. Before you begin, it’s a good idea to clamp your wood board to a workbench or sturdy surface to prevent it from moving, and always wear safety glasses. Carefully align the tip of the spade bit with each of your pencil marks. Drill straight down, applying steady pressure. The goal is to drill each hole to roughly the same depth, deep enough for the test tubes to sit securely without tipping over, but not so deep that they disappear entirely. A quick test fit with one of your test tubes can help you determine the ideal depth. Once all holes are drilled, clear away any sawdust from the holes and surface.
Easy peasy, right?
Step 5: Stain or Paint Your Wood
This is where your vase truly starts to come to life! If you’re staining, grab your Rust-Oleum Kona Ultimate Wood Stain (or your preferred color). Apply the stain evenly with a clean rag or foam brush, following the grain of the wood. Allow it to penetrate for a few minutes, then wipe off any excess. For a deeper color, you can apply a second coat after the first has dried. If you prefer painting, choose an acrylic or chalk paint and apply thin, even coats. Allow sufficient drying time between coats and before handling. For added durability and protection, especially if the vase will be exposed to moisture (from watering flowers), you might consider applying a clear polyurethane sealer.
Hellllllllo Kona!
I am LOVING Rust-Oleum Kona Ultimate Wood Stain! It truly creates such a rich, beautiful finish!
That’s it for the construction!
Step 6: The Grand Finale: Insert Test Tubes and Decorate
The final step is the most rewarding: decorating your new vase! Gently place your glass test tubes into the drilled holes. Fill each tube with a small amount of water. Then, head to your garden or local grocery store and pick up a few fresh flowers. Single stems work beautifully in these bud vases, allowing each bloom to be admired individually. Place one flower stem in each tube, and arrange them to your liking. Voila!
Now… How incredibly easy is that?!
The Budget Breakdown: Affordable Elegance
Let’s crunch the numbers and see just how budget-friendly this project truly is:
- $10 for the pack of 10 test tubes
- $4 for the 2×6″ wood board
- Total: A grand total of $14 for supplies!
Yup! That is absolutely my kind of project – high impact, low cost! You truly can’t beat that for a custom, handmade home decor piece. And remember, with the extra wood, you could even make a second vase or a smaller coordinating piece.
Want to see what I made with the extra test tube? I’ll be sharing that exciting project with you very soon! 😉
A Gallery of Inspiration: More Views of Your New Vase
For now, feast your eyes on a few more pictures of the finished Test Tube Bud Vase, showcasing its versatility and charm!
Creative Variations and Customization Ideas
The beauty of DIY is making it truly your own! While I love the rustic stained look, here are some ideas to customize your test tube bud vase:
- Paint it! Instead of stain, paint your wood base a vibrant color to match your decor, or a classic white for a modern farmhouse feel. Chalk paint works wonders for a distressed, matte finish.
- Vary the Wood: Use reclaimed wood for an even more authentic rustic vibe, or a smoother, polished wood for a more contemporary look.
- Different Sizes: Create a series of vases in varying lengths or with different numbers of test tubes for a dynamic display.
- Add Embellishments: Consider stenciling a design, adding small metal accents, or even burning a pattern into the wood for extra flair.
- Seasonal Themes: Decorate your vase with seasonal foliage or holiday-themed artificial flowers to keep your home festive year-round.
Tips for Maintaining Your Beautiful Bud Vase
To keep your DIY Test Tube Bud Vase looking its best for years to come, here are a few simple maintenance tips:
- Cleaning Test Tubes: To keep your test tubes sparkling, simply remove them from the wood base and wash them with warm, soapy water using a narrow bottle brush if needed.
- Wood Care: Avoid prolonged exposure to excessive moisture, especially if the wood isn’t sealed. Wipe up any water spills immediately to prevent staining or damage to the wood finish.
- Changing Flowers: Refresh your blooms regularly for the freshest look. Experiment with different types and colors of flowers to change the mood of your display.
Frequently Asked Questions About Your DIY Test Tube Vase
Q: What if I don’t have a drill?
A: While a drill is highly recommended for this project, you might be able to borrow one from a friend or neighbor. Alternatively, some hardware stores offer tool rental services. If drilling is truly not an option, you could explore creating a similar look with individual smaller vases or bottles arranged on a decorative wooden tray, though the integrated look is harder to achieve without drilling.
Q: Can I use different sized test tubes?
A: Absolutely! The key is to ensure that the spade bit you use for drilling the holes perfectly matches the external diameter of your chosen test tubes for a secure fit.
Q: What kind of flowers work best in test tube vases?
A: Test tube vases are ideal for single stems or small clusters of delicate flowers like roses, carnations, daisies, lavender, or even interesting foliage. Their narrow openings make them perfect for showcasing individual blooms.
Q: How do I clean the test tubes if they get cloudy?
A: For cloudy or stained test tubes, a solution of warm water and a little white vinegar can work wonders. A thin bottle brush can help scrub away any stubborn residue.
Conclusion: Your Next Inspiring Home Accent
I truly hope you love this project as much as I do! It’s a testament to how a simple idea, sparked by observation, can transform into a beautiful, functional, and incredibly affordable piece of home decor. This DIY Test Tube Bud Vase is not just a vase; it’s a statement piece, a conversation starter, and a proud display of your crafting prowess.
Not a fresh flower kind of person? No sweat! Just skip the water and use some high-quality artificial blooms. They’ll look just as charming and require even less maintenance.
I would LOVE to see your creations and hear your thoughts! Please consider sharing this project with your friends and family on Pinterest and other social media platforms. Your support means the world! Thank you so much for stopping by and taking the time to explore this fun and easy DIY. Have a fantastic week, and happy crafting!
~Whitney