
Create Your Own Chic DIY Photo Gallery Wall: Simple & Budget-Friendly
Hey fellow DIY enthusiasts!
I hope you all had a fantastic weekend filled with creativity and relaxation. My last week was quite an adventure, to say the least! With two unexpected visits to the ER for stitches, just five days apart for my adventurous little ones, I’m certainly not vying for “Mom of the Year” awards anytime soon. These unexpected detours made me crave a project that was genuinely simple, quick, and required minimal fuss. Something that could bring a touch of beauty and personalization back into our home without adding any more stress to my plate. And that’s exactly what I decided to tackle this past weekend!
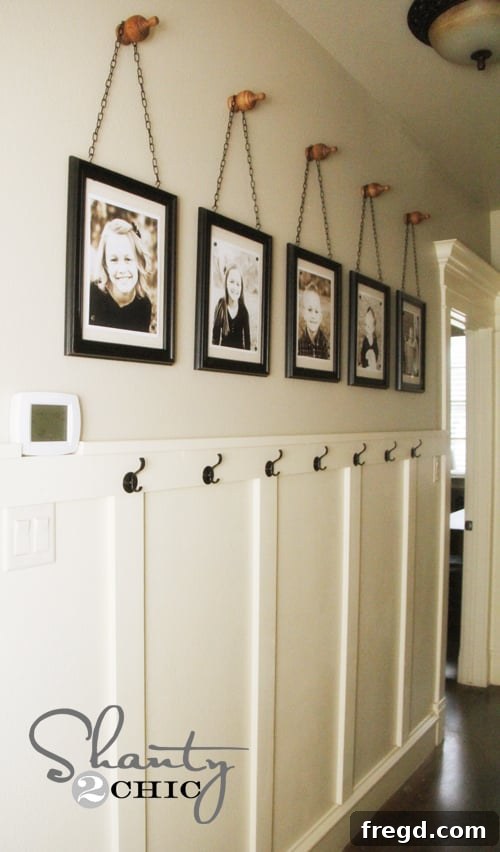
For far too long, I’ve gazed at the expansive, blank canvas above our board and batten wall, knowing it had so much potential. It was an inviting space just waiting to be filled with cherished memories and a touch of our family’s unique charm. Finally, the time came to transform it. I decided to adorn it with the beaming faces of my five favorite little people, crafting a beautiful and personal wall gallery. The result? A stunning, one-of-a-kind display that captures precious moments and adds warmth to our home. Here’s a peek at how these charming wall gallery frames turned out!
Why a DIY Photo Gallery Wall?
A photo gallery wall is more than just a collection of pictures; it’s a visual narrative of your life, a testament to cherished moments, and a vibrant reflection of your personality. It serves as an instant conversation starter and a constant source of joy, turning a sterile wall into a heartwarming display. Beyond its aesthetic appeal, a DIY photo gallery offers incredible benefits. It’s an incredibly budget-friendly way to decorate a large space, allowing you to showcase multiple photos without breaking the bank. Furthermore, it offers unparalleled flexibility – you can easily update photos as your family grows, swap out seasonal images, or refresh the entire look whenever inspiration strikes. This project, in particular, champions simplicity, requiring no complex power tools, making it accessible for even the most novice crafter. Just grab your trusty hot glue gun, and let’s get started on creating something truly special!
Materials You’ll Need:
- 5 Photo Frames (or as many as you need, any size/style)
- Hot Glue Gun and Glue Sticks
- Cup Hooks (2 per frame)
- Spray Paint (optional, to match hooks to chain)
- Decorative Chain (enough for 42 links per frame, plus extra)
- Cutting Pliers (for chain)
- Unfinished Wood Finials (one per frame, or alternative hooks/drapery finials)
- Wood Stain or Paint (for finials)
- Photos (printed copies are recommended)
- Decorative Tacks (one for each corner of each photo)
- Wall Anchors (optional, if frames are heavy or wall integrity is a concern)
Step-by-Step Guide to Crafting Your Finial Wall Gallery:
1. Selecting and Preparing Your Frames
The foundation of this charming gallery lies in your choice of frames. I started with five simple frames I discovered at Walmart, priced at an affordable $5 each. Their clean lines and basic design were perfect for this project, offering a versatile base that could be easily customized. Don’t feel limited by high-end options; dollar stores often have fantastic, inexpensive frames that work just as well, especially when you’re going to personalize them. Once you have your frames, carefully remove the backing and the glass. For this particular display, we want an open, airy frame, so the glass isn’t necessary. This also significantly lightens the overall weight of each display, making hanging much simpler.
2. Reassembling the Frame Backing
With the glass removed, it’s time to secure the frame’s backing. While it might seem counter-intuitive to put the backing back in an “open” frame, this creates a sturdy structure for mounting your photos later. Take the original backing pieces and gently slide them back into the frame. Using your hot glue gun, apply a bead of glue along the edges of the backing and press it firmly into place. Hot glue provides a quick and secure bond, ensuring the backing remains stable. If you prefer an alternative, Gorilla tape is another excellent choice, offering robust adhesion to hold everything in place. The goal here is to create a solid, stable frame structure without the need for the original clips or hardware that held the glass.
3. Adding Hanging Hooks to Your Frames
To elegantly suspend each frame, we’ll be using simple cup hooks. These small, curved hooks are perfect for holding the decorative chain. Before attaching them, consider spray painting them to match the color of your chosen chain, or any other accent color in your room. I opted for black to create a cohesive look with my chain. Once dry, carefully screw two cup hooks into the top edge of each frame. Position them approximately 2 inches in from each side. This spacing ensures the frame hangs evenly and provides a balanced point for the chain. Make sure they are screwed in securely, as they will bear the weight of the frame and photo.
4. Preparing Your Decorative Chains
The decorative chain is a key element that gives this gallery its unique, rustic-chic appeal. I found a suitable chain at Lowe’s for around $7, offering great value for the amount needed. For my project, each frame required a chain approximately 42 links long. This length will vary depending on your desired hanging height and the size of your frames. To ensure clean, precise cuts, use a pair of cutting pliers to separate the links. Measure carefully and cut all your chains to the exact same length for a uniform look across your gallery. Once cut, simply attach one end of each chain to the cup hooks you just installed on the frames.
5. The Charming Touch: Finials for Hanging
My absolute favorite detail in this project is the use of finials for hanging. These decorative wooden pieces add a sophisticated and finished look to the entire display. I sourced unfinished finials from Lowe’s. While they used to carry a wider variety, the single style currently available still worked perfectly for my needs. To match my rustic aesthetic, I stained mine using Rust-Oleum Wood Stain in the “Early American” shade, which gives them a beautiful, warm finish. The beauty of these finials is their versatility. You can also use decorative hooks or drapery finials for a similar charming effect. Since my frames are quite lightweight, I simply screwed the finials directly into the wall, spacing them approximately 16 inches apart for a balanced arrangement. If you’re working with heavier frames or have concerns about the structural integrity of your wall, it’s always best to install wall anchors first and then screw the finials into those for added security. It’s an easy step that provides peace of mind!
6. Printing Your Cherished Photos
For all my DIY projects, I typically prefer to print my pictures right from home. It offers unparalleled convenience and speed, perfect for a spontaneous crafter like me! You have full control over the size, cropping, and paper finish, allowing for perfect customization. However, if home printing isn’t an option or you need larger prints, many retailers like Walmart offer excellent prices on 1-hour photo developing services, which are incredibly handy. When printing, consider using good quality photo paper. This will ensure your memories look vibrant and last longer. Since we’ll be using tacks to attach the photos, which will create small holes, I highly recommend using inexpensive prints or copies of your cherished photographs rather than original, irreplaceable ones. This way, you can easily swap them out without worrying about damaging precious originals.
7. Attaching Photos with Decorative Tacks
I wanted a method to attach my photos that was not only visually appealing but also allowed for easy changes whenever I desired. Decorative tacks proved to be the perfect solution! I found a beautiful selection at Hobby Lobby, but your local hardware store is also a great place to check for unique styles. To attach each photo, simply push a decorative tack into each of the four corners of the picture, securing it firmly against the frame’s backing. The small, decorative heads of the tacks add a charming, vintage-inspired touch that enhances the overall aesthetic. While the tack might protrude slightly on the back of the frame, this isn’t visible once hung, so I chose to overlook it. As mentioned before, this method will create small holes in your photos, which is why using inexpensive prints or copies is highly encouraged. This ensures you can refresh your gallery wall with new memories without any hesitation or regret.
Design Tips for Your Perfect Gallery Wall:
Creating a cohesive and eye-catching gallery wall involves a bit of planning. Before hanging, lay out your frames on the floor to experiment with different arrangements and spacing. Consider the overall balance and how the varying heights of the chains will look. For a clean, uniform display, ensure consistent spacing between each finial on the wall. You can also incorporate other small decorative elements, like a tiny wreath or a painted initial, to break up the photo pattern and add more visual interest. Don’t be afraid to mix and match photo orientations (portrait and landscape) to add dynamic flair. The beauty of this DIY project is its adaptability – let your creativity guide you!
The Final Reveal: Simple, Chic, and So You!
And there you have it! A wall gallery that is not only simple to create and incredibly cheap but also undeniably chic and utterly personal. It breathes life into an otherwise blank space, turning it into a beautiful display of family and memories. This project is a testament to how accessible and rewarding DIY home decor can be, even when life throws a few curveballs.
What do you think of this charming, chain-hung photo gallery?
I truly hope you love this project as much as I do! It’s a wonderful way to bring personal touches into your home without a huge investment of time or money.
If you’re feeling inspired, I would absolutely love for you to share these frames and PIN them below for others to discover!
Thanks so much for stopping by and sharing a bit of your day with me. I’m off now, hopefully not headed to the ER… again! 😉 Wishing you all a beautiful and accident-free week ahead!
~Whitney