
Craft Your Own Pottery Barn Inspired Photo Carousel for Under $10
There’s a unique satisfaction that comes with creating beautiful home decor, especially when it’s a stunning replica of a high-end designer piece without the hefty price tag. We’ve all admired the rustic charm and sophisticated simplicity of Pottery Barn items, but their price points often place them out of reach for budget-conscious decorators. What if you could capture that same aesthetic for a fraction of the cost, with a project that’s not only incredibly rewarding but also surprisingly simple? This guide will walk you through crafting your very own Pottery Barn-inspired Old Fashioned Photo Carousel, a project so affordable and quick, you’ll want to make one for every room and everyone you know!
I recently fell in love with a gorgeous Pottery Barn Photo Carousel my mom acquired. Its vintage appeal and the elegant way it displayed cherished memories instantly captivated me. However, the thought of purchasing one for myself was, frankly, not an option due to the expense. That’s when my DIY instincts kicked in! I knew I could replicate its charm and functionality without breaking the bank. The result? A stunning photo carousel that cost me less than $10 and took mere minutes to assemble. Get ready to transform your space and showcase your favorite photos, greeting cards, or even important memos with this ingenious and inexpensive DIY.
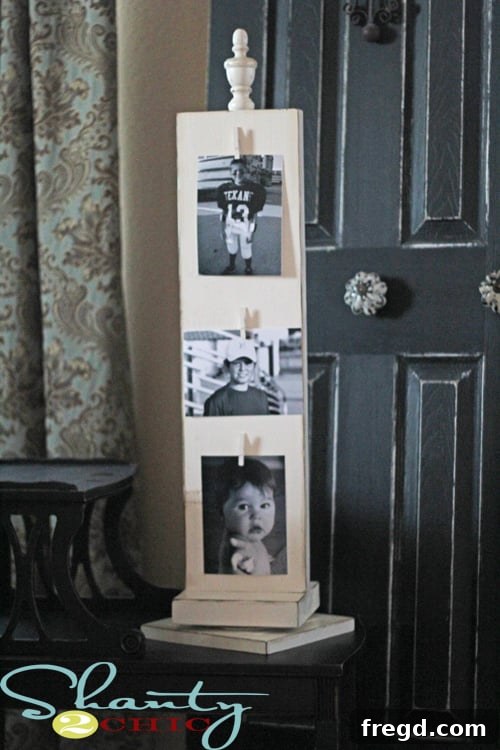
My version, built for less than $10, captures the essence of the Pottery Barn classic, offering both style and functionality without the premium price tag. It’s a testament to the power of creative DIY and smart material sourcing.
You might be surprised to learn that this sophisticated-looking photo display can be built in about 30 minutes, not including drying time for paint and glue. This makes it an ideal project for a weekend afternoon or even a quick evening craft session. Let’s dive into how you can construct this charming photo and greeting card carousel with ease.
Materials You’ll Need for Your DIY Photo Carousel
One of the best aspects of this project is its affordability and the readily available materials. Most items can be found at your local hardware store, craft store, or even repurposed from existing scrap wood. Here’s a comprehensive list of what you’ll need:
- Wood:
- One 8-foot 2×8 piece of lumber (often available for under $5-$8).
- A scrap piece of wood, approximately 9 inches by 9 inches (can be plywood, MDF, or another piece of 2×8).
- Hardware:
- One Lazy Susan swivel hardware (typically found for under $5 at hardware stores like Home Depot, often in the lock or specialty hardware aisle).
- Two decorative finials (Lowe’s or similar stores often sell these in pairs for around $3-$5).
- Adhesives:
- Gorilla Glue Epoxy (a strong, fast-setting adhesive crucial for bonding the wood and hardware).
- Hot glue gun and glue sticks (for attaching clothespins quickly).
- Display Elements:
- Miniature clothespins (a bag of these can be found for $1.50-$3 at craft stores like Hobby Lobby, especially with a coupon). You’ll need enough for both sides of your carousel, typically 6-12 pins.
- Finishing Supplies:
- Spray paint (your favorite cream, off-white, or color of choice).
- 3M sanding block or fine-grit sandpaper (for distressing).
- Minwax Dark Walnut stain (or a similar wood stain for an antiqued finish).
- Soft cloths or rags for applying and wiping stain.
- Tools:
- Saw (miter saw, circular saw, or hand saw for cutting wood).
- Drill with a suitable drill bit for pre-drilling holes for the finial.
- Measuring tape and pencil.
Step-by-Step Guide to Building Your Photo Carousel
Follow these easy steps to construct your beautiful, budget-friendly photo and greeting card carousel. The key to success lies in careful measurement and allowing adequate drying time for the adhesives.
Step 1: Preparing Your Wood Pieces
Start by taking your 8-foot 2×8 piece of lumber. Using a saw, cut it into two distinct pieces. The first piece should be 28 inches long, which will serve as the central vertical post of your carousel. The second piece should be 7 1/4 inches long, forming the smaller, rotating base. For the very bottom, stationary base, cut your scrap piece of wood into a 9-inch by 9-inch square. If you don’t have a specific scrap piece, you can cut another section from your 2×8, though a wider piece provides more stability.
Step 2: Installing the Lazy Susan Hardware
The Lazy Susan hardware is the magic component that allows your carousel to spin effortlessly. I purchased mine at Home Depot for under $5, finding it unexpectedly in the lock aisle – so keep an eye out! Instead of screws, which can sometimes split wood or be tricky to align perfectly, I opted for a more secure and aesthetically pleasing method: Gorilla Glue Epoxy. Mix the epoxy according to the package directions, then apply it generously to one side of the Lazy Susan mechanism. Carefully center the hardware between your two base pieces – the 7 1/4-inch square (which will be the rotating top base) and the 9-inch by 9-inch square (the stationary bottom base). Press firmly and ensure it’s perfectly centered for smooth rotation. Let the epoxy cure completely according to the manufacturer’s instructions. This usually takes a few hours.
Step 3: Attaching the Vertical Post
Once the Lazy Susan epoxy is fully dry and secure, it’s time to attach the main vertical post. Take your 28-inch piece of wood and apply a liberal amount of Gorilla Glue Epoxy to one end. Carefully center this end on top of the smaller, rotating base (the 7 1/4-inch piece). Ensure it is standing perfectly upright and centered to maintain balance and proper rotation. Hold it in place for a few minutes or use clamps if you have them, then allow the epoxy to dry and cure completely. This bond is crucial for the stability of your entire carousel.
Step 4: Adding the Photo Clips
While waiting for the epoxy to dry, you can begin preparing your photo display elements. Grab your mini clothespins. Using a hot glue gun, carefully attach three clothespins to each side of the 28-inch vertical post. You can space them evenly or arrange them in a staggered pattern, depending on your preference and the size of the photos or cards you plan to display. Hot glue provides a quick and strong bond, allowing you to move to the next step without a long wait. These pins will be what holds your precious memories and messages.
Step 5: Securing the Finial
For the final structural step, you’ll add a decorative finial to the top of your carousel. Finials add a touch of elegance and complete the “old fashioned” look. I purchased two finials at Lowe’s for just $3. Using a drill, pre-drill a small hole directly in the center of the top of the 28-inch piece. This prevents the wood from splitting when you screw in the finial. Then, carefully screw the finial into the pre-drilled hole until it’s snug. You might also choose to glue it for extra security.
Finishing Touches: The Art of Aging Your Carousel
Once the construction is complete and all adhesives are thoroughly dried, it’s time to give your photo carousel its signature Pottery Barn look with paint and stain. This step is where the magic truly happens, transforming simple wood into a weathered, vintage-inspired masterpiece.
First, spray paint the entire carousel with your favorite cream-colored spray paint. Apply multiple light coats for even coverage, allowing each coat to dry completely before applying the next. A cream or off-white hue provides a classic, warm base that perfectly complements the distressed aesthetic. Once the paint is dry, take your 3M sanding block or fine-grit sandpaper and gently distress the edges and raised surfaces of the carousel. Focus on areas that would naturally show wear and tear, such as corners, edges of the bases, and the sides of the vertical post. This technique reveals glimpses of the raw wood underneath, adding character and an authentically aged appearance.
Finally, apply a light coat of Minwax Dark Walnut stain. You can apply it with a brush or a rag, then immediately wipe off the excess. The stain will settle into the distressed areas and wood grain, creating a beautiful antique patina and enhancing the contrast. This two-step finishing process—painting, then distressing and staining—is key to achieving that coveted shabby chic or farmhouse look so popular in high-end home decor. Let the stain dry completely according to the manufacturer’s instructions, ensuring no residue remains before adding photos.
Showcasing Your Memories
With your carousel beautifully finished, it’s time for the best part: adding your personal touch! I filled mine with a selection of recent black and white pictures, which really popped against the distressed cream finish. The beauty of this design is its versatility. Thanks to the Lazy Susan hardware, it swivels smoothly, allowing you to easily view photos on all sides. It’s not just a static display; it’s an interactive piece of art that invites engagement and storytelling.
I absolutely adore how it swivels to show off both sides, making it a dynamic centerpiece for any table or shelf!
Creative Uses and Gift Ideas
The beauty of this project isn’t just in its low cost and ease of construction; it’s also in its incredible versatility. With plenty of leftover wood and supplies from my initial purchase, I immediately set out to make a second carousel as a gift. My friend’s daughter was turning 14, and I knew a personalized, handmade gift would be perfect. For her teenage spin, I opted for a black spray paint base, then mod podged a vibrant scrap-book paper onto the small base to add a pop of personality. After distressing it all over, I hot glued a small rhinestone onto each clothespin for a touch of glam and sparkle. Currently, my own photos are on display, but I can’t wait for her to fill it with her cherished memories!
This project makes for phenomenal gifts, especially with the upcoming holiday season. Imagine presenting a beautifully customized photo carousel to a loved one, filled with special memories! It’s also perfect as a Christmas card display, holding cherished holiday greetings. Teachers would adore one as a memo holder for their desks, and it could even be a stylish recipe card holder in the kitchen. For approximately $10, I was able to make one for myself and one as a heartfelt gift, with supplies still remaining for another project. That’s what we call a DIY win!
Why You Should Try This DIY Project
In a world where mass-produced items often lack soul, crafting your own home decor brings a unique warmth and personality to your space. This Pottery Barn-inspired photo carousel is more than just a place to display pictures; it’s a conversation piece, a rotating gallery of your life’s precious moments, and a testament to your creativity. It’s incredibly cost-effective, quick to build, and offers endless possibilities for personalization. Whether you’re looking to enhance your own home, create meaningful gifts, or simply enjoy a fun and rewarding craft project, this DIY photo carousel is an absolute must-try.
Thank you so much for joining me on this DIY adventure! I hope you feel inspired to create your own beautiful, budget-friendly photo carousel. Don’t forget to share your creations and experiences!
~Ashley