
DIY Hanging Bathroom Shelf: Stylish Storage and Smart Solutions for Small Spaces
Hey fellow DIY enthusiasts!
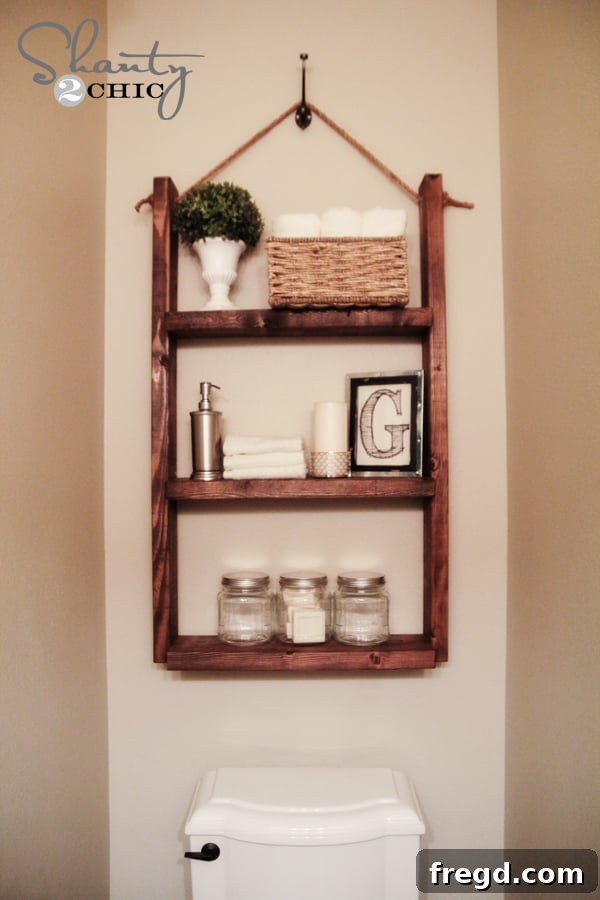
I hope you all had a truly amazing weekend, perhaps even diving into a project of your own. For those of you who follow us on Instagram, you might have already caught a sneak peek of my latest creation – this absolutely charming and incredibly functional hanging bathroom shelf! It’s a project my little guy and I teamed up on, and it has already transformed a forgotten corner of my powder bath into a stylish and practical storage area.
Discover the Perfect Storage Solution for Your Small Bathroom
Doesn’t that just look fantastic? I’ve been grappling with the challenge of that perpetually blank wall above the toilet in my very small powder bath for quite some time. The lack of adequate storage in compact bathrooms is a common dilemma, leading to cluttered countertops and overlooked vertical space. My initial thought process led me down the path of designing elaborate built-in shelves, which, while beautiful, can be quite complex and permanent.
However, I quickly pivoted. My goal became to create a practical, stylish, and easily replicable storage solution that wouldn’t be tied to a single, fixed location. I envisioned something that anyone could effortlessly hang on their wall, offering the flexibility to move it to any room in their home as needed. This shift in vision resulted in the hanging bathroom shelf you see today – a truly versatile piece of home decor. So, for all the renters out there who are constantly seeking clever, non-permanent ways to maximize their living spaces, this project is especially for you! Woohoo!
Why a Hanging Shelf is Your Go-To DIY Project
Choosing a hanging shelf over traditional wall-mounted or built-in options offers a plethora of advantages, particularly for those with limited space or a desire for flexibility. Firstly, its installation is remarkably straightforward, typically requiring just one well-anchored hook rather than multiple wall penetrations. This means less damage to walls and greater ease if you ever decide to reposition your shelf or move. For renters, this aspect is a game-changer, allowing for personalization and functionality without breaching lease agreements.
Beyond practicality, a hanging shelf brings a unique aesthetic appeal. It introduces an element of visual interest and texture, especially when crafted from beautiful wood and paired with natural ropes. The open design prevents the space from feeling heavy or cramped, promoting an airy and uncluttered atmosphere crucial in smaller rooms. It serves as a focal point, drawing the eye upward and making the room feel larger. Furthermore, the ability to select your own wood, rope, and finish allows for unparalleled customization, ensuring the shelf perfectly complements your existing decor style, whether it’s farmhouse, modern, rustic, or bohemian.
Let’s Get Started: Your Step-by-Step Tutorial
Embarking on this DIY journey is simpler than you might imagine, and the reward is a beautiful, handcrafted piece that you can proudly say you made yourself. To guide you through every stage, Ash and I have also teamed up with our friends at Ryobi Tools to bring you this comprehensive how-to video on assembling the hanging shelf. This video is an invaluable resource, demonstrating critical steps and offering alternative assembly methods, especially useful if you don’t own a Kreg Jig. Visual learners will find it particularly helpful for understanding the nuances of the construction process. Let’s gather our materials and tools, and transform some basic lumber into a stunning home accent!
Essential Tools and Materials List
Before you begin any cutting or assembly, it’s crucial to have all your tools and materials ready. This prevents interruptions and ensures a smooth, enjoyable building experience. We’ve broken down everything you’ll need for this sturdy and stylish hanging shelf:
Supply List:
- Lumber:
- 1 – 2x4x8 whitewood or pine board (These will serve as your sturdy vertical supports.)
- 1 – 2x6x8 whitewood or pine board (These will become your beautiful, spacious shelves.)
(Pine and whitewood are excellent choices for beginners due to their affordability and ease of cutting/sanding. They also take stain and paint beautifully.)
- Hardware & Adhesives:
- Kreg Jig (optional, but highly recommended for creating strong, concealed pocket-hole joints for a cleaner finish.)
- Wood screws (Choose screws appropriate for your wood thickness. Typically 1 1/2″ to 2″ coarse-thread pocket hole screws if using a Kreg Jig, or equivalent wood screws if not.)
- Gorilla Wood Glue (or any other high-quality wood adhesive. Glue provides incredible strength to your joints, making the shelf very durable.)
- Hanging Components:
- Sisal Rope (or jute, cotton, or even a synthetic rope depending on your desired look and strength requirements) from your local hardware store. The natural fibers of sisal or jute lend a beautiful rustic touch.
- A cute hook (seriously, this is not optional! The right hook adds so much character and finishes the look perfectly. Choose one that matches your home’s aesthetic and is strong enough to support the shelf and its contents.)
- Tools:
- Miter Saw (or a circular saw with a guide, a jigsaw, or even a hand saw for careful cuts. A miter saw offers the most precision.)
- Drill/Driver (for drilling pocket holes if using a Kreg Jig, and for driving screws.)
- Measuring Tape
- Pencil
- Safety Glasses (always protect your eyes!)
- Clamps (essential for holding pieces securely during assembly.)
- Sanding Blocks or Electric Sander (for a smooth, splinter-free finish.)
Step-by-Step Construction: Build Your Dream Shelf
Step 1: Precision Cuts for a Perfect Fit
Your first and most critical step is making accurate cuts. The success of your entire project hinges on the precision of these initial cuts, ensuring that all components fit together seamlessly. For this project, I rely on my Ryobi 10″ Sliding Compound Miter Saw. It’s a fantastic tool that delivers clean, precise cuts every time and is one we frequently get asked about because of its reliability and ease of use. If you’re new to using a miter saw, don’t worry – we’ve also put together a quick how-to video on it HERE to help you get comfortable. Alternatively, if you don’t own a saw or prefer not to use one, most local hardware stores are happy to cut your boards for you; simply provide them with the following detailed cut list.
Your Detailed Cut List:
- From the 2×4 board:
- 2 pieces at 40″ long (These will form the vertical sides of your shelf structure.)
- From the 2×6 board:
- 3 pieces at 21″ long (These will be your three sturdy shelves.)
Pro Tip: Always measure twice and cut once! It’s a fundamental rule in woodworking that saves time, material, and frustration. Use a reliable tape measure and make clear pencil marks.
Step 2: Assembling the Shelf Structure
Now that all your pieces are perfectly cut, it’s time for assembly! This is where your chosen joinery method comes into play. If you’re using a Kreg Jig, you’ll love how it creates strong, hidden pocket-hole joints, giving your shelf a clean, professional appearance. If you don’t have a Kreg Jig, fear not! The video tutorial mentioned earlier beautifully demonstrates alternative methods, such as using screws directly through the outside of the 2×4 vertical supports into the ends of the 2×6 shelves. While the screws will be visible, this method is still robust and effective.
For Kreg Jig Users:
- Set your Kreg Jig to the appropriate depth for your 2×6 boards (typically 1 1/2 inches for standard 2x lumber).
- Drill two pocket holes on each end of your three 21-inch long 2×6 shelf pieces.
- Apply a thin, even bead of Gorilla Wood Glue along the ends of each 2×6 shelf piece where it will butt against the 2×4 vertical supports.
- Carefully position your shelves between the two 40-inch long 2×4 vertical supports. Consider your desired spacing; a common and aesthetically pleasing arrangement often features the bottom shelf about 10-12 inches from the bottom of the 2x4s, and subsequent shelves spaced similarly above. Use a tape measure and pencil to mark the exact locations on your 2x4s for precise alignment.
- Using Kreg Jig screws, firmly secure the 2×6 shelves to the 2×4 supports. Before fully tightening, use a speed square or level to ensure each shelf is perfectly horizontal. Promptly wipe away any excess wood glue with a damp cloth to avoid dried residue that can interfere with finishing.
General Assembly Tips (for both Kreg Jig and alternative methods):
- Clamps are Your Best Friend: Utilize wood clamps to hold your pieces together firmly while drilling and driving screws. This prevents shifting and ensures accurate alignment.
- Check for Square: Periodically use a carpenter’s square to ensure all corners are at perfect 90-degree angles. This is crucial for a stable and visually appealing shelf.
- Work on a Flat Surface: Assemble your shelf on a clean, flat workbench or floor to prevent any warping or unevenness in the final structure.
Step 3: Preparing for Hanging with Sisal Rope
Once your shelf structure is fully assembled and the wood glue has had ample time to dry (refer to the glue manufacturer’s recommendations, typically 24 hours for full cure), it’s time to prepare it for its grand debut on your wall. This involves attaching the sisal rope, which gives the shelf its distinctive hanging characteristic.
- Drill Rope Holes: On the top edge of your uppermost shelf, measure and mark two points inward from each of the 2×4 vertical supports, typically about 1 to 2 inches. These will be the points where your rope passes through. Using a drill bit slightly larger than the diameter of your chosen sisal rope, carefully drill a hole at each marked point. Ensure these holes are clean and smooth to prevent the rope from fraying prematurely.
- Cut Rope Lengths: Measure and cut two equal lengths of sisal rope. The exact length will depend on how low you wish your shelf to hang from the hook, plus extra for knotting. A good starting estimate is usually around 4 to 5 feet per rope, which you can trim to perfection later.
- Thread and Knot: Thread one end of each rope down through its respective hole on the top shelf. Once the rope is pulled through, tie a large, secure knot underneath the top shelf (an overhand knot or a figure-eight knot works well) to prevent the rope from pulling back up. You can optionally fray the ends of the rope below the knot for a rustic look or apply a dab of strong adhesive to prevent unraveling.
- Form the Hanging Loop: Bring the two ropes together above the shelf. Carefully lift the shelf to ensure it hangs level. If one side is lower than the other, adjust the rope length by re-tying the knot underneath that side. Once satisfied with the level, tie a single, large, strong knot where the two ropes meet at the desired hanging point, forming a loop. This loop will be what you hang over your decorative hook.
Step 4: Finishing Touches and Final Installation
With the structure complete and the rope attached, it’s time to add the personal flair and get your shelf up on the wall!
- Sanding for Smoothness: Thoroughly sand all surfaces of your shelf. Start with a medium-grit sandpaper (e.g., 120-grit) to smooth out any rough patches, splinters, or imperfections from cutting. Then, move to a finer-grit sandpaper (e.g., 220-grit) for a silky-smooth finish that’s pleasant to touch and ready for your chosen finish.
- Choosing Your Finish: This is where your shelf truly comes to life and reflects your personal style.
- Stain: For a classic, warm, or rustic look, apply a wood stain. Follow the product instructions carefully regarding application, dwell time, and wiping off excess. Consider a color that complements your bathroom’s existing palette.
- Paint: A fresh coat of paint can give your shelf a modern, farmhouse, or crisp clean look. If painting pine, a good primer is highly recommended to prevent knots from bleeding through. Apply two thin coats of your chosen paint for the best coverage and durability.
- Protective Sealant: Given that this shelf is destined for a bathroom, it’s crucial to protect the wood from moisture. After staining or painting (or even if you choose to leave the wood natural), apply several coats of a protective sealant like polyurethane (water-based for easy cleanup) or a clear wax. This will guard against humidity, splashes, and general wear and tear, ensuring your shelf looks great for years to come.
- Install the Decorative Hook: Select a decorative hook that is not only “cute” but, more importantly, sturdy enough to safely support the weight of your finished shelf and whatever items you plan to display on it. Install the hook into a wall stud if at all possible for maximum stability. If a stud isn’t conveniently located, use a heavy-duty wall anchor (like a toggle bolt or self-drilling anchor) rated for the combined weight. Ensure the hook is perfectly level and at the desired height before tightening.
- Hang and Decorate: Carefully lift your beautifully finished shelf and gently place the rope loop over your installed hook. Adjust it as needed to ensure it hangs perfectly straight and level. Now comes the most satisfying part – decorating! Fill your new hanging shelf with your favorite bathroom essentials, such as neatly rolled towels, small potted plants, decorative jars, candles, or other charming accents. Revel in the added storage and the gorgeous new focal point you’ve created in your room!
Customization Ideas to Make Your Shelf Uniquely Yours
The beauty of DIY lies in the ability to personalize every aspect. This hanging bathroom shelf offers incredible versatility for customization:
- Wood Species: While pine is a great, economical choice, consider other wood types like oak, maple, or even reclaimed barn wood for a different grain pattern, color, and inherent character. Each wood offers a unique aesthetic and level of durability.
- Rope Variations: Beyond sisal, explore other rope materials. Jute rope provides a similar rustic charm, while cotton rope can offer a softer, more coastal or bohemian vibe. Synthetic ropes like braided nylon could lend a more modern or industrial edge. You can also experiment with different rope thicknesses or even braid multiple thinner ropes together.
- Finish Techniques: Don’t limit yourself to just stain or paint. Consider techniques like whitewashing for a distressed farmhouse look, dry-brushing for texture, or even applying a liming wax for a soft, aged appearance. For a truly unique touch, you could stencil a design or quote onto the back of the shelves.
- Shelf Spacing: Adjust the spacing of your shelves during assembly to better accommodate the specific items you plan to store. Taller bottles, folded towels, or shorter decorative items might dictate different intervals.
- Add a Towel Bar: For even more functionality in a bathroom, consider adding a small dowel rod or a thin metal bar beneath the bottom shelf to serve as a mini towel bar for hand towels.
- Corner Brackets: If you want to reinforce the shelf’s connection to the vertical supports or simply add a decorative, industrial element, small metal corner brackets can be added underneath the shelves.
Final Thoughts on Your DIY Hanging Shelf Journey
Completing this DIY hanging bathroom shelf project is incredibly rewarding. It’s more than just building a piece of furniture; it’s about transforming a space, solving a storage problem creatively, and adding a touch of personalized charm to your home. The satisfaction of crafting something beautiful and functional with your own hands is truly unparalleled, and this project is perfectly suited for DIYers of all skill levels.
Whether you’re looking to declutter a small bathroom, add character to an empty wall, or simply enjoy the process of making, this hanging shelf tutorial provides all the guidance you need. We truly hope this detailed guide inspires you to pick up your tools and create a stunning and practical piece for your home. Don’t forget to share your finished projects with us on Instagram – we absolutely love seeing your creativity come to life!
Happy building!
This post may contain affiliate links.