
Hello, fellow DIY enthusiasts! Happy Friday! To ensure you never miss out on our latest projects and inspirations, be sure toFOLLOW us on Instagram andPinterest!
Crafting the Perfect DIY Nightstand with Hidden Storage
Exciting transformations are currently underway at my home! My eldest daughter is approaching her tenth birthday, and we’re celebrating this milestone by closing off an upstairs space to create a brand-new, private bedroom just for her. I’m incredibly excited about the potential of this area and can’t wait to share the progress with you all next week. Simultaneously, I’ve also been dedicating time to my youngest daughter’s room. You might recall the bed I custom-built for her a few weeks ago. Well, I’ve just put the finishing touches on the matching nightstands, and the results have truly exceeded my expectations. They turned out absolutely adorable!
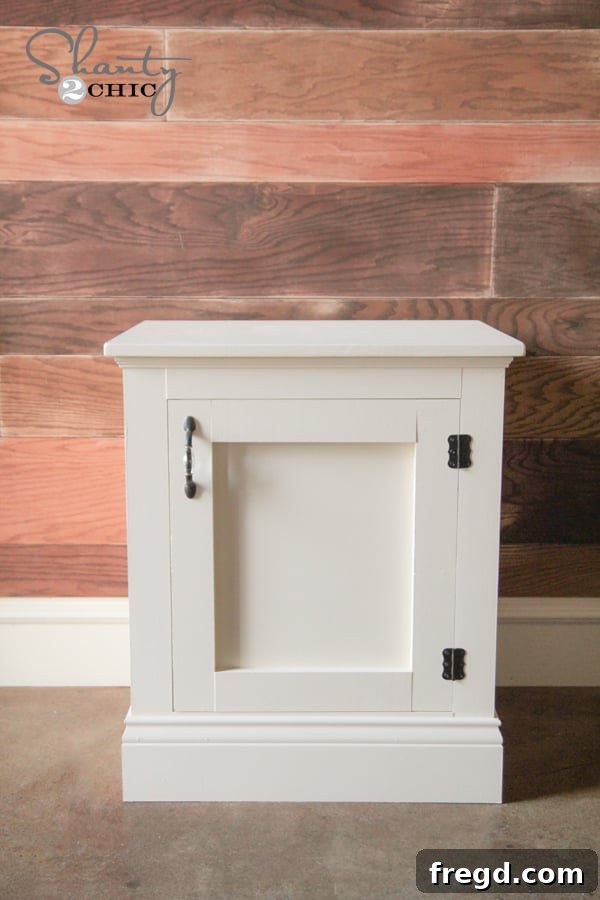
Oh, how I adore these! I crafted two of these stunning nightstands for her room. While her space is still undergoing its grand makeover, I couldn’t resist giving you a sneak peek right here against my DIY plank wall. These custom pieces are not just furniture; they’re a testament to the joy of building and personalizing your home.
Inspiration and Design: A Girly Take on Hidden Storage
For the design of these exquisite nightstands, I had the pleasure of collaborating with my immensely talented friend, Ana White. I shared with her how much I cherished the DIY nightstands I had built for my son previously, and we both agreed it was time to create a “girly” version, incorporating all the charm and functionality a girl’s room deserves. The defining feature of these nightstands, and arguably the best part, is the ingenious hidden storage they offer. It’s perfect for tucking away books, toys, or any bedside essentials, keeping the room tidy and clutter-free. Beyond their beautiful aesthetics and practical storage, these nightstands are surprisingly easy to build. I promise, even if you’re new to DIY, you’ll find this project incredibly rewarding!
As always, you can access and download the complete set of FREE plans directly from Ana’s website. To ensure your building process is as smooth as possible, I’m excited to provide a very detailed tutorial here, guiding you through each step to help you confidently tackle those plans and bring these beautiful nightstands to life.
The Foundation: Selecting Your Materials
Let’s dive into the specifics! For the primary frame of these charming tables, I opted for primed finger joint pine boards, readily available at Home Depot. My intention was always to paint the finished pieces, and these boards are an excellent choice: they are budget-friendly, reliably straight, and come pre-primed in white, which significantly simplifies the painting process later on. Choosing the right wood is crucial for a smooth build and a professional finish, and these boards fit the bill perfectly for painted furniture projects.
Essential Tools for a Seamless Build
Building furniture requires the right tools, and for this project, a few key pieces made all the difference. My absolute favorite tool, and one I highly recommend for any DIYer, is my incredibly efficient Kreg Jig. Specifically, I use the Kreg Jig K5 model. It’s truly worth every extra dollar for its enhanced features and ease of use, allowing for incredibly strong and precise pocket hole joinery. You can easily purchase it on Amazon HERE!
Alongside the Kreg Jig, a reliable drill is indispensable for driving screws. I rely on my robust Ryobi 18V drill. This powerhouse is a game-changer! Its battery system is incredibly convenient, fitting all my other Ryobi 18V ONE+ tools, and it charges in less than 30 minutes, keeping your project moving. Don’t just take my word for it – check out its impressive ratings on Home Depot yourself! I actually own two of these drills; it’s a personal preference that allows me to avoid constantly swapping between my Kreg bit and a driver bit, maximizing efficiency during the build.
Step-by-Step Construction: Bringing Your Nightstand to Life
Let’s get into the exciting part – building! Starting with the smaller pieces that form the frame, I used my Kreg Jig to add 3/4-inch pocket holes. This innovative joinery method creates incredibly strong and hidden connections, ideal for furniture. Precisely drilled pocket holes are key to a stable frame.
Once the pocket holes were ready, I joined all the pieces securely using 1 1/4-inch pocket hole screws. This ensures a robust and lasting connection for the framework of your nightstand.
Constructing the Frames: Skinny and Fat
For each nightstand, you’ll build a total of four frames: two “skinny” frames and two “fat” frames. These will form the structural sides of your table.
The “skinny” frames, which make up the narrower sides, should look like this upon completion:
And the “fat” frames, designed for the wider sections, will take on this appearance:
Assembling the Main Box: Connecting the Frames
With all four frames constructed, the next crucial step is to join them together to form the main body of your nightstand. To achieve a sturdy connection, I added more pocket holes into my skinny frames. This process involves carefully placing the entire frame back into the Kreg Jig, as demonstrated in the photo below.
By doing this, I created three additional pocket holes on each side of the skinny frames, providing ample points for secure attachment.
Next, I meticulously attached the skinny frames to the fat frames, driving screws through these newly added pocket holes. For extra strength and durability, I also applied a generous line of wood glue between the two frames before fastening them. This combination of screws and glue creates an incredibly robust bond.
To further reinforce the structure, particularly in areas where pocket holes weren’t present, I utilized my Ryobi AirStrike nailer. A few brad nails strategically placed down the middle provided additional stability and peace of mind.
This image illustrates how the frames look once they are successfully attached. The arrows clearly indicate the precise locations of the pocket holes used for their secure fastening, highlighting the strength of this joinery method.
I repeated this exact process for my other skinny frame, and soon enough, I had a perfectly formed box that would serve as the main structure of the nightstand. The consistent application of these steps ensures symmetry and stability.
Adding the Sturdy Base and Side Panels
The next crucial step involves attaching the base of the nightstand. For this component, I chose to use MDF (Medium-Density Fiberboard) due to a surplus of material I had on hand. MDF offers a very smooth surface, ideal for painting, and provides excellent stability. I prepared the base by adding 3/4-inch pocket holes around its entire perimeter.
Then, I carefully fitted the base piece inside the bottom of the nightstand frame and secured it firmly using 1 1/4-inch pocket hole screws. This creates a solid and level foundation for the entire structure.
For the panels that form the sides of the table and the door, I used 1/4-inch Purebond hardwood plywood. This particular plywood is an excellent choice because it provides an exceptionally smooth finish when painted, making it ideal for the elegant aesthetic of this nightstand. To attach these panels, I applied a bead of wood glue along each piece and then secured them using my fantastic new Ryobi Airstrike Staple gun. Friends, this tool is truly remarkable! It’s the perfect companion to my nail gun, but instead of nails, it uses staples. This makes it ideal for working with thinner materials like plywood, and it’s also a dream come true for upholstery projects. The precision and power it offers are simply unbeatable.
Once the side panels are securely attached, the exterior of your nightstand will begin to take on its refined appearance, as shown here:
Attaching the Top and Adding Decorative Trim
With the main body and panels in place, it’s time to secure the top of the nightstand. For this, I chose project panels. These panels are wonderfully smooth and take paint exceptionally well, yielding a flawless finish. Plus, they are quite economical! I used my reliable nail gun to attach the top firmly to the frame, ensuring a clean and secure fit.
Now for the details that elevate the piece: trim! First, I added a delicate piece of decorative trim just beneath the top panel. I carefully cut each end of this trim at a precise 45-degree angle to create crisp, clean corners, then secured it with my nail gun. These small details make a big impact on the overall aesthetic.
For the base, I selected a 5 1/4-inch primed base molding, which adds a substantial and elegant finish. I applied wood glue for a strong bond and used my Ryobi nailer to attach it. I began with the front piece, meticulously cutting each end at a 45-degree angle to form perfect mitered corners.
Following the front piece, I added the side pieces of the base molding, also carefully cut at 45-degree angles to create seamless, continuous corners around the base. This attention to detail in the trim work makes a significant difference in the finished look, giving your DIY nightstand a professional and polished appearance.
Building the Door and Internal Shelf
The door, a key element of the hidden storage, is constructed by building a frame from the same primed pine boards used for the main structure. These frames are joined using 1 1/4-inch pocket hole screws through 3/4-inch pocket holes, ensuring a strong and durable door. Once the frame was assembled, I attached a piece of the 1/4-inch hardwood plywood to the back, forming a solid and smooth panel for the door.
To enhance the nightstand’s functionality and maximize the hidden storage, I decided to incorporate an internal shelf. I did this by adding 1×2 pieces to the inside of each table to create the shelf supports. I secured these with both wood glue and nails. It’s important to strategically place your nails only at the front and back where there are existing boards to attach them to, ensuring a strong and concealed attachment.
My final structural step was to attach the back panel, completing the enclosed storage space. Using my trusty stapler, I secured the back panel firmly, readying the nightstand for its finishing touches.
The Art of Finishing: Painting and Hardware
With the construction complete, it was time for the finishing touches that truly bring the nightstands to life. Before painting, I meticulously applied caulk to any open seams, ensuring a smooth and seamless appearance. I also filled all nail holes with painter’s putty, creating a perfectly even surface for the paint. These small steps are essential for achieving a professional, factory-like finish.
For the paint color, I selected Valspar’s “Ivory Lace.” This beautiful shade perfectly complements her existing bed, creating a cohesive and serene look in her room. The choice of paint is paramount in achieving the desired aesthetic and making the custom furniture feel like an integral part of the decor.
To complete the look, I found the most charming pulls at Lowe’s – aren’t they absolutely beautiful? I fell in love with them instantly. The cute hinges, which were incredibly simple to attach, came from Home Depot. The right hardware adds character and functionality, tying the entire design together. These small details are often overlooked but contribute significantly to the overall appeal of a DIY project.
Whew! That was quite the journey, but absolutely worth every step to create these stunning custom pieces for my daughter’s room. From selecting the right wood to adding the final coat of paint and hardware, every detail contributes to a unique and functional nightstand.
Your Turn to Build: Get the Free Plans!
I sincerely hope you love these DIY nightstands as much as I do! They are not just pieces of furniture; they are a testament to what you can achieve with a little effort and the right guidance. Remember, you can easily access the full set of FREE plans over on Ana’s site, making it simple for you to replicate this project in your own home.
Don’t forget to PIN this project and share it with your friends and fellow DIY enthusiasts! Spreading the joy of crafting custom furniture is what it’s all about. If you have any questions at all during your build or about any of the steps, please don’t hesitate to ask in the comments below. I’m always happy to help!
Happy building, and have a fantastic Friday!
Whitney