
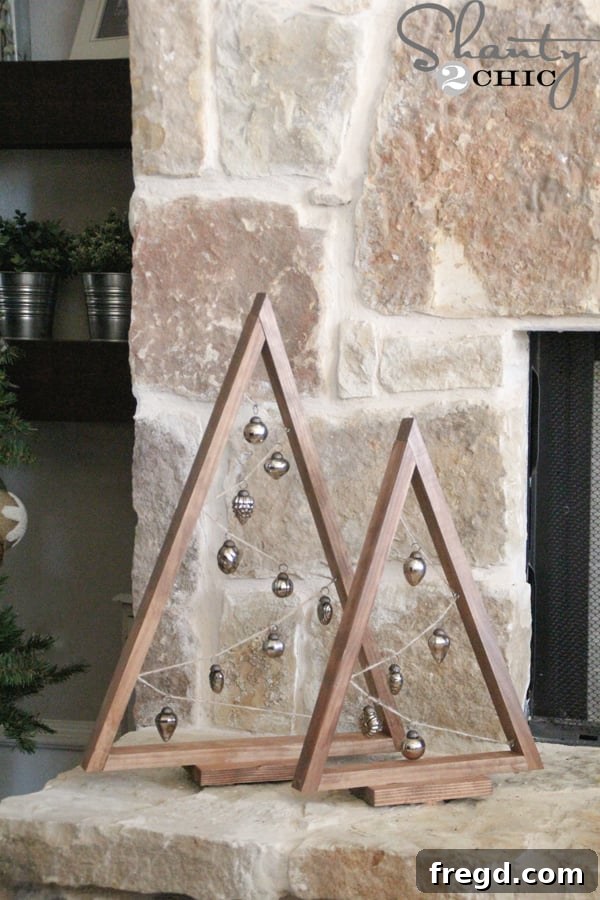
DIY Wooden Ornament Trees: A Charming & Easy Christmas Craft
Welcome back, craft enthusiasts, to Day 4 of our much-loved 12 Days of Christmas series! Today, we’re unwrapping a project that truly shines, a delightful addition to any holiday home: the **DIY Wooden Ornament Tree**. While it’s hard to pick a favorite among all our festive creations, this project consistently ranks at the very top for its sheer charm, simplicity, and budget-friendly appeal.
Imagine these rustic yet elegant wooden trees adorning your mantel, gracing a tabletop, or even serving as unique centerpieces. They’re undeniably adorable, and here’s the best part: I whipped up both of these beauties in roughly an hour, spending a mere $15 on materials! That’s an unbeatable combination for high-impact, low-cost holiday decor.
Ready to add this touch of handmade magic to your holiday setup? I’m going to walk you through every step of crafting these charming wooden ornament trees. To make things even easier, we’ve prepared **Free Printable Plans** for you. These detailed plans will guide you through the precise cuts and measurements needed, ensuring your project is a success. Don’t forget to download them before you begin!
You can access the free plans by clicking HERE or by simply clicking on the image below. Having these plans handy will streamline your building process significantly.
Why You’ll Love Crafting These Wooden Ornament Trees
Beyond their undeniable aesthetic appeal, these DIY wooden ornament trees offer several compelling reasons to become your next favorite holiday project:
- Budget-Friendly: With materials costing around $15 for two trees, this project is incredibly economical, allowing you to create beautiful decor without breaking the bank.
- Quick to Build: From cutting to finishing, the entire process takes approximately one hour, making it perfect for busy individuals or spontaneous crafting sessions.
- Highly Customizable: These trees serve as a blank canvas. You can personalize them with various stains, paints, ornaments, and embellishments to perfectly match your existing holiday theme or create a unique look.
- Rustic Charm: The natural wood finish, especially with a warm stain like Early American, provides a timeless, rustic elegance that complements many decor styles, from farmhouse to traditional.
- Unique Display: Offer an alternative to traditional wreaths and garlands, providing a vertical element that draws the eye and beautifully showcases your favorite small ornaments.
Gather Your Supplies: Tools and Materials
Before diving into the construction, ensure you have all the necessary tools and materials. Having everything prepped will make the building process smooth and enjoyable.
Materials:
- Wood for the tree frames (refer to free plans for specific dimensions, typically 1×2 or 1×3 lumber)
- 1×4 lumber for the bases
- Small eye hooks (quantity as per plan, typically 3-4 per tree side)
- Wood stain (e.g., Varathane Early American) or paint
- Clean cloths for stain application and blending
- Wood glue (Gorilla Super Glue Gel recommended if staining first, otherwise standard wood glue)
- 1-inch nails (for brad nailer or hand nailing)
- Jute twine or decorative string
- Small ornaments or embellishments for decoration
Tools:
- Miter saw (essential for precise angled cuts)
- Drill with a small drill bit (sized for pilot holes for eye hooks)
- Brad nailer (e.g., Airstrike 18-gauge) or a hammer and finishing nails
- Measuring tape
- Pencil
- Safety glasses (always important when working with power tools!)
Step-by-Step Guide: Crafting Your Wooden Ornament Trees
Step 1: Making Your Precision Cuts
The unique “tree” shape of this project comes from carefully angled cuts. This is where your miter saw becomes your best friend. Accuracy here ensures a beautiful, symmetrical outcome.
Begin by setting your miter saw to a **50-degree angle**. Make your initial cuts on one end of each piece of wood that will form the main “branches” of your tree. These angles will define the top points and outward slope of your design, creating the classic A-frame aesthetic.
Next, adjust your miter saw’s arm. You’ll slide the miter arm over to cut **20-degree angles** on the *opposite* ends of the same pieces. These cuts are crucial for creating the inward slope that meets at the bottom of the tree, forming the distinct A-frame structure. Ensure all pieces are cut according to the dimensions provided in the free printable plans to guarantee a perfect fit and consistent tree shape.
Step 2: Drilling Pilot Holes for Eye Hooks
Once your wooden pieces are cut, it’s time to prepare them for hanging ornaments. Drilling pilot holes is a small but important step that prevents wood splitting when you insert the eye hooks and makes the process much easier, especially in thinner lumber.
Using a drill bit slightly smaller than the thread of your eye hooks, carefully drill pilot holes at the specified locations. The exact placement of these holes will determine where your ornaments or jute string will hang, so precision is key for a balanced display. Refer to the image and the detailed measurements below:
Pilot Hole Placement:
- For the Large Tree:
- Left (green) piece: Mark and drill at 3″, 9″, and 18″ from the bottom end.
- Right (red) piece: Mark and drill at 6″, 14″, and 22″ from the bottom end.
- For the Small Tree:
- Left (green) piece: Mark and drill at 2.5″ and 11″ from the bottom end.
- Right (red) piece: Mark and drill at 8″ and 16″ from the bottom end.
These staggered measurements ensure a pleasing, natural-looking display for your ornaments on both the large and small trees, mimicking the organic growth of branches.
Step 3: Preparing the Bases
The final wooden pieces you’ll need are the bases, which will provide crucial stability for your ornament trees. These are typically cut from 1×4 lumber, offering a solid foundation for your festive creations.
Using your miter saw, cut the 1×4 pieces to the lengths specified in the printable plans. These cuts are usually straight (90-degree) crosscuts, making them straightforward to execute. Once cut, all your individual wooden components should be ready for the next stage of finishing and assembly.
Step 4: Staining for a Rustic Finish
Before assembling the pieces, I opted to stain them. This approach proved much easier, allowing for thorough coverage without the challenges of working around assembled joints and tight corners. A rich, warm stain like Varathane Early American enhances the natural beauty of the wood, giving your trees a lovely rustic and timeless appeal that perfectly complements holiday decor.
To apply the stain, use a clean cloth and wipe one coat onto all sides of each wooden piece. Ensure you get into all edges and surfaces. Allow the stain to sit for approximately 5 minutes, giving it time to penetrate the wood fibers. Then, use a separate, clean cloth to blend and wipe off any excess. This method ensures an even finish and prevents the stain from becoming too dark or patchy. If you prefer a painted look or a distressed finish, this is the stage where you would apply your chosen paint color or base coat instead.
Step 5: Assembling the Tree Frames
Now that your wood pieces are beautifully stained (or painted!), it’s time to bring them together to form the distinctive tree structure. While traditional wood glue is often preferred for woodworking projects, since my pieces were already stained, I chose Gorilla Super Glue Gel for its strong bond and quick setting time on finished surfaces. This prevents the need for clamping for extended periods.
Apply a thin, even bead of glue along the angled edges where the pieces will join. Press the pieces firmly together, ensuring the angles align perfectly to create the desired inverted V-shape of the tree. Hold them in place for a moment to allow the glue to set slightly and form an initial bond.
For added strength and durability, I followed up with 1-inch nails using my Airstrike 18-gauge brad nailer. A brad nailer makes this step incredibly fast and leaves minimal evidence of fasteners, resulting in a clean finish. However, if you don’t have a nailer, don’t worry! You can achieve the same strong bond by carefully using a hammer and small finishing nails. Just be sure to pre-drill tiny pilot holes for the finishing nails to prevent splitting, especially if you’re working with thinner wood, and use wood filler if needed to hide the nail heads.
And just like that, your sturdy tree frames are assembled! It’s surprisingly simple and satisfying to see the basic structure take shape so quickly.
Step 6: Attaching the Bases for Stability
With the main tree frames complete, the next crucial step is to attach the 1×4 bases. These bases provide the necessary stability, allowing your ornament trees to stand proudly and securely on any flat surface, preventing them from tipping over.
You’ll attach the bases to the bottom of your assembled tree frames using the exact same method as in Step 5: apply Gorilla Super Glue Gel (or wood glue if using unstained wood and clamps), then secure with 1-inch nails from your brad nailer or finishing nails with a hammer. Ensure the tree frame is centered on the base for optimal balance and aesthetic appeal. This careful alignment makes a big difference in the final look and stability of your finished ornament tree.
Finishing Touches: Jute, Eye Hooks, and Ornaments
Now for the truly fun part – bringing your wooden trees to life with their decorative elements! This stage adds the functionality for hanging ornaments and enhances the rustic charm of the design, making your project truly shine.
Step 7: Installing Eye Hooks and Threading Jute
Start by screwing the eye hooks into the pilot holes you drilled earlier. They should twist in easily by hand; if they’re a bit stiff, you can use a small screwdriver or pliers for leverage, being careful not to strip the threads. Once all the eye hooks are firmly in place, grab your jute twine.
Cut a single, long piece of jute for each tree. The length should be generous enough to thread through all eye hooks on one side and still have enough to tie secure knots at both the top and bottom. It’s always better to cut a little extra and trim later.
Tie one end of the jute securely to the lowest eye hook on one side of your tree. A simple double knot will suffice to hold it firmly in place. This knot will be the anchor for your ornament display.
Now, meticulously thread the jute through each subsequent eye hook, working your way up the tree. Keep the jute taut but not overly tight, allowing for a slight decorative curve between each hook, which adds to the rustic appeal. Once you reach the topmost eye hook, tie another secure knot to finish this side. Repeat the entire process for the other side of the tree, ensuring both jute strings are symmetrical.
Step 8: Adorning Your Trees with Ornaments
This is where your creative vision truly comes to life! The beauty of these trees lies in their ability to beautifully showcase small, cherished ornaments or any festive embellishments you choose. I stumbled upon these particularly charming mini ornaments at Marshall’s, and they were an absolute match made in heaven for my new wooden trees, perfectly fitting the rustic aesthetic.
Many small ornaments come with a keyring-type hook, which makes attachment incredibly easy. You can simply pinch the jute twine between the rings to secure them directly to the string. If your ornaments don’t have this convenient feature, don’t fret! You can easily tie them on using small pieces of jute, thin ribbon, clear fishing line for a floating effect, or even small wire hooks. Get creative with your selection to reflect your personal style!
And just like that, your beautiful, custom-made DIY wooden ornament trees are complete! Step back and admire your handiwork. These festive accents are ready to bring holiday cheer to any room.
Personalize Your Holiday Decor
The true magic of these DIY wooden ornament trees lies in their incredible versatility. While I chose a rustic stain and mini ornaments, the possibilities for customization are endless, allowing you to tailor them perfectly to your existing decor or create a completely new festive theme. Consider these ideas:
- Painting: Instead of stain, paint your trees white for a snowy, minimalist look, a vibrant red or green for classic Christmas charm, or even metallics like gold or silver for a modern, sophisticated touch.
- Different Ornaments: Unleash your creativity! Use handmade ornaments, cherished family photos, small personalized gift tags, or even natural elements like dried orange slices, cinnamon sticks, or small pinecones for an aromatic, rustic display.
- Lighting: Drape delicate fairy lights or battery-operated LED strings around the jute or subtly along the wood frame for a magical, warm glow, especially beautiful in the evenings.
- Base Embellishments: Add small decorative elements to the base, such as faux snow, miniature bottle brush trees, a tiny festive bow, or even a small cluster of berries to enhance the holiday spirit.
- Size Variations: Experiment with different wood lengths and angles to create a whole forest of varied-sized trees, perfect for a dynamic centerpiece or mantel display!
These trees are not only inexpensive and easy to make, but they also offer a fantastic opportunity to infuse your personality and style into your holiday decorations. They make wonderful, thoughtful handmade gifts for friends and family too, spreading the joy of crafting!
Join the 12 Days of Christmas Celebration!
Thank you so much for joining us today for Day 4 of our inspiring “12 Days of Christmas” series! We hope this DIY Wooden Ornament Tree project has sparked your creativity and given you a fantastic new idea for your holiday decor. This series is packed with incredible festive ideas from talented creators across the web, and you won’t want to miss any of them as we count down to Christmas.
Make sure to hop over and visit our amazing friends who are also participating in the 12 Days of Christmas series. They are constantly impressing us with their ingenuity and holiday spirit, sharing unique projects and inspiration. Plus, there’s a fantastic giveaway happening on one of our blogs every single day throughout the series, so be sure to check them all out for more inspiration and chances to win some festive prizes!