
DIY Kids’ Bathroom Transformation: Creating an Engaging Alphabet Wall Art
Decorating a shared kids’ bathroom can often feel like a puzzle, especially when balancing the needs and preferences of different age groups and genders. I’ve been on this journey for quite some time, aiming to create a space that feels distinctly “kid-friendly” yet remains universally appealing for my two older boys and my baby girl. The challenge was finding a theme that was both fun and unisex, avoiding anything overly specific or gendered. Then, a spark of inspiration ignited when I stumbled upon a delightful alphabet nursery wall on Pinterest. It was perfect – educational, playful, and visually engaging. My mission became clear: adapt this charming idea for our bathroom, making it a bit less “frilly” and more robust for a bustling kids’ space. This guide shares how I achieved this vibrant transformation for around $65, proving that stunning, personalized decor doesn’t have to break the bank.
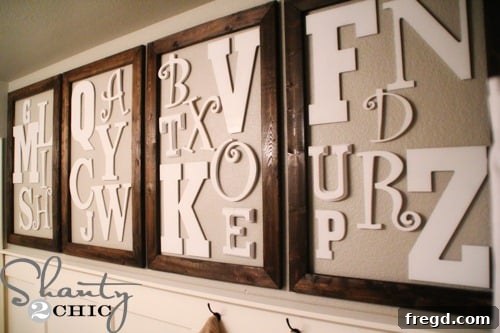
The result? A dynamic, eye-catching alphabet wall that brings character and educational fun to our children’s bathroom. This project was not only incredibly satisfying to complete but also surprisingly affordable. Let me walk you through each step of how I brought this vision to life!
Why an Alphabet Wall? The Perfect Unisex & Educational Choice
Choosing an alphabet theme for a children’s bathroom offers numerous advantages. Firstly, it’s inherently unisex, appealing to both boys and girls without leaning into specific themes like superheroes or princesses. This neutrality ensures the decor remains relevant and loved as children grow and their preferences evolve. Secondly, an alphabet wall is subtly educational. What better place for kids to subconsciously learn and recognize letters than in a space they visit multiple times a day? It’s a fantastic way to integrate learning into everyday life without it feeling like a chore. Lastly, it offers immense creative freedom. You can select various letter styles, sizes, and finishes to match your existing decor or create a unique focal point. My goal was to create something timeless, sturdy, and full of personality – a goal perfectly met by this alphabet art project.
Gathering Your Materials: The Foundation of Your Project
Embarking on any DIY project starts with gathering the right materials. For this alphabet wall art, the components were straightforward and readily available, keeping the overall cost manageable. Sourcing these items efficiently is key to staying within budget. Here’s what you’ll need to begin crafting your own stunning wall art:
- Wood Strips: I opted for 10 1×3 furring strips from Home Depot. Furring strips are an excellent budget-friendly option for framing, offering decent quality at a lower cost than premium lumber.
- Wood Glue: A strong adhesive like Gorilla Glue wood glue is essential for securely assembling the frames.
- Stain: Rust-Oleum Dark Walnut stain was my choice for a rich, warm finish on the frames.
- Spray Paint: Rust-Oleum Flat White spray paint for the alphabet letters.
- Unfinished Wooden Letters: Purchased from Hobby Lobby during a 40% off sale. The key here is variety in sizes and styles to add visual interest.
- Hanging Solution: 3M Command Strips for damage-free installation.
- Tools: Saw (miter saw recommended for precise cuts), measuring tape, foam brush or roller, cloth, staple gun (optional, for added frame reinforcement).
By keeping an eye out for sales, especially on the wooden letters, you can significantly reduce the total expenditure, just as I did. My letters cost $53, but with strategic shopping, you could easily spend even less!
Step-by-Step Guide to Crafting Your Alphabet Wall Art
Preparing Your Wood Frames: Precision Cutting
The first step involves preparing the wood strips that will form the frames for your alphabet letters. Precision is key here to ensure clean, professional-looking corners. I purchased ten 1×3 furring strips, which are ideal for their light weight and ease of handling, especially for decorative frames. Using the measurements provided in the diagram below, I carefully cut each piece.
It’s crucial to note that the measurements provided are from “long point to long point.” This detail is critical for mitered cuts (cuts at an angle, typically 45 degrees) where the outside edge of the frame piece is longer than the inside edge. When cutting, always double-check your measurements and ensure your saw is set to the correct angle for consistent corners. Taking your time here will save frustration later on.
These precise cuts ensure that when assembled, the frame corners meet perfectly, creating a seamless and aesthetically pleasing border for your letters. Remember, safety first when operating power tools!
Assembling the Frames with Precision and Strength
With all your wood pieces perfectly cut, the next step is to assemble them into sturdy frames. I relied on Gorilla Glue wood glue for this crucial stage. Gorilla Wood Glue is renowned for its incredible strength and durability, forming a bond stronger than the wood itself once cured. Apply a generous, but not excessive, amount of glue to the mitered edges of your frame pieces, ensuring complete coverage for a strong bond.
After applying the glue, press the pieces together firmly, aligning the corners. To ensure maximum stability while the glue dries, I also used a staple gun to add a few small staples at each corner. This provides immediate reinforcement and holds the pieces in place, preventing shifting as the glue sets. Clamps could also be used for this purpose if you prefer, but staples offer a quick and effective solution, especially for multiple frames.
Allow ample drying time for the glue as per the manufacturer’s instructions, typically at least 24 hours, to ensure the frames are completely solid and ready for the next step.
Staining for a Rich, Rustic Look
Once your frames are fully assembled and the glue has dried, it’s time to add character with stain. I chose Rust-Oleum Dark Walnut stain for its deep, warm hue, which provides a beautiful contrast to the white letters and gives the frames a rustic, yet sophisticated, appeal. This particular shade is versatile and complements a wide range of decor styles.
Applying the stain is a simple process: using a foam brush or roller, apply one even coat to the wood frames. Work in small sections to ensure even coverage. After about five minutes, before the stain has a chance to fully dry, use a clean, lint-free cloth to wipe away any excess. This technique allows the wood grain to show through beautifully while achieving the desired depth of color. If you prefer a darker finish, you can apply a second coat after the first has dried, following the same wipe-away method. Ensure proper ventilation during this step.
Curating and Arranging Your Alphabet Letters
The letters themselves are the stars of this show, and selecting them is where your personal style truly shines. I sourced my unfinished wooden alphabet letters from Hobby Lobby, taking full advantage of a 40% off sale on unfinished wood items. This strategy allowed me to purchase a variety of sizes and fonts without exceeding my budget. Don’t be afraid to mix and match; varying heights, widths, and even slight differences in font styles add a dynamic and engaging element to the wall.
Before any painting or permanent hanging, I highly recommend a crucial planning step: lay out all your letters and frames on the floor. This allows you to experiment with different arrangements, ensuring a balanced and appealing composition. Consider spacing, the flow of letters, and how the various sizes interact. Once you’re happy with the layout, take a picture! This photo will serve as your invaluable reference guide when it comes time to transfer your design to the wall, preventing any guesswork and ensuring your final arrangement is exactly as you envisioned.
Painting the Alphabet Letters for a Crisp Finish
With your letters arranged and a plan in place, it’s time to add color. For a clean, classic, and versatile look, I opted to spray paint all the letters with Rust-Oleum Flat White. Flat white is an excellent choice for several reasons: it provides a crisp contrast against the dark frames, offers a modern aesthetic, and brightens up any space. Its flat finish helps to minimize imperfections and gives the letters a sophisticated, understated appearance.
When spray painting, work in a well-ventilated area, preferably outdoors. Apply multiple thin, even coats rather than one thick coat. This technique prevents drips, ensures smooth coverage, and allows the paint to cure properly. Allow sufficient drying time between coats and before handling the letters. While flat white provides a beautiful, clean look, you could also experiment with vibrant colors, pastels, or even metallic finishes to match different decor schemes. The key is consistent application for a professional result.
Damage-Free Hanging with Command Strips
Now for the exciting part – hanging the letters and seeing your vision come to life! 
To ensure a damage-free installation that allows for easy repositioning or removal in the future, I chose 3M Command Strips for both the frames and the individual letters. These strips are a DIYer’s best friend, providing a strong hold without leaving sticky residue or damaging your wall paint, unlike traditional nails or screws. This is particularly important in a bathroom where you might want to refresh the decor periodically without major patch-up work.
While Command Strips are incredibly convenient, they can add up in cost. To economize, especially for the smaller letters, I strategically cut the strips into smaller pieces. A single strip can often be divided into two or three smaller sections, still providing ample adhesion for lightweight wooden letters. This simple trick allows you to maximize your purchase and keep the project within budget. 
Refer back to your photo of the floor layout and begin carefully placing each frame and letter on the wall, ensuring they are level and spaced correctly. The peel-and-stick nature of Command Strips makes this process straightforward and forgiving, allowing for minor adjustments as you go. 
The Grand Reveal: A Playful & Personalized Kids’ Bathroom
And just like that, the transformation is complete! I tried my best to capture the full scope of the wall, but our bathroom’s galley style layout made it a bit challenging to get wide-angle shots. Please bear with me as I share these glimpses into the finished space. 
The dark walnut frames beautifully complement the crisp white letters, creating a striking contrast that draws the eye. The mix of letter sizes and the dynamic arrangement add a whimsical, yet sophisticated, touch that truly defines the “kids’ bathroom” feel without being overtly childish. It’s a space that encourages imagination and learning, all while being incredibly stylish.
Each frame highlights a letter, creating a gallery-like effect that feels intentional and curated. The overall impact is one of personalized charm and thoughtful design, proving that DIY projects can achieve professional-level results on a budget.
This alphabet wall has become the focal point of the bathroom, setting a cheerful and inviting tone for the entire space. It perfectly captures that unisex, juvenile aesthetic I was striving for, and I couldn’t be happier with how it turned out.
Beyond the Alphabet Wall: Complementary Decor Ideas
The alphabet wall is just the beginning of our bathroom’s transformation! I am absolutely in love with how this unisex, juvenile bathroom is shaping up, and it has sparked so many more ideas for making this space truly special. To complement the new wall art and enhance the overall theme, consider adding a few more thoughtful touches:
- Colorful Textiles: Introduce vibrant towels, a playful shower curtain featuring simple patterns or even more letters, and a soft, fun bath mat to add warmth and softness to the room.
- Smart Storage Solutions: Utilize open shelving or cute storage bins to keep toys and toiletries organized, maintaining a tidy and clutter-free environment. Look for baskets in natural materials or bright colors.
- Whimsical Accessories: Add small, themed accessories like animal-shaped soap dispensers, colorful toothbrush holders, or small potted plants (if humidity allows) to bring in extra personality.
- Lighting: Upgrade lighting fixtures to something brighter and more modern, or add a fun nightlight for younger children.
- Mirrors: A unique mirror frame or a small, decorative mirror can add depth and reflect light, making the space feel larger and more inviting.
These additional elements can tie the whole room together, creating a cohesive and enchanting space that your children will adore. I can’t wait to share all my upcoming ideas and projects for this bathroom with you!
Conclusion: A Fulfilling DIY Journey
Creating this alphabet wall art for our kids’ bathroom has been a incredibly rewarding experience. It successfully bridges the gap between fun, education, and style, all while adhering to a budget-friendly approach. It proves that with a little inspiration, some readily available materials, and a willingness to get hands-on, you can craft truly unique and cherished spaces in your home. I hope this detailed guide empowers you to tackle your own DIY projects and transform your living spaces into something you love. 
Thanks so much for stopping by and following along with this DIY adventure!
~Ashley