
Hey fellow DIY enthusiasts and home decor lovers!
Crafting Your Dream Industrial Coffee Table: A DIY Journey
Are you ready to dive into a rewarding weekend project? Today, I’m thrilled to share a recent creation that perfectly blends industrial charm with functional elegance – a stunning factory cart coffee table, inspired by high-end designs but built with love and on a budget!
Just yesterday, while my incredible older kids were enjoying a delightful stay with their grandparents and the baby settled down for one of her glorious, long afternoon naps, I seized the moment. For any parent out there, you know precisely how precious and rare these moments of uninterrupted creative time can be! It was the perfect window to bring a long-cherished design dream to life.
The Inspiration: A High-End Design Dream
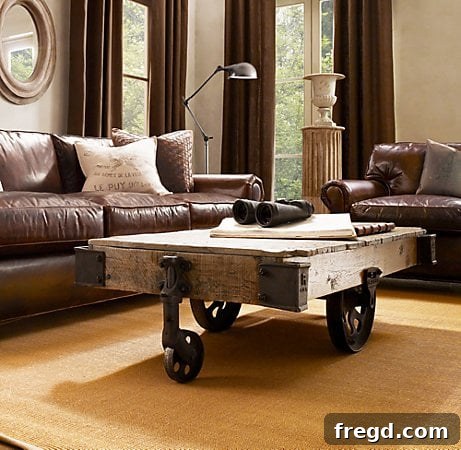
For years, I’ve harbored a deep admiration for the iconic factory cart coffee table from Restoration Hardware (RH). Its robust construction, rustic aesthetic, and wheeled mobility make it a true statement piece, embodying that perfect blend of vintage industrial chic.
However, with a price tag soaring well over $1000, acquiring one of these beauties always felt like an extravagant dream rather than a practical possibility. The cost alone was enough to keep it firmly in the realm of “someday, maybe” – until, that is, I stumbled upon a game-changing discovery: Ana White’s ingenious DIY version of this very table! It was an instant epiphany – a way to achieve that sophisticated look without breaking the bank.
Empowered by this newfound plan, I decided it was time to make room for my new project. My current coffee table, still in great shape, found a loving new home with my younger sister. With that transition complete, yesterday officially marked the beginning of my exciting woodworking adventure!
Gathering Materials: A Trip to the Hardware Store
Every great DIY project starts with a trip to the hardware store! My first stop was Lowe’s, and I certainly wasn’t alone. One of my adorable little “helpers” insisted on joining me, making the material selection process all the more memorable.
She was, of course, diligently inspecting the receipt – definitely not attempting to sample its paper-y goodness, right? 😉 Choosing the right lumber is crucial for any woodworking project. For this table, I focused on selecting sturdy, straight boards, keeping in mind the rustic aesthetic I was aiming for. The quality of your wood will significantly impact the final look and durability of your piece.
Beyond the lumber, the iconic wheels are a defining feature of a factory cart coffee table. I made a separate stop at Northern Tool to pick up my metal casters. While I found several options online, I was eager to get started and preferred to have them in hand immediately. I purchased these robust casters for $12 a piece. Though they represented the most significant individual expense for this table, I firmly believe they are an indispensable investment, adding both authentic character and essential functionality.
Customizing Ana White’s Plans: Making It My Own
While Ana White’s plans provided an excellent foundation, I opted to make a few strategic modifications to better suit my specific needs and aesthetic preferences. This is the beauty of DIY – you can adapt and personalize any project to truly make it your own! Here are the adjustments I made:
- Increased Height for Sides: Instead of the 1×6 boards specified for the sides, I opted for 1×10 lumber. This seemingly small change added an extra 4 inches to the table’s overall height. Given my large, plush couch, a lower-sitting coffee table wouldn’t have been as comfortable or proportionate, so this adjustment was key for ideal ergonomics and visual balance.
- Expanded Tabletop: To achieve a slightly longer and more substantial tabletop, I incorporated an extra 1×6 plank. This modification provided more surface area, enhancing both the table’s functionality and its imposing presence in the living space.
- Desired Overhang: I extended the length of the top planks by an additional 3 inches beyond Ana’s measurements. This created a beautiful, deliberate overhang, which was a specific design element I envisioned for a more authentic, antique factory cart feel.
- Strategic Brace Placement: To accommodate the overhang, I shifted the 1×2 braces located underneath the table. Instead of recessing them by 3/4 inch, I positioned them flush with the sides of the table. Interestingly, this minor alteration not only supported my desired overhang but also simplified the entire assembly process, making the build surprisingly easier!
- Reinforced Wheel Supports: For the wheel supports on the bottom, I utilized 2×4 lumber. I happened to have some extra on hand, and it’s generally a more cost-effective and significantly stronger option than what was originally suggested. This ensures the table’s stability and longevity, especially with the added weight and potential movement.
These thoughtful modifications allowed me to tailor the factory cart coffee table perfectly to my home’s aesthetic and practical requirements, proving that a little customization can go a long way in DIY!
The Building Process: Step by Step
Once the materials were gathered and the plans customized, it was time for the real fun to begin: assembly! Here are a few snapshots illustrating the key steps in bringing this vision to life.
For robust construction, I relied heavily on Gorilla Wood Glue for every joint. This high-strength adhesive provides an incredible bond, essential for a sturdy piece of furniture that will endure daily use. In addition to glue, I used a 2-inch nailer to firmly secure all components together. The combination of glue and nails creates an incredibly durable frame, ensuring the table is built to last. It truly is sturdy!
These are the planks carefully lined up, ready to form the tabletop. To achieve that coveted aged and “shanty” or distressed look, I intentionally sought out the knottiest, most character-rich wood I could find. Imperfections like knots and unique grain patterns are not flaws; they are features that contribute to the authentic rustic charm of a factory cart.
This image captures the finished underside of the table, showcasing the sturdy construction and the strategically placed wheel supports, just moments before it was flipped over and prepared for staining. Seeing the structure complete is always such a satisfying milestone in any woodworking project!
And here it is, proudly standing, ready to receive its beautiful stain. This stage is crucial, as the stain will define its final character and bring out the natural beauty of the wood, complementing the industrial aesthetic perfectly.
The Finishing Touches: Staining, Protection, and Wheels
Last night, I carefully applied the stain, allowing it to penetrate and highlight the wood’s natural grain and the charming knots. Choosing the right stain color is essential to achieving the desired industrial or rustic look. I opted for a rich, deep tone that would give the wood an aged, well-worn appearance, mimicking the patina of antique factory carts.
This morning, the next vital step is to apply polycrylic, which will provide a durable protective finish. This layer is crucial for safeguarding the wood from spills, scratches, and daily wear and tear, ensuring that this beautiful table remains a centerpiece in our home for years to come. Only after the polycrylic has cured will I attach the wheels, completing the table’s transformation.
The metal casters also received a little revamp to ensure they perfectly matched the table’s aesthetic. A fresh coat of paint can make a world of difference!
Here they are, looking sharp and industrial after I sprayed them all with a coat of Rust-Oleum Black spray paint. This simple step not only protects the metal but also unifies the look, giving them a sleek, factory-fresh (or rather, factory-aged) appearance. Woohoo!
An Easy and Affordable DIY Project
I promise you, this project is incredibly manageable – even for novice woodworkers! Ana White’s original plan primarily utilizes screws for assembly, meaning if you have a drill, you possess the main tool needed to construct this fantastic piece. It truly is that easy! I managed to complete the entire build, from cutting to assembly, within the two hours it took my little one, E, to nap. That’s the ultimate testament to its simplicity and efficiency!
Oh, and I almost forgot one of the most exciting details: the total cost out of my pocket for this entire project was less than $85! Let that sink in for a moment. That’s a staggering saving compared to the RH version’s price tag, and remarkably, it’s even $10 LESS than the quoted shipping cost alone for their table! This truly underscores the incredible value and satisfaction that comes with DIY. You get a custom, high-quality piece of furniture that perfectly fits your style, all while keeping your budget happily intact.
The Grand Reveal: Coming Soon!
Are you as excited as I am to see the fully finished industrial factory cart coffee table, complete with its wheels and glossy protective coat? Me too! I simply cannot wait to share the final reveal with all of you in my very next post. Stay tuned for the complete transformation!
Until then, have a wonderful Wednesday! I’m off to tackle more projects and make the most of this productive time!
~Whitney