
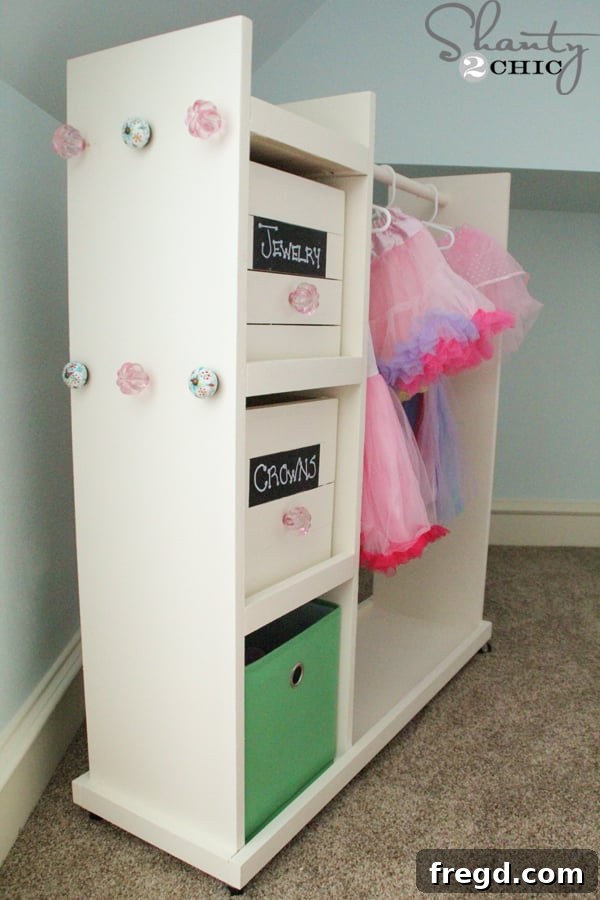
Hello fellow DIY enthusiasts and creative parents! This week, I took a delightful detour from building larger furniture pieces and embarked on a special project for our little one. If you’ve been following our journey on Instagram, you might have already caught a glimpse of this fantastic creation: a custom-built dress-up storage cart! This has been a dream project of mine for a considerable time, but I patiently waited until every member of our household had a comfortable bed, ensuring all the essentials were covered before diving into this fun, imaginative build.
Why Choose DIY Over Store-Bought? Cost, Customization, and Quality!
There were moments during my busy schedule when I considered the convenience of simply purchasing a dress-up cart. After all, I had so many other furniture builds on my plate! However, past experiences with store-bought items for my daughter, such as a play kitchen and a bassinet, left me disappointed. They simply didn’t hold up to the rigors of enthusiastic play. The specific cart I was considering was priced at a steep $150, not including shipping and tax, and I simply couldn’t justify another investment in something that might fall apart within a year. My goal was to create something durable, beautiful, and perfectly suited to her needs.
Not only did building this DIY dress-up storage cart allow me to customize it to perfectly match her room’s aesthetic, but it also proved to be incredibly budget-friendly. The total material cost came in at an astonishing $70, and that was with a generous half-sheet of plywood remaining for future projects! So, in my book, this fantastic organizational solution was essentially a $50 investment. This significant saving, coupled with the ability to create a high-quality, lasting piece, solidified my decision to build rather than buy. It’s truly a win-win for both my wallet and my daughter’s imagination!
Get Your Free Printable Plans for This Amazing Dress-Up Cart!
As always, we’re thrilled to share our detailed and absolutely FREE printable plans with you! These comprehensive plans will guide you through every cut, drill, and assembly step, making this project accessible even for novice builders. You can easily access and print your copy by clicking HERE or by clicking on the image below. We believe everyone should have the opportunity to create beautiful, functional pieces for their home without breaking the bank.
A Detailed Step-by-Step Guide: Building Your Own Dress-Up Storage Cart
Beyond the plans, I’ve also put together a comprehensive collection of step-by-step pictures to visually guide you through each stage of the build. This visual walkthrough, combined with the detailed instructions in the plans, ensures you’ll have all the support you need to successfully complete this project.
1. Gathering Your Materials: A Smart Start
Our journey began with a trip to Home Depot for all the necessary supplies. A crucial decision involved the type of lumber. We opted for 3/4″ Purebond Plywood, and the helpful staff at the store were kind enough to rip it down into four 11 1/4″ wide boards for us. This decision was largely driven by cost-efficiency and quality. While 1×12 boards could be substituted, they were priced at $20 each, and it was challenging to find two that had precisely the same width. Furthermore, selecting pine boards would have cost a whopping $30 each. By choosing Purebond plywood and having it cut, I managed to get the equivalent of four 1×12 boards for just $49, a significant saving that contributed to the overall affordability of this project. Investing a little time in lumber selection can truly pay off!
2. Preparing the Components: Precision Cutting
Once we had our lumber safely home, it was time to get to work. I began by precisely cutting the four boards that would form the robust frame of the dress-up cart. Accurate measurements at this stage are paramount, as they ensure all subsequent pieces fit together seamlessly, leading to a square and sturdy final product. Always measure twice and cut once!
3. Mastering Pocket Holes for Strong Joints
Next, I turned my attention to drilling pocket holes, a technique I rely on for creating strong, concealed joints in many of my furniture builds. Using my trusted Kreg K5 Pocket-Hole Jig, I drilled three 3/4″ pocket holes on each end of the bottom board. Pocket holes are incredibly versatile and allow for quick, secure assembly without the need for complex joinery. They are a DIYer’s best friend for projects like this!
4. Assembling the Main Structure
With the pocket holes drilled, it was time to bring the main frame together. I carefully attached the side pieces to the bottom piece using 1 1/4″ pocket hole screws. For added strength and durability, I also applied a generous amount of Gorilla Glue Wood Glue to all mating surfaces before securing them with screws. This combination of mechanical fasteners and strong adhesive ensures a rock-solid assembly that will withstand years of active play.
5. Crafting Customizable Shelves for Organization
Next up were the shelf pieces. I cut these to size and then drilled two pocket holes into each side of every shelf. This is where the beauty of a custom build truly shines: the placement of these shelves is incredibly customizable! While the plans provide my recommended shelf heights, you have the flexibility to adjust them to fit specific bins, baskets, or other storage containers you might already own or plan to use. Just remember to measure your bins and mark your shelf positions accordingly before drilling and attaching them with pocket hole screws and wood glue.
6. Integrating the Center Support for Stability
Once the side shelves were in place, I added the crucial center board. This piece not only provides additional structural integrity but also defines the separate cubbies for better organization. I attached the shelves to this center board, and then secured the bottom of the center board to the base of the cart, ensuring everything was firmly connected and square. This step creates distinct storage compartments, perfect for keeping costumes and accessories neatly separated.
A quick tip for tight spaces: attaching the shelves to the center board can be a bit snug for a standard drill. I found my Ryobi Right Angle Drill to be invaluable here. If you don’t have one, a short Kreg bit attachment for your regular drill can also work wonders in those confined areas, allowing you to drive screws efficiently and securely.
7. Adding Decorative and Functional Trim
To give the cart a more finished and polished look, I added 1×2 trim pieces to the front edges of the shelves and the base. I secured these trim pieces using my 18 gauge Airstrike nailer, 1 1/4″ nails, and wood glue. For a perfectly seamless fit, I highly recommend measuring each trim piece as you cut it. This ensures crisp, tight joints and a professional appearance.
8. Installing the Hanging Dowel for Costumes
No dress-up cart would be complete without a place to hang dresses, capes, and other regal attire! To attach the dowel securely, I predrilled pilot holes into the outside board, the center board, and then into the center of both ends of the dowel itself. This careful predrilling prevents the wood from splitting and ensures a straight, strong connection. I then attached the dowel using 2 1/2″ wood screws and wood glue, creating a robust rail for hanging all those precious costumes.
The Fun Part: Personalizing Your Dress-Up Cart
And just like that, the main construction is complete! Now comes the truly exciting part: bringing the cart to life with paint and accessories. This is where your creativity can truly shine, transforming a functional piece into a whimsical treasure for your child.
Painting for a Flawless Finish
I chose to paint the entire cart in Valspar’s “Ivory Lace,” a beautiful, soft shade that perfectly matches the trim and her bed in her room. Selecting a paint color that coordinates with existing decor creates a cohesive and aesthetically pleasing look, making the cart feel like an integrated part of the room rather than just a standalone piece of furniture.
Accessorizing with Charming Knobs
To add both functionality and a touch of sparkle, I wanted to include pretty knobs for her to hang necklaces, wings, wigs, and other essential accessories. To achieve a clean finish without screws protruding into the cubbies, I predrilled holes from one end, carefully aligning them with the shelves. This technique ensures the screws are hidden, leaving only the decorative knob visible.
I then used Gorilla Glue Super Glue Gel, which I can confidently say is absolutely amazing for this type of application, applying a generous amount to each knob before pushing them firmly through the predrilled holes. Believe me, these babies aren’t going anywhere! We added two rows of six knobs to our cart, strategically placing them for maximum storage. I was lucky enough to snag these lovely knobs at Hobby Lobby during one of their fantastic sales – always keep an eye out for discounts on hardware!
The All-Important Mirror and a Personal Touch
What’s a dress-up cart without a mirror for admiring one’s fabulous new ensemble? I found the perfect mirror at Hobby Lobby, also purchased during a sale – smart shopping is key! After carefully removing the foam pads from its back, I securely glued it to the top of the opposite side of the cart. To make it truly her own, I added a charming “T” for her name right above the mirror. These small, thoughtful details make a big difference in personalizing the piece and making it special.
Mobility and Convenience: Casters and Pull
To ensure her elaborate wardrobe can follow her wherever her imagination takes her, I added four small, smooth-gliding casters to the base of the cart. This makes it incredibly easy for her to move her dress-up station from her room to the living room or wherever her play might lead. And to complete the mobile design, I attached a cute pull handle. (And yes, I acknowledge I might regret this when I find dress-up clothes scattered throughout the entire house, but for now, it’s pure joy!)
Completing the Look: Storage and Styling
With the cart finished, it was time to fill it with treasures! I utilized some scrap lumber from previous projects to build a couple of adorable crates. These fit perfectly into the cubbies and offer additional organized storage for smaller items like shoes, hats, or masks.
To further enhance the cart’s functionality and aesthetic appeal, I added a vibrant green storage cube from Target. This cube not only provides extra storage but also beautifully matches her bedding, tying the entire room’s decor together effortlessly. These thoughtful additions ensure that every accessory has its place, making clean-up a breeze and keeping her imaginative play area tidy and inviting.
A Project Built to Last and Inspire
Building this dress-up cart was not only incredibly fun, but it also resulted in significant cost savings and a piece of furniture that is truly built to last for years to come. Unlike flimsy store-bought alternatives, this sturdy cart can withstand the boundless energy of a child’s imagination. Its versatile design means it could even be easily modified for adult use, serving as extra storage in a closet or craft room. Imagine a chic mobile organizer for your scarves, accessories, or craft supplies!
Ready to Build Your Dream Dress-Up Cart?
I hope this detailed guide inspires you to tackle your own DIY dress-up cart project. It’s a rewarding experience that yields a beautiful, functional, and personalized piece for your home. Now, it’s back to the shop for me – I still have plenty of furniture left to build and ideas to bring to life! Thanks so much for stopping by and being a part of our creative journey. Happy building!
~Ashley