
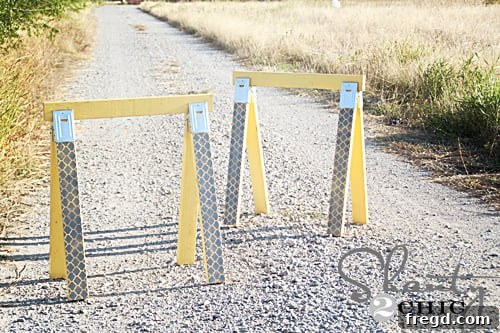
Welcome, fellow DIY enthusiasts! Have you ever found yourself hunched over projects on the cold, hard garage floor, battling backaches and knee pain? I certainly have! But today, I’m thrilled to share a game-changing solution that will not only save your body but also elevate your workspace with undeniable style: the easiest and most affordable DIY sawhorses you’ll ever build. Forget flimsy, expensive store-bought options; we’re crafting sturdy, functional, and beautifully personalized work supports right here, in true “Shanty chic” fashion. Get ready to transform your crafting and building experience from strenuous to spectacular, all while infusing a touch of personal flair into your home workshop.
The beauty of this project lies in its remarkable simplicity and cost-effectiveness. For a mere $24 and about an hour of your time, you can construct a robust set of sawhorses that will revolutionize your DIY endeavors. Whether you’re a novice just dipping your toes into the world of woodworking or a seasoned crafter who, like me, has endured years of floor-level construction, these heavy-duty work supports are an absolute must-have. They provide a stable, ergonomic surface for cutting, assembly, painting, and countless other tasks, making every project more enjoyable and efficient. Say goodbye to uncomfortable bending and hello to a comfortable, professional-grade workspace right in your garage or backyard.
Why Building Your Own Sawhorses is a Game Changer
Investing a little time and effort into building your own sawhorses offers a plethora of benefits that store-bought alternatives simply can’t match. First and foremost, the **cost savings** are substantial. Pre-made sawhorses, especially those offering decent stability, can quickly add up. Our DIY approach utilizes readily available lumber and simple brackets, keeping the price tag incredibly low. Secondly, **customization** is key. You get to choose the exact height that suits your ergonomic needs, preventing strain on your back and knees. Taller for standing tasks, shorter for specific projects – the power is in your hands. Additionally, these bracket-based sawhorses are often **portable and easy to store**. If you need to clear your workspace, you can often disassemble them quickly or fold them away, a huge advantage for smaller garages or workshops.
Beyond the practical advantages, there’s immense **satisfaction** in crafting your own tools. These sawhorses aren’t just functional; they’re a testament to your growing DIY skills. They serve as versatile **multi-purpose work surfaces**, perfect for supporting long pieces of lumber, acting as a temporary workbench, holding materials for painting, or even serving as a sturdy base for a temporary outdoor table. They’re an essential addition to any home workshop, providing a solid foundation for countless projects to come. Let’s gather our materials and dive into building these essential workshop companions.
Gathering Your Materials: Simple & Affordable
The beauty of this project lies in its minimal material list, making it accessible even for those with limited budgets or tool collections. Here’s exactly what you’ll need to construct your sturdy sawhorse set:
- **Lumber:** You’ll need four 8-foot 2x4s. Standard pine or fir 2x4s are perfectly sufficient for this project, offering excellent strength and stability for a low cost. When selecting your lumber, look for straight boards with minimal knots or warps to ensure the best results.
- **Sawhorse Brackets:** The secret to this quick and easy build lies in the WorkForce sawhorse brackets (or similar universal brackets). These ingenious devices simplify the construction process immensely. You’ll need two packages, as each package typically contains enough brackets for one sawhorse. You can usually find these in the tool aisle of your local hardware store, often right alongside the pre-made sawhorses. The best part? The packaging usually includes a handy chart on the back that outlines the precise cut lengths required for your 2x4s, based on your desired sawhorse height. This takes all the guesswork out of the measurement process!
- **Fasteners:** A box of nails (or screws, if you prefer a more secure and potentially disassemble-friendly option) appropriate for 2×4 lumber.
- **Tools:** A measuring tape, a saw (a circular saw or miter saw will make quick work of your cuts, but a hand saw will also suffice), and a hammer or drill (if using screws).
For my sawhorse height, I opted for a standard 32 inches, which is a versatile height for most general woodworking tasks. Following the chart on the bracket packaging, this meant cutting ten pieces of 2×4 to 32 inches each (five for each sawhorse). Always double-check your measurements and make precise cuts for the best stability and appearance of your finished sawhorses. Safety first: always wear appropriate eye protection when cutting wood.
Step-by-Step Assembly: Quick and Easy Construction
Once your lumber is cut to size, the assembly process is incredibly straightforward, thanks to the efficiency of the sawhorse brackets. Here’s how to quickly put together your sturdy work supports:
- **Assemble the Legs:** Take your pre-cut 32-inch 2x4s. Each WorkForce bracket has openings designed to snugly fit the ends of your 2x4s. Simply slide one 2×4 into each side of the bracket, ensuring it’s pushed in all the way. The brackets come with pre-drilled holes, guiding where you need to secure the lumber. Using your hammer, drive nails through these holes and into the 2x4s, effectively locking the legs into place. It’s truly that easy! Repeat this process for all four legs of your sawhorse.
- **Pro-Tip for Painting:** If you plan on painting your sawhorses but want to keep the metal brackets their original color (or a different color), I highly recommend painting your 2x4s *before* assembly. I learned this the hard way! Painting after assembly means tedious taping off the brackets to avoid overspray. A little pre-planning here saves a lot of time and frustration later.
- **Attach the Top Beam:** With the legs securely in place, the final structural step is to attach the top 2×4. The sawhorse brackets have a larger opening at the very top, specifically designed for this purpose. Slide one of your remaining 8-foot 2x4s (or a custom-cut length for a shorter sawhorse) into this top opening. Before fastening, gently pull the legs of the sawhorse apart until they are splayed out and stable – this creates the wide, secure base typical of sawhorses. Once you’re happy with the stance, hammer nails through the pre-drilled holes in the top section of the brackets, securing the top 2×4 firmly. Repeat this entire process for your second sawhorse, and just like that, you have a fully functional pair of robust work supports!
Adding Your Personal Touch: “Shanty Style” Decoration
Now that your sawhorses are structurally complete, it’s time for the fun part: adding a personalized touch that reflects your unique “Shanty style”! This is where these functional tools become an extension of your creative space. A little paint and a custom stencil can transform ordinary lumber into a glamorous addition to your workshop.
Painting the Base
To begin, I opted for a cheerful and vibrant base coat. I used two generous coats of **Rust-Oleum Summer Squash** spray paint, covering the entire wooden structure (excluding the metal brackets, as previously advised). This bright yellow hue instantly adds a pop of color and personality, making these sawhorses a joy to look at even when they’re not in use. Ensure each coat dries completely before applying the next for a smooth, durable finish. While I chose yellow, feel free to pick any color that inspires you – a bold blue, a rustic red, or even a sleek black would look fantastic!
Adding Stenciled Details
For an extra layer of sophistication, I decided to add a stenciled pattern to the legs. I cut a beautiful **Moroccan print stencil** using my Silhouette Cameo machine. If you don’t own a cutting machine, don’t worry! You can easily find an incredible variety of pre-made stencils at any craft store, or even create your own using cardstock and an X-Acto knife. The key is to choose a pattern that speaks to your style and complements your base color.
For the stencil color, I chose **Rust-Oleum Granite spray paint**. This particular shade offers a fantastic textured appearance that perfectly suited the “unfinished rough look” I was aiming for. The trick here is to spray a very light mist, just one pass, to achieve that distressed, organic feel rather than a solid, crisp pattern. Since my 12×12 inch stencil wasn’t long enough to cover the entire sawhorse leg in one go, I simply worked my way down, carefully aligning the stencil with the pattern I had already sprayed above it. Take your time to ensure the pattern flows seamlessly. This method creates a visually interesting and unique design that truly elevates the humble sawhorse.
Mission Accomplished: Your New Stylish & Functional Workshop Essential!
And there you have it! In just about an hour and for a grand total of $24, you’ve successfully built a pair of incredibly sturdy, functional, and aesthetically pleasing sawhorses. It’s a testament to how simple DIY projects can yield fantastic results, providing immense value without breaking the bank. These sawhorses are more than just practical tools; they’re a statement that your workspace can be both highly efficient and beautifully inspiring.
Imagine the relief of no longer having to crouch, kneel, or strain while working. These sawhorses provide the perfect elevation for almost any project, from cutting lumber and assembling furniture to painting small items and even providing a temporary snack bar during outdoor gatherings. And who says you can’t have a little glam while you’re sweating in your PJs, bringing your creative visions to life in the garage? Your workspace should be a place of comfort, efficiency, and inspiration, and these DIY sawhorses tick all those boxes and more.
I hope this guide empowers you to tackle this super easy and rewarding project. You’ll wonder how you ever managed without them! Now go forth, build, and create with confidence and style!
Thanks so much for stopping by and happy crafting!
~Ashley