
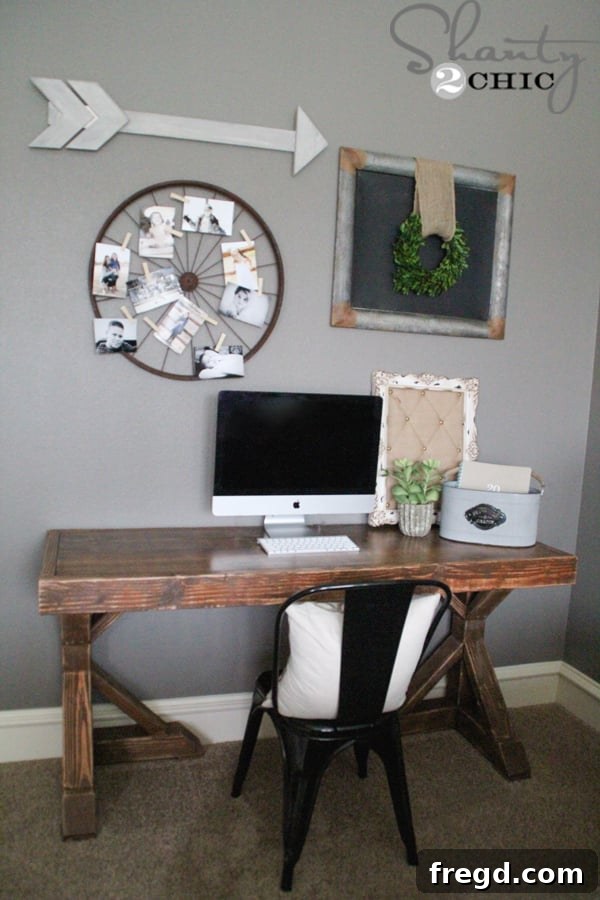
Build Your Own Stylish & Affordable DIY Trestle Desk
Are you dreaming of a beautiful, functional desk that perfectly complements your home office or creative space, but hesitant about the high price tag of store-bought furniture? Look no further! This comprehensive guide will walk you through building your very own DIY Trestle Desk, inspired by timeless design and crafted with affordability in mind. Say goodbye to generic office furniture and embrace the satisfaction of a handmade piece that’s both sturdy and incredibly stylish.
The design for this magnificent 5-foot-long desk draws inspiration from my beloved Restoration Hardware-inspired dining table. I adored its robust aesthetic and functional elegance so much that I knew I had to replicate its essence in a desk format. To bring this vision to life, I collaborated with our talented friend, Jamison from Rogue Engineer, who meticulously designed the detailed plans. His expertise ensured that this project is not only achievable for DIY enthusiasts but also incredibly cost-effective. We managed to construct this entire desk for an astonishingly low $70 in lumber costs, proving that high-end looks don’t have to come with a high-end price.
Ready to embark on your next woodworking adventure? You can easily download and print the FREE, step-by-step plans directly from Rogue Engineer’s website. Once you have your plans in hand, follow along with my detailed build process below, complete with practical tips and insights, to create a stunning piece of furniture that you’ll be proud to showcase.
Essential Materials and Tools for Your Trestle Desk Project
Before diving into the build, gathering the right materials and tools is crucial for a smooth and successful project. This desk primarily utilizes common lumber sizes, making it accessible for most DIYers. For the main structure, you’ll primarily need 2x4s and 4x4s, along with some smaller dimension lumber for specific components like the footpads and angle pieces. Always choose straight, knot-free lumber if possible for the best results, as this will prevent warping and ensure a clean finish.
Beyond the lumber, here’s a list of essential tools and supplies you’ll want on hand:
- Miter Saw: Indispensable for accurate straight and angled cuts, especially for the legs and feet.
- Drill/Driver: For pre-drilling and driving screws.
- Kreg Pocket Hole Jig: A game-changer for strong, concealed joinery. We used both a standard Kreg jig for 2x4s and a Kreg HD (Heavy Duty) jig for the thicker 4×4 lumber.
- Orbital Sander or Corner Cat Sander: Essential for smoothing surfaces and distressing the finish.
- Brad Nailer (optional but recommended): For quick and secure attachment of trim pieces with wood glue. Screws can also be used.
- Wood Glue: Crucial for adding strength and durability to all joints.
- Pocket Hole Screws: 1 1/4″ for standard joints, and Kreg HD screws for thicker stock.
- Wood Filler: To conceal any exposed pocket holes or imperfections.
- Stain: Varathane Early American or your preferred color.
- Topcoat: Varathane Triple Thick or a durable polyurethane for protection.
- Safety Gear: Always wear safety glasses, hearing protection, and a dust mask.
Here’s a glimpse of the raw lumber, ready to be transformed into a stunning desk.
Step-by-Step Construction: Building the Robust Desk Top
Creating the Planked Surface
(Image Here: Attach Top Planks)
The foundation of our trestle desk is its planked top, which not only provides a spacious work surface but also contributes significantly to its rustic charm. I began by meticulously preparing the individual planks that would form the tabletop. This typically involves cutting the planks to the specified length according to the plans. Ensure all cuts are straight and square for a seamless fit. Once cut, arranging them in your desired pattern helps visualize the final look and ensures proper alignment during assembly.
Assembling the Frame with Pocket Holes
Next, I focused on constructing the sturdy frame for the desktop, utilizing 2×4 lumber. Pocket hole joinery is the secret to a strong yet visually clean frame, as the screws are driven at an angle and hidden from view. Using my Kreg Jig, I carefully drilled pocket holes into the end pieces of the 2x4s, ensuring they were positioned correctly to allow for secure attachment to the side pieces. Precision in this step is key for a truly square and stable frame.
Connecting the Frame Components
(Image Here: Attach Side Pieces)
With the pocket holes drilled, the frame came together quickly. I aligned the end pieces with the side pieces, applying a bead of wood glue to each joint before securing them with pocket hole screws. Wood glue significantly enhances the strength of the joint, making it far more durable than screws alone. It’s vital to ensure the frame is perfectly square at this stage, using a speed square or framing square, to prevent any wobbling or unevenness in the final desk. This careful assembly leads to a rock-solid foundation.
And just like that, the robust frame for the desktop was complete and ready for the next phase of assembly.
Attaching the Planked Top to the Frame
Now it was time to marry the planked top to its newly built frame. I carefully positioned the planks onto the frame, ensuring they were flush with the top edges of the 2×4 frame. This creates a clean, uniform surface. Using 1 1/4″ pocket hole screws, I attached the planks to the frame from underneath, driving the screws up through the frame into the planks. This method ensures that no unsightly screw heads are visible on the finished desktop surface, maintaining a sleek and professional appearance.
Adding Crucial Supports for Durability
(Image Here: Add Supports)
To further enhance the stability and prevent any potential warping or sagging of the large desktop over time, I added additional supports underneath. These supports, strategically placed according to the plans, provide crucial reinforcement, especially for a desk that might hold heavy monitors, books, or equipment. Attaching these supports securely to both the planks and the frame significantly boosts the desk’s longevity and structural integrity.
With all the components securely joined, the desk top was complete and ready to be paired with its distinctive trestle legs!
Crafting the Elegant Trestle Legs
The trestle legs are arguably the most distinguishing feature of this desk, lending it a classic, architectural look. Their construction requires precision cutting and careful assembly to achieve both aesthetic appeal and robust stability. Each leg assembly consists of vertical supports and angled feet, creating a broad, stable base.
Precise Angle Cuts for the Feet
While the main leg pieces are simple straight cuts, the feet require a precise 45-degree angle cut at their ends. This angle provides the signature splayed look of a trestle base. To achieve this, set your miter saw blade to 45 degrees. It’s critical to accurately mark where the angle will begin on the board, following the dimensions provided in the free plans. Double-check your measurements and saw settings before making the cut to ensure symmetry and a perfect fit.
(Image Here: Angle Cuts on Feet)
Once your saw is set and your mark is made, carefully make the cut. Repeat this for all foot pieces, ensuring consistency across both leg assemblies.
Utilizing the Kreg HD for Thicker Lumber
When working with thicker lumber, such as the 4x4s used for the legs and feet, a standard pocket hole jig may not be sufficient. This is where the Kreg HD (Heavy Duty) jig becomes invaluable. Designed specifically for boards thicker than 2 inches, it drills larger pocket holes and uses longer, stronger screws, providing a significantly more robust joint. I used my Kreg HD to drill pocket holes into the foot pieces, preparing them for secure attachment to the vertical leg supports. This ensures the feet can withstand the desk’s weight and everyday use without compromise.
Assembling the Leg Components
With the pocket holes drilled, I meticulously attached the angled feet to the main vertical leg supports. A generous application of wood glue between the mating surfaces is essential before driving the Kreg HD pocket hole screws. The combination of glue and screws creates an incredibly strong, rigid joint that forms the foundation of each trestle leg. Clamp the pieces tightly while the glue sets for optimal adhesion.
Adding Foot Pads for Protection and Stability
To further enhance the stability of the legs and protect your floors, foot pads were attached to the very bottom of the angled feet. These small but important additions distribute the weight more evenly and prevent the sharper edges of the lumber from scratching your flooring. I secured these with wood glue and small screws or brad nails.
The leg assembly was now complete! (A quick note: I inadvertently drilled some pocket holes on the wrong side. Don’t worry if you make a minor mistake! These were easily filled with wood filler and would later be covered by other structural pieces, becoming completely invisible in the final product. It’s a reminder that woodworking often involves clever problem-solving).
With both trestle leg assemblies and the desktop prepared, we were ready for the final assembly phase.
Bringing It All Together: Final Assembly of the Trestle Desk
Attaching the Angle Trusses
To enhance the structural integrity and stability of the trestle legs, angle pieces (often referred to as trusses in this context) were added to the bottom sections. These pieces brace the legs, preventing any lateral movement. I found my Ryobi 18-volt nailer combined with wood glue to be the quickest and most efficient way to attach these. While screws can certainly be used, the nailer offers a faster workflow for this type of attachment.
Securing the Top and Legs
For a secure connection between the desktop and the trestle legs, I first flipped the desktop upside down. Then, I attached strategically placed stop blocks to the underside of the top, again using my nailer and wood glue. These blocks will cradle the top of the trestle legs, preventing them from shifting or sliding, thus ensuring a stable and immovable desk. It’s crucial to position these blocks precisely according to the plans for a snug fit.
Finally, the remaining angle piece, which serves to connect and brace the two leg assemblies at the top, was attached to the desktop. This creates a cohesive and exceptionally sturdy structure. Once all components were secured, the desk was carefully flipped upright, revealing its full form.
Preparing for the Finish: Filling Holes
Before any staining or finishing could begin, it was imperative to address any visible screw holes or minor imperfections. I meticulously filled all exposed holes with wood filler, allowing it to dry completely. Once dry, these areas were sanded smooth to create a flawless surface. This step is critical for achieving a professional, high-quality finish that looks fantastic.
With all the joinery complete and surfaces prepared, the desk was now fully assembled and ready for its transformative finish!
The Finishing Touch: Staining and Protecting Your Trestle Desk
The finish you choose for your DIY trestle desk can dramatically alter its appearance, bringing out the natural beauty of the wood and providing crucial protection. This stage is where your personal style truly shines through, transforming raw lumber into a piece of furniture with character.
Selecting and Applying Your Stain
For this project, I opted for Varathane’s “Early American” stain. This particular shade provides a beautiful, warm, and classic look that perfectly matched the existing furniture in my master bedroom, specifically the bed I had previously built. When applying stain, ensure the wood surface is clean and free of dust. Use a brush or rag, working in the direction of the wood grain. Apply evenly and wipe off any excess after a few minutes to achieve your desired depth of color. Always test your stain on a scrap piece of the same wood to confirm the shade before applying it to the entire desk.
After applying the stain, I allowed it to dry for approximately an hour, or as recommended by the manufacturer’s instructions. Proper drying time is crucial before moving on to the next step to prevent smudging or uneven finish.
Achieving a Distressed Look
To add character and a touch of rustic appeal, I decided to distress the entire piece. Using my Ryobi Corner Cat Sander, fitted with an 80-grit sanding pad, I gently sanded various edges and prominent surfaces. The goal here is not to remove all the stain but to subtly wear away some of the finish, mimicking natural aging and creating soft highlights on the wood. Focus on areas that would naturally see wear and tear over time, such as corners, edges, and raised sections. This technique adds depth and a lived-in feel to the desk.
Applying a Durable Topcoat
The final, and arguably most important, step in the finishing process is applying a protective topcoat. For the desktop, I used one generous coat of Varathane’s Triple Thick Polyurethane. This product is fantastic because it provides the equivalent protection of three coats of traditional polyurethane in a single application. It’s incredibly durable, making it perfect for a desk surface that will see frequent use. The key to applying Triple Thick is to be generous and allow it to self-level. Don’t overwork it. It may appear somewhat thick or glue-like initially, but as it dries, it will level out into an incredibly smooth, hard, and protective finish. Allow ample drying time as per product instructions for optimal curing and durability.
The Completed DIY Trestle Desk: A Masterpiece in Your Home
And with that, the DIY Trestle Desk was complete! The transformation from raw lumber to a stunning, functional piece of furniture is incredibly rewarding. I couldn’t be happier with the result – a sturdy, stylish desk that perfectly suits my needs and budget.
The unique trestle legs are undoubtedly my favorite design element. They provide an elegant, architectural touch that elevates the desk beyond simple utility, turning it into a focal point within the room.
A massive thank you goes out to Rogue Engineer for generously providing the FREE plans for this fantastic project! If you’re inspired to build your own, head over to his site to grab the plans and be sure to tell him the Shanty Sisters sent you!
Creating your own furniture not only saves money but also provides a deep sense of accomplishment. This DIY trestle desk is a testament to what can be achieved with a clear plan, a few basic tools, and a little dedication. I hope this detailed guide encourages you to pick up your tools and start building something beautiful today!
Looking for the sources of the stylish decor items featured in my photos? Here’s where you can find them:
- Wagon Wheel Photo Collage: Save On Crafts
- Chalkboard frame: Hobby Lobby
- Boxwood Wreath: Target
- Metal Bucket: HomeGoods
- Succulent: HomeGoods
Thank you for joining me on this woodworking journey. Happy building!
~Ashley