
Transform Your Entryway: The Ultimate DIY Board and Batten Wall Guide
Hello fellow DIY enthusiasts and home decor lovers! We recently had a blast giving our youngest sister’s space a delightful makeover, and the results were so fantastic, we simply couldn’t leave our other sister out of the home improvement fun. This time, we set our sights on her entryway, embarking on an exciting project to create a stunning DIY Board and Batten wall. This classic architectural detail adds incredible character and charm, instantly elevating any space. If you’ve been dreaming of a stylish yet affordable way to refresh your home, you’ve come to the right place. We’re thrilled to share our detailed guide, complete with all the tips and tricks you’ll need to achieve this beautiful look in your own home. Get ready to be inspired and discover how simple it can be to add custom flair to your walls!
Watch the Transformation: DIY Board and Batten Video Tutorial
To give you the best possible insight into this project, we’ve put together a comprehensive video tutorial. It covers every step from start to finish, showing you exactly how we brought this vision to life. Visual learners will find this invaluable!
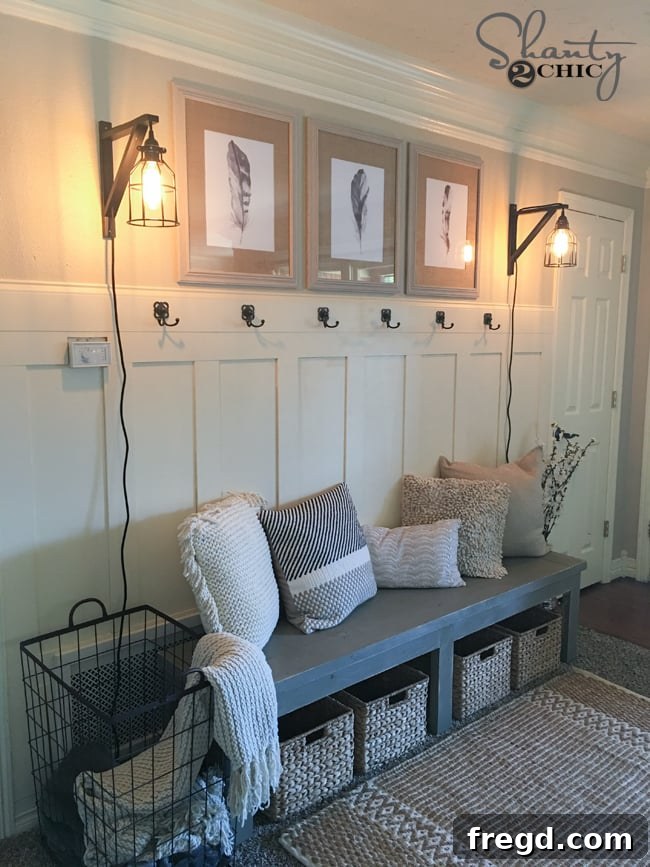
Wasn’t that transformation simply amazing? Her entryway now boasts an incredible blend of classic elegance and functional design. This stunning accent wall instantly brightens the space, creating a warm and inviting first impression for anyone who walks through the door. It’s truly a testament to how a simple DIY project can dramatically enhance a home’s aesthetic and value. The crisp lines and added dimension bring a sophisticated touch that makes the entire area feel more curated and complete.
Among the many styles of accent walls, the board and batten technique stands out as one of our absolute favorites, and for good reason. Its inherent beauty lies in its versatility and understated elegance. This particular method creates a very low-profile design, meaning the added depth is subtle yet impactful, perfect for spaces where you want to add texture without overwhelming the room. Moreover, the materials required are incredibly inexpensive, making it an ideal choice for budget-conscious renovators. But perhaps the best part? It’s surprisingly EASY to achieve, even for DIY beginners. This project offers maximum visual impact with minimal complexity, a win-win in our book!
DIY Board and Batten Wall: Essential Supplies List
Before you dive into transforming your entryway, careful planning and preparation are crucial. The first step involves accurately measuring your wall to determine the precise quantity of each material you’ll need. Every wall has unique dimensions, so customizing your measurements is essential for a seamless finish. For instance, in our sister’s shorter entryway, we opted to space the battens closer together to create a cozier, more detailed look. Conversely, for a longer wall, we might choose wider spacing to maintain visual balance and prevent the design from looking too busy. Taking the time to do this math upfront will save you multiple trips to the hardware store and ensure your project runs smoothly. Here’s a comprehensive list of what you’ll need:
- 1/4″ MDF Panels (2′ x 4′): These medium-density fiberboard panels form the base of your board and batten design. They are smooth, stable, and take paint beautifully. You can typically find these at your local hardware store or HERE on Home Depot.
- 1/4″ MDF Bender Board: These thinner, more flexible strips will serve as your vertical battens. Their consistent thickness is key to a professional-looking finish. Find them HERE on Home Depot.
- 5″ Base Moulding: This will cap your design, providing a finished edge. The 5-inch width offers a substantial and elegant look.
- Panel Adhesive: Essential for securely attaching the MDF panels and battens to the wall, ensuring they remain firmly in place over time. This is a reliable brand that offers strong adhesion.
- Caulk Gun: Necessary for applying the panel adhesive neatly and efficiently.
- Jig Saw: Invaluable for making precise cuts around outlets, switches, and other wall obstructions. While a miter saw handles straight cuts, a jig saw allows for more intricate shaping.
- Miter Saw: Perfect for making straight, clean cuts for your battens and base moulding, ensuring tight joints and a professional finish.
- Nail Gun: Speeds up the installation process significantly, providing quick and secure fastening of panels and battens with brad nails.
- Brad Nails (1.25″): Used with the nail gun to provide additional securing power, especially while the adhesive dries.
- Level: Absolutely critical for ensuring all your panels and battens are perfectly straight, preventing a crooked appearance.
- Tape Measure: For all your precise measuring needs.
- Pencil: For marking cuts and measurements.
- Wood Putty: To fill nail holes for a seamless, paint-ready surface.
- Caulk: For filling any gaps between the new trim and the wall, creating a smooth, finished look.
- Paint and Primer: Choose a high-quality paint that complements your existing decor.
- Hooks (Optional): For adding functional storage and decorative appeal to your entryway.
Step-by-Step Guide: How to Install Your DIY Board and Batten Wall
1. Initial Planning and Wall Preparation
Before any cutting or gluing begins, it’s vital to assess your existing wall. Our sister’s entryway already had baseboards we wanted to keep, so we built our board and batten design directly above them. If your wall lacks existing baseboards, you’ll want to install a new baseboard first to provide a solid foundation for your project. Next, carefully measure your entire wall. As you measure, identify and mark any existing outlets, light switches, air returns, or other fixtures that will need to be meticulously cut around. We recommend tackling these obstructions panel by panel as you install them, ensuring precise fit and finish.
2. Installing the MDF Panels: The Foundation
Begin by cutting your first MDF panel. In our sister’s entryway, the initial panel required cuts for an A/C control unit and an air return. Measure from the floor up to the bottom and top of each obstruction, and then measure its width. Transfer these measurements onto your MDF panel and carefully use a jig saw to cut out the necessary openings. This tool excels at intricate cuts, making it perfect for custom fitting around fixtures. To account for natural wood swelling and prevent future buckling, we spaced each of our panels approximately 2 inches apart. This small gap allows the material to expand and contract without causing stress on the wall, ensuring the longevity of your beautiful new wall.
Once your first panel is cut, apply several generous lines of panel adhesive to its back using your caulk gun. Position the panel carefully on the wall, ensuring it’s level. This is where your level becomes indispensable, especially on older walls that may not be perfectly plumb. Secure the panel further by using a nail gun with 1.25″ brad nails. Continue this process for subsequent panels, always checking for and cutting around any additional outlets or fixtures. If your last panel needs trimming to fit the wall’s end, mark your cut line with a pencil and use the jig saw – it cuts through MDF “like butter,” making the job quick and easy!
3. Adding the Top Rail
With all your MDF panels securely in place, it’s time to install the top rail, which will provide a horizontal boundary for your vertical battens. Cut your 1/4″ bender board to the appropriate length using your miter saw. We aligned our top rail with the very top edge of the installed MDF panels. As with the panels, use your level to ensure this piece is perfectly straight across the entire wall. Apply panel adhesive to the back of the top rail and then secure it firmly with your nail gun and 1.25″ brad nails. This piece not only defines the upper edge of your board and batten but also offers a small ledge, perfect for displaying lightweight decor later on.
4. Attaching the Vertical Battens
Now for the defining feature: the vertical battens! This is where you get to decide on the spacing that best suits your aesthetic and the scale of your wall. For our sister’s entryway, we opted for a consistent spacing of 10.5 inches between each batten to create a visually appealing rhythm. Cut your 1/4″ bender board pieces to the desired height (from the top of your existing baseboard to the underside of your newly installed top rail). Apply panel adhesive to the back of each batten, position it carefully using your tape measure to ensure even spacing, and then secure it with your nail gun and brad nails. Remember to use your level frequently to ensure each vertical piece is perfectly plumb.
Here’s what the entire wall looks like once all the vertical battens are in place, ready for the final piece of trim!
5. Incorporating the Base Moulding
To add an extra layer of architectural detail and a unique touch, we decided to install a base moulding above the top rail. Rather than installing it conventionally, we attached it upside down. This subtle inversion gives the moulding a distinct profile and creates a small, decorative lip that will serve a functional purpose later on when we add hooks. Cut your 5″ base moulding to length, apply adhesive, and secure it with your nail gun and brad nails, ensuring it’s level and flush with the top rail.
6. Finishing Touches: Putty, Caulk, and Paint
You’re almost ready for the exciting part – painting! But first, a few crucial finishing steps. Go over every single nail hole with wood putty, filling them completely and smoothly. Once the putty is dry, sand it lightly for a perfectly flush surface. Next, apply a thin bead of caulk along all seams where the new trim meets the wall, as well as where panels and battens meet each other. This step is often overlooked but is absolutely vital for achieving that professional, built-in look. Caulk fills any tiny gaps, creating a seamless transition that will disappear under paint. After the caulk is dry, your wall is finally ready for primer and paint! We opted to let our sister take over at this stage, allowing her to choose the perfect paint color to match her personal style and existing decor.
Elevate Your Entryway: Decorating Your New Board and Batten Wall
7. Functional Flair: Adding Hooks (Optional but Recommended)
The final, optional, but highly recommended step is to add hooks! Entryways often become a dumping ground for bags, coats, and keys. By incorporating stylish hooks along the newly installed base moulding, we provided a practical and attractive solution for storage. This keeps the space tidy and organized, making daily life just a little bit easier while enhancing the overall aesthetic.
Lighting Up Your Space
And let’s not forget the power of lighting! The right fixtures can truly transform an entryway from functional to fabulous. We were absolutely thrilled with the elegant lights we chose for this space. While the exact lights we purchased are no longer available, you can find similar stylish options HERE to perfectly complement your new board and batten wall.
Personalizing with Wall Art & Decor
Once the foundation is set, it’s time to infuse your personality into the space. We added beautiful wall art, including these captivating feather printables that tie the entire look together. You can get the FREE Printables for the Feather Wall Art HERE! Complementary decor like soft pillows, cozy blankets, and stylish baskets not only enhance comfort but also provide practical storage solutions for everyday items. These thoughtful touches complete the entryway, making it truly feel like home.
But beyond all the beautiful materials and meticulous steps, we have to confess that the absolute best part of this entire entryway makeover, and indeed any DIY project we undertake, is witnessing the reaction of those we’re helping. There’s nothing quite like the joy and surprise in someone’s eyes as they see their newly transformed space for the first time. That heartfelt moment of appreciation and happiness is truly priceless, and it’s what continually motivates us to keep creating and sharing our passion for DIY.
Just for fun, here are a few more shots of the finished entryway! We sourced almost all the fantastic goodies to decorate this refreshed space from At Home. It truly is one of our absolute favorite places to find nearly everything you could imagine for home decor – from stunning frames and plush pillows to practical baskets and cozy blankets. They have an incredible selection that allows you to easily find those perfect pieces that tie your entire look together. You can check out their website here to locate a store near you and start your own treasure hunt!
Looking for More DIY Inspiration?
If you loved this project, you might also be interested in creating a matching piece of furniture for your entryway. You can find the FREE plans for our popular $25 Farmhouse Bench HERE! It’s another fantastic project that adds both style and functionality without breaking the bank.
Final Thoughts and Your Next DIY Project
Thank you so much for joining us on this exciting journey to create a stunning DIY Board and Batten wall! We hope this detailed guide has inspired you and given you the confidence to tackle this rewarding project in your own home. A board and batten accent wall is a timeless addition that instantly elevates any space, bringing architectural interest, texture, and a custom feel that looks far more expensive than it is. It’s an accessible project for various skill levels, offering a significant impact with relatively simple techniques.
Don’t forget to watch the full video tutorial HERE on YouTube for a visual step-by-step walkthrough, and be sure to SUBSCRIBE to our channel for more inspiring DIY projects, home makeovers, and helpful tutorials. We love hearing about your DIY adventures, so feel free to leave comments or share your own board and batten creations with us!