
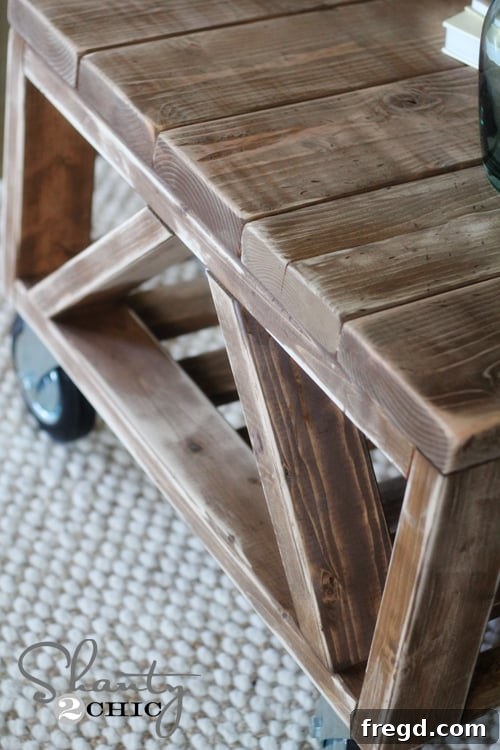
Welcome, fellow DIY enthusiasts and home decor lovers! Today, I am absolutely thrilled to unveil my latest furniture creation, a project that combines both elegance and practicality: the stunning Triple Truss Coffee Table. This build was a fantastic collaboration with the incredibly talented Ana White, a true pioneer in the world of accessible woodworking plans. The outcome? A beautiful, robust coffee table that has quickly become a focal point in my living room, and I’m confident you’ll adore it just as much as I do!
If you’ve been searching for an inspiring and achievable woodworking project, look no further. This Triple Truss Coffee Table DIY is not only incredibly straightforward to construct, making it perfect for both novice builders and seasoned crafters, but it also comes with an astonishingly low price tag. The total cost for lumber was under $50, proving that you don’t need to break the bank to add custom, high-quality furniture to your home. This project is a testament to what can be achieved with a clear plan and a few essential tools, allowing you to create a personalized piece that truly reflects your style. I’ll walk you through some essential tips and tricks I picked up during the process right here, detailing the tools, techniques, and finishing touches. For the complete, step-by-step cutting diagrams, comprehensive material lists, and detailed assembly instructions, be sure to visit the full set of plans on Ana White’s website. Let’s dive into how you can build this incredible piece for your own space!
Every successful woodworking project, especially one as rewarding as building your own coffee table, begins with selecting and utilizing the right tools. While this DIY coffee table can certainly be built with more basic equipment, having certain power tools can significantly streamline the process, enhance the precision of your cuts and joinery, and ultimately improve the quality and professional appearance of your finished product. Let’s delve into the key players in my workshop that proved indispensable in bringing this stylish and sturdy coffee table design to life.
To ensure absolute precision and efficiency when cutting all the various wood pieces for this project – a critical step for any successful furniture build – I turned to the newest and one of the most exciting additions to my woodworking arsenal. A good saw is the backbone of any carpentry project, and this one certainly delivered.
For anyone considering an upgrade to their workshop or making their first significant saw purchase, the Ryobi 10″ Compound Miter Saw is an outstanding and highly recommended choice. This saw is an absolute game-changer for accurately cutting lumber, saving an immense amount of time and effort compared to manual cutting methods. Its compound miter capabilities are invaluable, allowing for precise miter cuts (angles across the face of the wood) and bevel cuts (angles through the thickness), which are essential for crafting the exact angles and joinery needed for a professional-looking DIY coffee table. This precision contributes significantly to the overall stability and aesthetic appeal of your furniture projects. Beyond its versatile functionality, it offers incredible value for its price, making high-quality, accurate cuts accessible even on a tight budget. Investing in a reliable miter saw truly transforms the daunting task of cutting into a swift, satisfying, and enjoyable part of the building process, ensuring your project starts on the right foot with perfectly cut components.
Next, to effortlessly and robustly assemble the various components of this sturdy coffee table, particularly for creating strong, hidden joints, I relied on one of my absolute favorite woodworking tools—a truly indispensable companion for any serious DIYer. This tool has revolutionized how I approach joinery, making complex assemblies surprisingly simple.
The Kreg Jig pocket hole system revolutionized my approach to furniture building and is easily one of the most impactful tools in my workshop. It simplifies joining wood pieces like no other tool, creating incredibly strong and discreet joints. The beauty of pocket holes lies in their hidden nature, allowing for seamless connections, and their superior holding power, resulting in projects that are not only more stable and durable but also boast a much more professional, high-end finish. For this coffee table, the very first step in assembly was diligently creating all the necessary pocket holes on the main structural components. Below, you can see a close-up shot of the underside of the table frame, clearly illustrating where I strategically placed these vital pocket holes. For these primary structural elements, I utilized 1 1/2″ pocket holes, ensuring maximum rigidity and strength for the table’s foundation.
Detailing the construction further, for the 1×3 slats that form the tabletop and other lighter components, I adjusted my Kreg Jig to create 3/4″ pocket holes. This versatility is another reason why the Kreg Jig is such a valuable asset; it effortlessly adapts to different wood thicknesses with simple adjustments, making the transition between various parts of a project incredibly smooth and efficient. The ability to switch between hole sizes quickly ensures that every joint is perfectly suited to its specific application, contributing significantly to both the structural integrity and the refined aesthetics of the final piece. This precision in joinery is what elevates a simple DIY project to a piece of furniture you’ll be proud to display.
Once the pocket holes were meticulously prepared and the main frame was assembled, the next stage of putting the coffee table together truly began. To securely fasten the top slats and the decorative angle pieces – elements that define the table’s unique Triple Truss design – I brought in another fantastic and efficient tool: my Ryobi Brad Nailer. This cordless tool simplifies the process of attaching smaller pieces and trim work, providing quick, strong connections without the need for cumbersome clamping for extended periods or waiting for glue to dry completely before moving on. It’s incredibly user-friendly, lightweight, and makes short work of intricate detail work or securing panels, proving to be a huge time-saver and adding to the overall clean finish of the project.
This particular stage of the build was incredibly gratifying and surprisingly straightforward, thanks to a simple yet highly effective technique. The method for attaching the tabletop slats was as follows: I applied a generous bead of under each slat for maximum adhesion, then secured them from the bottom side of the table using the trusty brad nailer. This strategic combination of wood glue and brad nails creates an exceptionally strong and durable bond, ensuring the tabletop is robust, stable, and ready for daily use and enjoyment. Always remember that glue, when applied correctly and given ample time to cure, is often stronger than the wood itself, providing a permanent and reliable connection that will stand the test of time.
With the core structure of our Triple Truss Coffee Table firmly assembled and all components securely in place, the next exhilarating phase was adding the finishing touches. This is truly where the piece comes alive, transforming raw wood into a character-filled furniture item. I wanted to experiment with a finish that offered both unique character and timeless appeal. Deciding on the right finish is paramount, as it not only protects the wood from daily wear and tear but also dictates the overall aesthetic and mood of your DIY furniture. My goal was to achieve a look that felt both classic and subtly aged, a versatile finish that would complement a wide variety of interior styles.
I initiated the finishing process by generously applying one of my absolute favorite wood stains to the entire table. This choice was deliberate, aiming for a warm, inviting hue that would beautifully highlight the natural grain and texture of the wood, rather than obscuring it.
Rust-Oleum Ultimate Wood Stain in Early American was the perfect candidate for achieving this vision. This particular shade provides a rich, deep brown with appealing reddish undertones, creating a warm, vintage look that is both sophisticated and wonderfully homey. When applying any wood stain, always remember to work methodically with the grain of the wood, ensuring even coverage. It’s crucial to wipe off any excess stain promptly to prevent blotchiness and achieve a uniform color. Allowing proper drying time, as indicated on the product label, is essential before proceeding to the next step, as this allows the stain to fully penetrate and cure, ensuring a lasting and beautiful color.
Once the stain had completely dried and settled into the wood, it was time to introduce a unique touch of character through a gentle sanding and distressing technique. This step allows you to further customize the piece, giving it a beautifully weathered, lived-in feel that adds depth and charm. For this delicate but impactful task, I brought out another incredibly handy and innovative tool that has quickly earned a coveted spot among my workshop favorites. It’s a game-changer for finishing details.
This remarkable little device is none other than Ryobi’s Corner Cat Finish Sander. It truly is one of the coolest and most efficient tools I’ve used in a long time for detailed finishing work, making it feel like the best invention since sliced bread! Many of you often inquire about the best tools for distressing furniture and achieving that perfect aged, rustic look, and I can confidently say this sander is a top contender. Its lightweight design makes it incredibly comfortable to handle for extended periods, reducing fatigue, yet it packs surprising power, making quick work of smoothing surfaces and creating subtle distressing effects. The unique triangular pad design is brilliant for reaching tight corners and intricate details that traditional orbital or rectangular sanders might miss, ensuring a consistent finish across the entire piece. Furthermore, changing the sanding papers is incredibly easy and quick, allowing for seamless transitions between different grits as needed. And perhaps the most appealing aspect? It’s incredibly affordable, offering professional-grade results without a hefty investment, making it accessible for all DIYers, regardless of experience level.
For this specific distressed finish, I employed a 120-grit sanding paper, which provides a good balance between removing some stain and creating a smooth, yet slightly textured surface. I gently sanded the entire surface of the table, paying particular attention to edges, corners, and other areas that would naturally show wear and tear over time. I continued until I achieved the desired level of distressing and smoothness, where the lighter wood grain started to peek through the darker stain in just the right places. The process was both quick and incredibly simple, yet it profoundly transformed the stained wood into a piece with delightful depth, character, and a story. This step truly highlights the immense beauty of DIY – the ability to personalize every minute aspect of your furniture to perfectly match your unique aesthetic vision and create something truly one-of-a-kind.
One of the most empowering and enjoyable aspects of embarking on a DIY furniture project is the boundless freedom to customize and truly make the piece your own. While Ana White’s original plans for this Triple Truss Coffee Table include traditional wooden feet, I decided to put my own unique spin on the design, enhancing both its aesthetic appeal and its practical functionality. Instead of fixed feet, I opted to install a set of sturdy, industrial-style wheels.
This modification not only adds a touch of modern, industrial chic to the rustic charm of the table but also significantly enhances its versatility and functionality, allowing for effortless repositioning within my living space. Whether you need to move it for easier cleaning, to redecorate a room, or simply to create more open floor space for a gathering, the addition of wheels makes it a complete breeze. This adaptability is precisely what makes DIY so rewarding – you are not just a builder, you are the ultimate designer! With just a few thoughtful modifications, you can take any existing plan and imbue it with your personal style, practical needs, and innovative ideas. No pun intended, but rolling with your creative instincts truly pays off, yielding a piece that perfectly fits your lifestyle and home.
And now, for the moment you’ve all been eagerly anticipating! It brings me immense joy and satisfaction to share the final outcome of this labor of love. Witnessing the transformation from raw lumber and individual components into a beautiful, functional piece of furniture that perfectly complements my home decor is an incredibly gratifying experience. This DIY Triple Truss Coffee Table now stands proudly in my living room, embodying rustic charm, robust construction, and customized details that make this project so special. I hope these images truly capture the essence and beauty of the finished piece, inspiring you to take on your own woodworking journey.
I sincerely hope this detailed guide to building your own Triple Truss Coffee Table has inspired you to pick up your tools and embark on your next DIY adventure. There’s immense satisfaction and pride in crafting something beautiful and functional with your own hands, especially when it costs less than $50 for materials! This project not only enhances your home but also builds your skills and confidence in woodworking. I truly believe you’ll cherish this unique, handmade coffee table as much as I do.
Your support means the world to me, so if you enjoyed this project and found these insights and tips helpful, please consider sharing this guide with your friends, family, and fellow DIY enthusiasts. A quick pin on Pinterest using the inspiring images below or sharing on your favorite social media platforms would be greatly appreciated! Together, we can inspire more people to discover the joy, creativity, and incredible rewards of handmade furniture.
Thank you so very much for taking the time to stop by, read through my experience, and share in my passion for DIY. Happy building, and I look forward to hearing about your own projects!
~Whitney